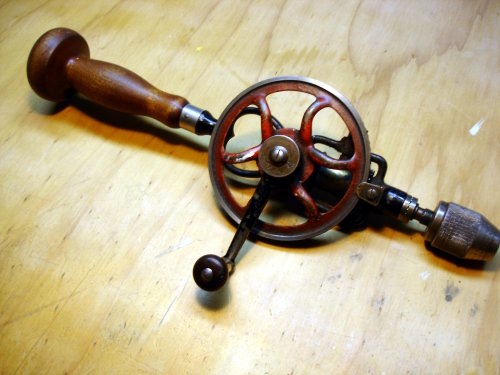
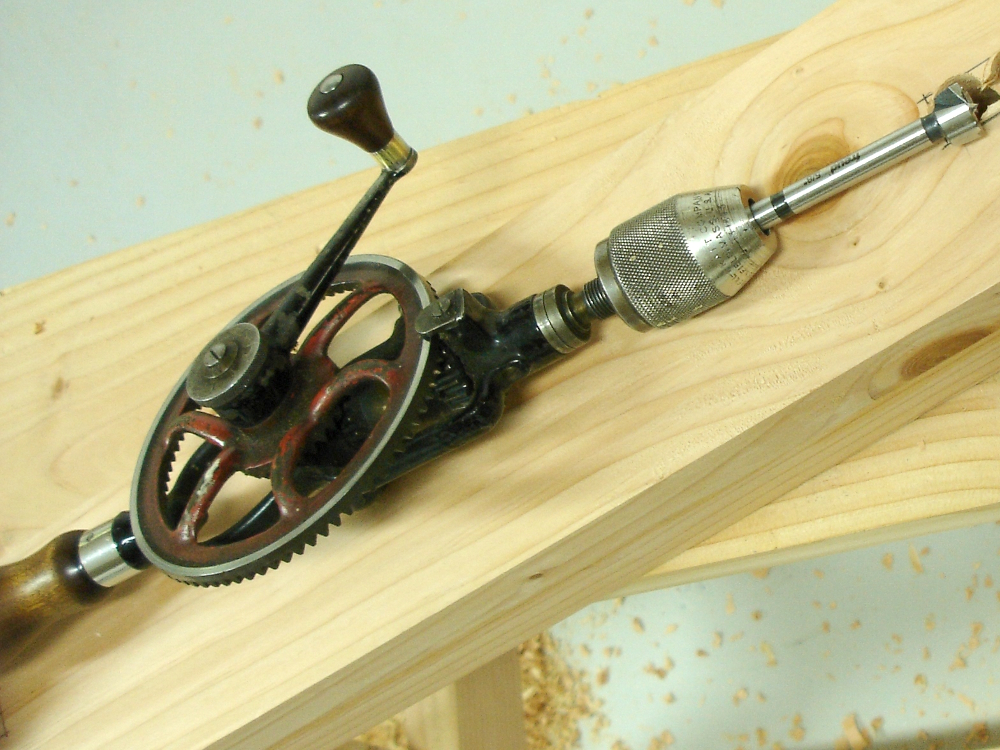
Goodell-Pratt Eggbeater
I found the Goodell-Pratt number 5 1/2 eggbeater drill at Liberty Tools in Liberty, Maine. Liberty Tools is a galoot’s paradise where one has little choice but to spend money. This drill went for $28. We put it to use immediately at the Wooden Boat School, drilling and setting screws on the boats we were building. We quickly discovered that it’s a very versatile drill. In addition to the usual drilling action, there is a fast / slow selector that alternates gearing ratios. The fast speed is great for drilling pilot holes and most screw setting. Switch to slow when more torque is needed. Then, there’s a ratchet mechanism too. See the R I L indications on the round plate under the hand crank? R and L set ratcheting for Right or Left. The I setting locks up tight, no ratcheting. This makes the drill very handy for working in tight spaces where’s there not enough room to fully spin the crank. Quite a nice eggbeater!
Other than wiping the handle clean so it didn’t stick to my hands, the way shoes stick to the floors in movie theaters, we did no other clean up. There is a patent date of Aug 13 1885. The next patent date found on that model drill is 1905. So, this one was manufactured sometime between those two dates. It had a fair amount of grunge, but not bad enough to affect smooth operation. We used it at the school. I then brought it home and used it in building a workbench and the first boat. Still no clean up. (Click the picture on the right to see 100+ years of “ambiance.”)
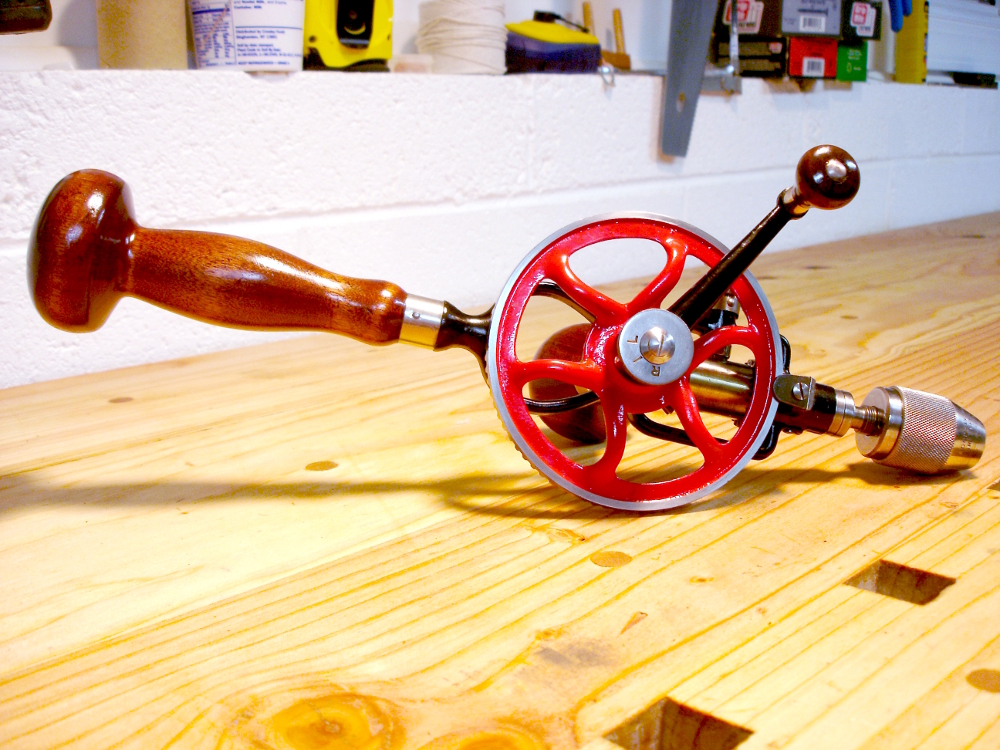
Being between projects, I’m following Stephen Covey’s habit #7: Sharpen the Saw. Actually, the saw was sharpened last week. This week I refurbished the eggbeater. Here’s where the traditional collectors will howl. Instead of doing the minimal (don’t harm the patina) restoration, I stripped it down, polished, and repainted. It’s not a collector’s item. It’s “a user.” So, I’m not worried about the howls. Three coats of fresh paint went on the metal parts. a new side knob of mahogany replaces the one that was lost. A bit of red stain brought the knobs and handles into harmony before receiving three coats of Minwax Polycrylic satin finish. Polishing the bare metal parts brought back their luster. One of the compression springs inside the chuck was badly deformed. I wound a new one from the steel core of a well used guitar string. (Don’t ever throw away used guitar strings.) Lubed and reassembled, the drill runs as smoothly as one could want, and looks almost as nice as Wictor Kuc’s. Ready for another hundred years.
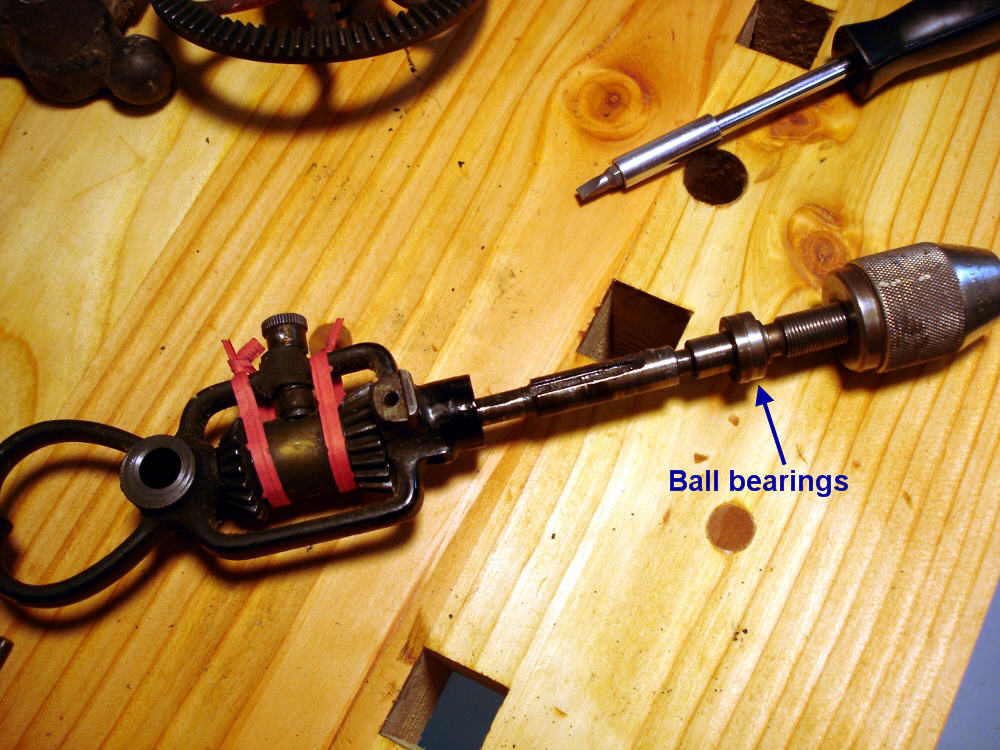
Update: A discussion over at the Sawmill Creek forums has Mike asking about the speed shifter on a Millers Falls drill. Although different in how the speeds are selected, I’m guessing the internal mechanism is similar. Following are 4 pictures showing my cautious step-by-step disassembly of the shifter. It turns out to be a simple device. The internal sleeve has ears on each end and is keyed to the collet shaft. Those ears engage either one pinion or the other. The little shift wheel on the frame moves a peg that slides the sleeve to one pinion or the other.


Hey Bob, nice job!
I have a couple of egg beaters and love using them. They can be a bit intimidating at first thought but once you try one you’ll never go back to the plastic. This one looks really nice. I have one that was my wifes grand uncles and one of Wictors rebuilds…he does amazing work…not my wifes grand uncle,(he died) but Wictor-nice work indeed!
Happy drilling!
October 6th, 2009 at 11:24 pmTom
Looks great and it obviously has been worth the $28.
Your blog looks great and you have really interesting posts. Thanks. Got to keep mine up better.
October 7th, 2009 at 3:35 amMarkus came up with an idea of outriggers for Mama’s boat. Have a couple on my flickr:http://www.flickr.com/photos/american_in_austria/?saved=1
October 7th, 2009 at 1:01 pmHi Bob,
Thanks for the help with getting my drill operational again. Your assumptions concerning my drill are all exactly on target. I will be trying the cable tie trick on my drill ASAP. I’m not entirely sure how you got the “main shaft” and chuck out of the frame? I am guessing there was holding a protected chuck with pliers and wiggling things into some sort of position in which the shaft would slide out.
After experimenting with mine I will report back.
Thanks again for your thoughtful help,
Mike
October 22nd, 2009 at 9:08 amThere’s no need for pliers Mike. Look for a set screw through the frame. On my GP, that set screw was near the top end of the shaft. It seats in the frame and rides in a slot on the shaft, holding it in place. Once the screw is backed out, the shaft can be pulled out easily by hand.
October 22nd, 2009 at 11:06 amNice job on the rebuild of your eggbeater drill. There is a Goodell-Pratt catalogue from 1926 on the Rose Antique Tools web page. Your drill is listed as a No. 259 which is described as being identical to the No. 5 1/2 B but with the addition of the new ratcheting feature on the crank handle. The new feature added about 20% to the price. So your drill dates from the first half of the 1920′s. It is always nice to know a little more about these amazing tools.
Rick in Oakville (Canada)
November 5th, 2009 at 10:21 amTHANKS for the added information Rick! So, it’s 20 years younger than I guessed, but no less useful.
November 5th, 2009 at 10:22 pmHello, Bob! I LOVE this eggbeater drill. Would you know where to find one? I’m looking for a simple one, doesn’t have to be as beautiful as this one you have. Do you think one of these could bore through stone with the right bit?
many thanks, warm regards! christina
November 11th, 2009 at 2:46 pmHi Christina,
Fortunately, there are lots of eggbeater drills in this world. They’re very easy to find on ebay. Just be careful to look for dealers who (a) trade mostly in old tools (look at the other stuff they have for sale) (b) have high reputation marks, and (c) have a return policy. If you don’t trust doing business that way, new eggbeaters can be found at places like Woodcraft or FrogWoodTools, or many other online places (Sorry, very few woodworking stores in NYC).
Can they drill holes in stone? Like the lawyer or economist would say, it depends… If you want rather small holes (1/4 inch or less) and use a masonry bit, I think one of these drills would work. Smaller holes will certainly be easier. At any size, you”ll be crankin and building muscles for quite awhile! The workout will be all the better for carrying your art tools.
November 11th, 2009 at 3:55 pmHi. I require drill chuck for Goodel & Pratt hand drill Model 5.1/2. Please quote if somebody can supply one. thanks-J.Venkatesh. Please email me to venkatesh100@hotmail.com
November 17th, 2009 at 5:17 pmMr. Venkatesh,
November 17th, 2009 at 8:37 pmThanks for stopping by. I do not have spare parts for these tools. I suggest you visit old tool dealers or search eBay for replacement parts. You will probably have to buy yet another drill to get the chuck you want.
I’m curious for a bit more information on how you fabricated the replacement chuck spring. I have a Goodell-Pratt 5 1/2 B that seems nice (spins very smoothly) but with two problems I’m not sure how to fix. The crank handle is loose. And the chuck springs are totally mangled. I looked around to buy replacement springs and nobody sells the right size, so I’ve been trying to figure out what to do with it. So how did you make chuck springs yourself?
November 23rd, 2009 at 5:57 pmHi Adrian,
Without seeing your particular handle, I can’t offer much advice. Mine has a ratchet mechanism which is very sturdy and tight. I actually don’t see how it could be loose.
Two ideas about the mangled springs. I saw recently where someone found the retraction spring in a ball point pen just right. Might be worth a try, but I think most of them are heavier than what is in your drill. But, if you were to replace all three with the same weight it might work.
I wound my own spring. I just happened to have some unused steel guitar stings available and one was exactly the right size (a digital caliper is nice to have sometimes). I wrapped that wire around the shank of a 1/16″ drill bit. Wrapping was done by clamping the tail end of the wire and the end of the bit in a metal working vise and then carefully wrapping the wire tightly, maintaining the spacing shown on the other springs. Wrap more turns than you’ll need and then trim to size. For wire, an alternative to the guitar string is any stainless steel wire you can find. Look for “piano wire” which is often available in hobby shops.
If you can’t come up with an exact match, you could still wind with wire that’s close. Wind three springs to keep tension balanced.
It’s not difficult. The only critical aspect of these springs is that the ends seat well in the sockets of the jaws. If they don’t seat well, they will pop out and you’ll end up with yet another mangled spring.
Enjoy refurbing the drill.
November 23rd, 2009 at 8:53 pmYou have a ratchet in the crank handle? Actually I’m mixing up problems I have with two different drills. On the Goodell Pratt the crank handle is tight and doesn’t spin well. (Too loose might not really matter.) My crank handle is attached by a long rivet that runs through the handle and the handle doesn’t turn easily.
I also have a Millers Falls that has the main handle loose. I managed to take the main handle off. It screws onto threaded rod and is held in place by a pin. And it seems like the pin is in the wrong position. I have to screw it past alignment and then the handle becomes tight. Not sure what to make of that.
Regarding chuck springs, I had heard that you needed to use a tool to wind springs. I didn’t realize it was possible to just do it by hand. I checked a couple ball point pens. The springs’ diameters are too large to fit in the holes in the chuck jaws. These springs appear to be *weaker* than the stock springs (from what I can tell given the mangled state of the stock springs). I searched at industrial supply sites like mcmaster for springs but nobody sells springs of the correct diameter. I got a quote from a custom spring maker of $250 for setup plus $5/spring.
I can buy stainless steel wire easily enough on line.
November 26th, 2009 at 3:25 pmHi Bob,
Great blog and a great post. I just got a 5 1/2-B, similar to yours but without the ratchet. It is a wonderful, smooth running drill that needs a little de-gunking. I’m curious if you found ball bearings in the spindle assembly or anywhere else? I didn’t notice any in your pictures. I read that these had ball bearings and thought it would be good to know your experience before disassembling mine!
All the best,
Doug
November 27th, 2009 at 12:41 amAdrian and Doug,
As Rick tells me in a comment above, my GP drill is really a #259 instead of a 5 1/2. The difference being the ratcheting handle.
Adrian, yes, I thought it might be hard to find ballpoint pen springs of the right weight. Find some fine ss wire anywhere you can and try winding by hand. Don’t buy any expensive tools. If any of the springs still exist unmangled, wind more with the same spacing. If not, I recall the space between windings being about a 3:1 ratio to the wire diameter. This wire is fine enough that carefully wrapping it around the shank of a drill bit is easy enough to not need tools. Patience is the most important tool in your toolbox, and I’m sure you could master this before you run through the first few feet of wire.
Doug, yes there is a ball bearing. It is the first bare finished object on the shaft above the chuck. It consists of a pair of races with (I don’t remember how many) small balls inside. The races slide apart very easily. The balls will probably be stuck together with dried grease, but have a drop cloth under them just in case. When I reassembled, I used only the slightest film of some very lightweight bearing grease (seems a shame to buy a quart of the stuff for only a fingertip’s worth).
November 27th, 2009 at 10:38 amI didn’t notice any ball bearings on my 5 1/2 B. I took all the obvious stuff apart for degunking. It was very straight forward, and I didn’t encounter any troublesome small pieces, although I couldn’t figure out how to get the shifting knob out.
I don’t think there’s any place ball bearings could have been hiding, so this must be a difference between the 5 1/2 B and the 259.
Now that it’s cleaned up it seems very nice, if I can rennovate the chuck and figure out what to do about the tight crank knob.
All three springs in my chuck are completely hosed. Here’s a picture:
http://members.cox.net/jsam/tmp/chucksprings.jpg
I’ll get some wire and see what I can do. (I think I have to buy 230 feet so I’ll have plenty of extra to practice.)
November 27th, 2009 at 12:40 pmUp above, Rick mentioned an old GP Catalog. It shows a great many GP drills and other tools. What I once thought was a 5 1/2B on catalog page 150 is really the 259 on catalog page 151. Both of those have ball bearings. Maybe yours is one of the other very similar variants?
Yep, none of those springs are useful. I don’t know how they get so mangled. It seems to me the primary function of the springs is to keep the jaw parts equidistant as they close in upon a drill bit. As the chuck tightens on a bit, the springs have little role to play. So, as you wind new ones you need to aim for two attributes. First, get the diameter small enough, and the end smooth enough, to fit within the sockets. They need to be able to be compressed and extended without popping out of the sockets. Second, get the compression tension on all three as close to equal as possible. That should provide the needed balance.
November 27th, 2009 at 5:35 pmMy drill is a nonratcheting drill that looks exactly like the picture on page 150. But I do see that the description says it runs on ball bearings. Where would they be? When I took it apart, the spindle slid out of the main casting. There is a piece in the shifter box that has a groove at each end which selects which gear drives the spindle. Where would the balls be?
That catalog is Number 16, the 1926 edition. Perhaps I have an earlier or later model of the same drill that didn’t have ball bearings?
I think you’re right about the spring function. I’ve been advised that the diameter has to be small enough but not too small, or the springs will pop out or misbehave. I figure if I wind one long spring and cut it in thirds I should get them balanced, but getting the right diameter seems to be the trick. (The holes are 0.145″ in diameter. If 0.12″ springs would work I wouldn’t have to bother with winding, but I’ve been told that this is too small. The next size up is 0.18″.) I’m expecting my stainless wire to arrive on Tuesday, so we’ll see if I can wind something suitable then.
November 28th, 2009 at 6:04 pmAdrian,
November 29th, 2009 at 7:36 amRefer to the first of four pictures where I show disassembly of the shifter, the one that shows the red twistie ties. Click on it to enlarge. Just to the left of the threads for the chuck, you’ll see the split cups for the ball bearings.
I took a look at your picture. My drill just has a solid one piece shaft. If there are ball bearings hiding somewhere I think they would have to be in the frame at the top end of the shaft.
I tried very briefly to wind springs. It’s not easy. They tend to come out curvy. Also I’m having trouble winding tightly enough. I wound on a 3/32″ (0.094″) and the resulting springs still did not fit in the 0.145″ holes.
December 3rd, 2009 at 12:37 amI have managed to wind a trio of at least somewhat functional springs. I used an 5/64″ drill bit. (Something without flutes would be better.) I would wind the wire a bit and then use a C-clamp to hold it down and then start making my spring, 11 turns, 11/16″ length. (Thanks, Bob, for that info.) I probably made about 15 springs before I got these successful ones.
Regarding ball bearings, I disassembled my drill again and looked for ball bearings. Nope. I must have an earlier model that didn’t have them. I looked at some pictures on line and at the picture of Bob’s drill and I can see a widened part of the shaft in front of the frame. My drill doesn’t have that part. The shaft is just one piece and it rests in a hole in the frame. No bearings.
December 13th, 2009 at 11:27 pmHi Bob,
Very useful article. There is a similar model for sale for $36 at a local antique shop. I’d like to buy it, but the chuck jaws are jammed and are at weird angles to each other. Can this be repaired? Is there a way to unscrew the chuck base? Or would I have to play surgeon and try to manipulate the jaws in-place using needle-nose pliers? Disassembly instructions for the chuck, if possible, would be greatly appreciated.
Thanks,
Mike
December 16th, 2009 at 6:58 pmMike,
There’s a very high probability the chuck can be repaired. They are very simple devices. (I guess I need an article that has pictures of chuck dis-assembly.)
What you have is a bad case of mangled springs, just like the problems Adrian discussed in several comments above. We don’t know exactly how they get mangled (not having done the deed ourselves), but this appears to be a very common malady.
You will need to (1) open the chuck, and (2) make some new springs.
First, remove the chuck from the drill shaft. This is a simple matter of unscrewing it until it falls off in your hand; no magic. As you suspect, the base of the chuck unscrews. The chuck on my drill has two holes in the base. I placed my chuck in a vise, padding it with softwood between the knurled barrel and the vise jaws. I used only enough pressure to hold it without deforming the barrel. I inserted the tips of a pair of needle nose pliers into those two holes and twisted counter-clockwise. That was enough to loosen mine. Yours might be tighter. If so, grip the bottom with vice-grips or plumber’s pliers … gently enough to avoid damage.
Once unscrewed, you will find the following parts: a “button” (don’t know the technical term) which sits in the bottom piece and is the seat that pushes against the jaws, the three jaws, and (maybe) the three springs that hold the jaws apart.
When it works correctly, the three jaws simply slide in and out in the conical barrel. They are kept in correct alignment by the springs and the shape of the barrel. They are moved by that “button” which has a conical end that mates with the drill’s main shaft. It’s all very simple. The weak link is the springs.
Which brings us to (2) making new springs. You’ll need some spring steel wire (“music wire,” “piano wire,” I used a guitar string) of the correct weight, a 1/16 inch (or 5/64 inch) drill bit and a bit of patience. Read back through these comments and see the discussion I had with Adrian about winding the springs. The results will be three springs, that fit in the sockets of the jaw pieces, and hold the jaw pieces symmetrically in the chuck. In my chuck those were 11 turns each and 11/16 inch long.
Reassemble in reverse order.
It sounds like fussy work, and it is. Yet, if you’re already inclined to refurbishing old tools, this is not really that difficult. Adrian was successful, so you will be too. Let us know how it goes.
December 17th, 2009 at 7:41 amHi Bob
Great article along with your thoughtful replies to everyone’s question. I am the guy with the MF 120BG chuck question one the Old Tools forum and I also appreciate your response to my question there. Would love it if you did write that blog on chuck re-assembly. I’m worried now that only 2 springs came out of mine when it fell apart (I unknowingly unscrewed the chuck completely when first cleaning the drill!).
John
December 18th, 2009 at 12:44 pmHi folks
And thanks Bob for your time and effort for the info you pass along
It’s been a few years back, I don’t recall which particular model that had badly damaged springs.
I started with the ink pen springs, we know how that worked. What I did find that worked was a spring for the flint out of a Bic disposable lighter. It can be stretched if needed and cut to length. And how often do you get a chance to recycle a disposable lighter.
Regards, Lamar
December 18th, 2009 at 6:43 pmUPDATE — Due to the number of questions and comments about chucks, jaws, and springs, I’ve added a new article, “Oh no, Don’t Chuck It” which looks inside the chuck and offers a method for making new springs.
December 18th, 2009 at 8:58 pmBob,
A great article and the associated one “Oh no, Don’t Chuck It”; it’s very poignant as I am in the process (partially based on your blog, of cleaning and rebuilding two Miller Fall’s drills, a 2 and a 5. Both work well; but the chucks need real cleaning; I have to remove rust and the enamel needs/should be re-applied. I will likely have to remove and install new springs for the MF 2A’s chuck; but that’s about it.
A quick question, is navel gel safe enough for rust removal, in conjunction with wire brush cleaning for the frames of the drills and the gear wheels?
Cheers and thank you for a great site; you’re encouraging me (and another blog, Bob Rozaieski’s http://logancabinetshoppe.weebly.com/blog.html) to move more towards a hand tool only setup.
December 21st, 2009 at 9:31 pmAnthony, sorry for missing this for a few days…
Navel gel certainly won’t harm the metal. I can’t vouch for what it might do to the paint. It’s been decades since I used navel gel, but I remember it as relatively benign. I tend toward the gentler solutions for rust removal and was recently surprised at how very well plain ole vinegar works. I used vinegar on the bench grinder and found it effective … slower than some of the stronger acids, but still very useful.
Good luck with the drill, and be careful sliding down the hand tools slope.
December 26th, 2009 at 8:33 pmOne question Bob:
Did you remove the shifting knob with “fast” and “slow” attached to the frame? I can only see one way to do so but I am hesitant. Two peened over knobs rest on opposite ends of the little brass cylinder which can only be ends of a pin. But if I punch out the pin I risk damaging the housing.
Did you remove this when you cleaned your drill?
Thanks,
Stephen H
Note: I accidentally posted this question on the follow-up article about the chuck. Sorry about that.
April 12th, 2010 at 6:32 pmHi Stephen,
No, I did not disassemble the shifter. It’s so simple that I didn’t see the need to remove it from the frame. Some WD-40 cleaned up the bearing surface, and I think I hit it quickly with a brass brush to give it a bit of polish.
Best wishes on your refurb.
April 12th, 2010 at 8:45 pmHey thanks a lot. I really appreciate it. This is a quality blog and I learn a lot reading it now that it has crossed my path.
-Stephen
April 15th, 2010 at 12:51 amDear Bob,
I have to annoy you once more.
Imagine if someone was anal enough to desire to take the shifter apart. Now imagine that person banged away keenly at the peened pin from both sides and not a budge resulted. Would you have any advice?
Also, did you remove the crank handle in order to repaint the parts? I removed the crank handle from a MF #2A by grinding out the middle and re-securing with cold weld compound. I asked a similar question of George Langeford of georgesbasement.com and he recommended many small blows with a 4 or 6 oz ball peen hammer to the crank end of the rod that goes through the handle while having the handle end backed up to an anvil or a basement floor.
It would look like this:
b
p—— small blows small hammer
O
=^======= crank w/ rod peened to stay on crank
April 15th, 2010 at 2:05 pmh^h
hh^hh handle with the rod through the middle
hh^hh
^ rod peened over keeps handle on
Stephen,
My hunch is that the pin that holds the shifter knob might be tapered. I’ve seen tapered pins used like this several times. Gentle filing on each end to remove any peening might reveal which end is smaller / larger. Then, punch out toward the larger end.
Yes, I did remove the handle of this drill. However, unlike many it is not pinned or peened. The ratchet mechanism is integrated into the handle hub. It works by wedging one of two movable wedges against a central splined hub, one wedge for each direction. As such, the handle has a splined center and is a rather loose fit over the ratchet mechanism and is held on by the screw through the ratchet direction selector plate.
This is the only eggbeater I’ve refurbished, so I can’t help much with the handle on yours.
Keep havin’ fun!
April 15th, 2010 at 5:57 pmLike you, I’ve gotten pretty good at restoring these GP eggbeaters. One issue I continue to have is replacement chuck springs. There must be a way to wind these on a lathe with a small enough mandrel. I play guitar, so I have a ready supply of used strings. Have you ever heard of someone winding new springs like this?
May 14th, 2010 at 9:27 amRichard,
Sure. Using a lathe would making spring winding very easy. Just chuck anything about 1/16″ into a 3 jaw chuck. (I used a 1/16 ” drill bit. Even a finishing brad would work.) Put a 90 degree bend a couple of inches from the end of that guitar string. Then tuck that short tail between a couple of chuck jaws. Wind the new spring by hand turning the spindle. No need for power. It’ll work great.
Enjoy!
May 14th, 2010 at 12:53 pmHi Bob,
What gauge wire did you use?
Thanks!
May 29th, 2010 at 2:36 pmHi again Bob,
I was interested in what Adrian and Doug had to say about thier respective 5-1/2′s not having ball bearings. I have run into one of these myself that I restored about 6 months ago. I beleive it is a VERY EARLY production piece, either from 1896 or 1897. It has NO ball bearings, the shaft is simply riding in the headspacer itself. This version also has a BRASS speed adjustment knob with “F” and “S” for fast and slow instead of spelling them out. The end of the shaft that rides in the rear of the frame is holed and there is a very small “nipple” in the receiver for this to ride in. These seem to be quite rare….I’ve only seen this one (which I still have). I’ve also seen a couple of stupid “single speed” versions of the 5-1/2, where the read gear (which should be low speed) is replaced by a very rough gear-less spacer. These were short-lived because GP soon found nobody wanted these. Why pay extra for that ($5.80 in 1921) when you could just buy a single speed drill for a couple of bucks? Just some interesting “history”.
Thanks!
May 29th, 2010 at 2:44 pmRichard,
I don’t know the wire gauge. That was a long time ago and I didn’t write it down. I used a digital caliper to measure one of the existing springs and then selected a steel guitar string that was the closest, within a few ten-thousandths. The best I can suggest is to try the same procedure yourself. Even without a digital caliper, it’s pretty easy to compare these small wire sizes with other (steel) wire you might find around the house or at the hobby shop.
Interesting notes you have on earlier versions. I imagine one could invest a lot of time in following all the variations for some of these tools. Thanks!
May 29th, 2010 at 3:47 pm