• Skip to primary navigation
  • Skip to main content
  • Skip to primary sidebar
  • Skip to footer

Bob Easton

Chocolate powered woodworking

  • Home
  • Grinling Gibbons Tour

Archives for 2008

1:16 Fiddlehead – Off the Horse

February 17, 2008 by Bob Easton Leave a Comment

off the building board
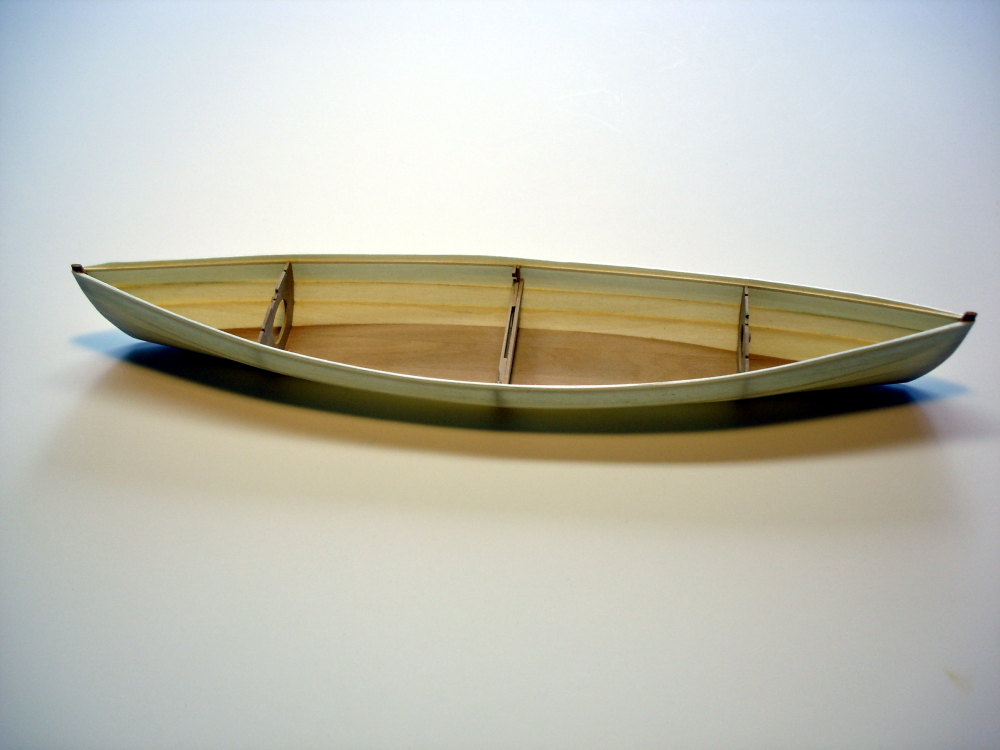
Here we see the boat removed from the building horse and the sheer planks trimmed. The translucent nature of these very thin planks lets us see how the laps (seen here as shadows) diminishes as they approach the stem.

Click on the image to show a larger version.

Filed Under: Fiddlehead model, Model building

1:16 Fiddlehead – Remaining Planking

February 17, 2008 by Bob Easton Leave a Comment

middle plankPlanking continues from the bottom up: the other garboard, the middle planks and the sheer planks.

A difficulty I discovered was in fitting and trimming. The planks are slippery, especially at the lapped faying surface. They are hard to hold in place steadily enough for accurate marking. The solution (and why didn’t I take a picture?) was to temporarily attach a batten to the lower plank, right at the lap. Then, the next plank can be rested against the batten and marked.

all planks hungAs before, masking tape makes the best clamps.

You can see “the gains” at the far right end of the mid plank photo. The overlap gradually becomes an edge-join before reaching the stem.

Once all the planks are attached, we can remove the boat from the building horse and then trim the sheer plank down to the edge of the clamp. More fun with my favorite plane.

trimming the sheerBy the way, attaching the model’s planks with glue is much easier than clinching with tacks as I will do for the 1:1 version. Copper tacks, 3/4 of an inch long, are pressed through the overlapped joint. As they are hammered in, a curve shaped iron is held inside the boat. The point of the tack strikes the iron and is turned back on itself, making a j-shaped fastener that holds tight. There are only a few hundred tacks needed on thie size boat.

Click on any image to show a larger version.

Filed Under: Fiddlehead model, Model building

1:16 Fiddlehead – Garboard Plank

February 12, 2008 by Bob Easton Leave a Comment

rough shaping the garboardThe garboard plank is the lowest plank on a boat or ship, and the first to be placed on this boat. Like most other parts, I temporarily glue a part of the drawing to the lumber and shape it, loosely, to the drawing. Leave lots of extra when doing the first cut for planks, especially on the upper edge. Here, I trimmed very close to the bottom.

That’s a simple little modeler’s vice, set sideways on a fixture, making it easy to see the lines.

first garboard hung

The upper edge of the plank is found by trial fitting. The markers for this edge are the apex points on the bulkheads and frame. Trim until it fits. We also need to cut “gains” before hanging the plank.

The planks on this boat are “lapstrake,” literally meaning the strakes (old term for planks) overLAP each other. At the ends of the boat, the overlap diminishes with the planks coming to a smooth join with the stems. This transition is accomplished by fitting “gains,” the area where the overlap transforms into an edge-to-edge join. There are two methods for cutting gains. One method, called “shiplap,” cuts an angled half lap in each plank. The other, called “dory lap,” bevels the edge of each plank. Because of the thinness of these planks, I used dory laps.

look at the twistThrough a good bit of experimentation, I found that the best way to hold the planks in position while glue sets is with thin strips of masking tape and a couple of de-toothed alligator clips. Fastening on the 1:1 boat uses very small screws and clinched tacks. We use only glue on the model.

The garboards are not only the widest planks, but the ones that take the most twists and turns. They are plumb vertical on the ends, and nearly at 30 degrees in the middle. Fitting this plank is usually the toughest part of planking any boat.

By the way, you can see two simulated screws in the bottom of the stem in this photo. They are actually bamboo trennels that add strength, and this will be the last time they are visible. Paint covers them later.

The keen observer will see that the “clamps” are in place. These are the very thin strips set into the top of the bulkheads and the frame. The fit into notches in those parts and form the line and structural support for the top, or sheer, of the uppermost plank.

almost translucentThese planks are of aspen and are a mere 5/16 inch thick, or only 20 thousands of an inch thick at 1:16 scale. I have a stunning window just beyond my modeling workbench, and the afternoon light shown through, showing the translucent thinness of the planks.

Click on any image to show a larger version.

Filed Under: Fiddlehead model, Model building

  • « Go to Previous Page
  • Page 1
  • Interim pages omitted …
  • Page 13
  • Page 14
  • Page 15
  • Page 16
  • Page 17
  • Interim pages omitted …
  • Page 19
  • Go to Next Page »

Primary Sidebar

Footer

Recent Posts

  • New Frame Saw / Scroll Saw
  • Lamppost Sign
  • Goodbye PayPal – Goodbye Bob’s eBooks
  • Anarchist’s Workbench is Done
  • Why we keep offcuts…

Categories

  • About
  • Artwork
  • Boatbuilding
  • Boating
  • bowl carving
  • Boxmaking
  • Clocks
  • Drawings
  • eBook
  • etude
  • Eva Too
  • Eva Won
  • Fiddlehead
  • Fiddlehead model
  • Flying
  • frame saw
  • gilding
  • green woodworking
  • Grinling Gibbons
  • Guns
  • Hand tools
  • Humor
  • kerfing plane
  • Lettercarving
  • Mill Creek 13
  • Model building
  • Power tools
  • Rant
  • resawing
  • scroll saw
  • Shopmade
  • sign painting
  • Stonework
  • Swimming
  • Technology
  • The Wall
  • treadle lathe
  • Uncategorized
  • VSD
  • Woodcarving
  • Woodturning
  • Woodworking
  • workbench

Other stuff

  • About
  • Contact
  • Privacy Policy

Copyright ©2024 · Bob Easton · All Rights Reserved