• Skip to primary navigation
  • Skip to main content
  • Skip to primary sidebar
  • Skip to footer

Bob Easton

Chocolate powered woodworking

  • Home
  • Grinling Gibbons Tour

Bob Easton

Hand Carved and Gilded Letters

April 28, 2017 by Bob Easton 12 Comments

photo of 5 hand carved blocks

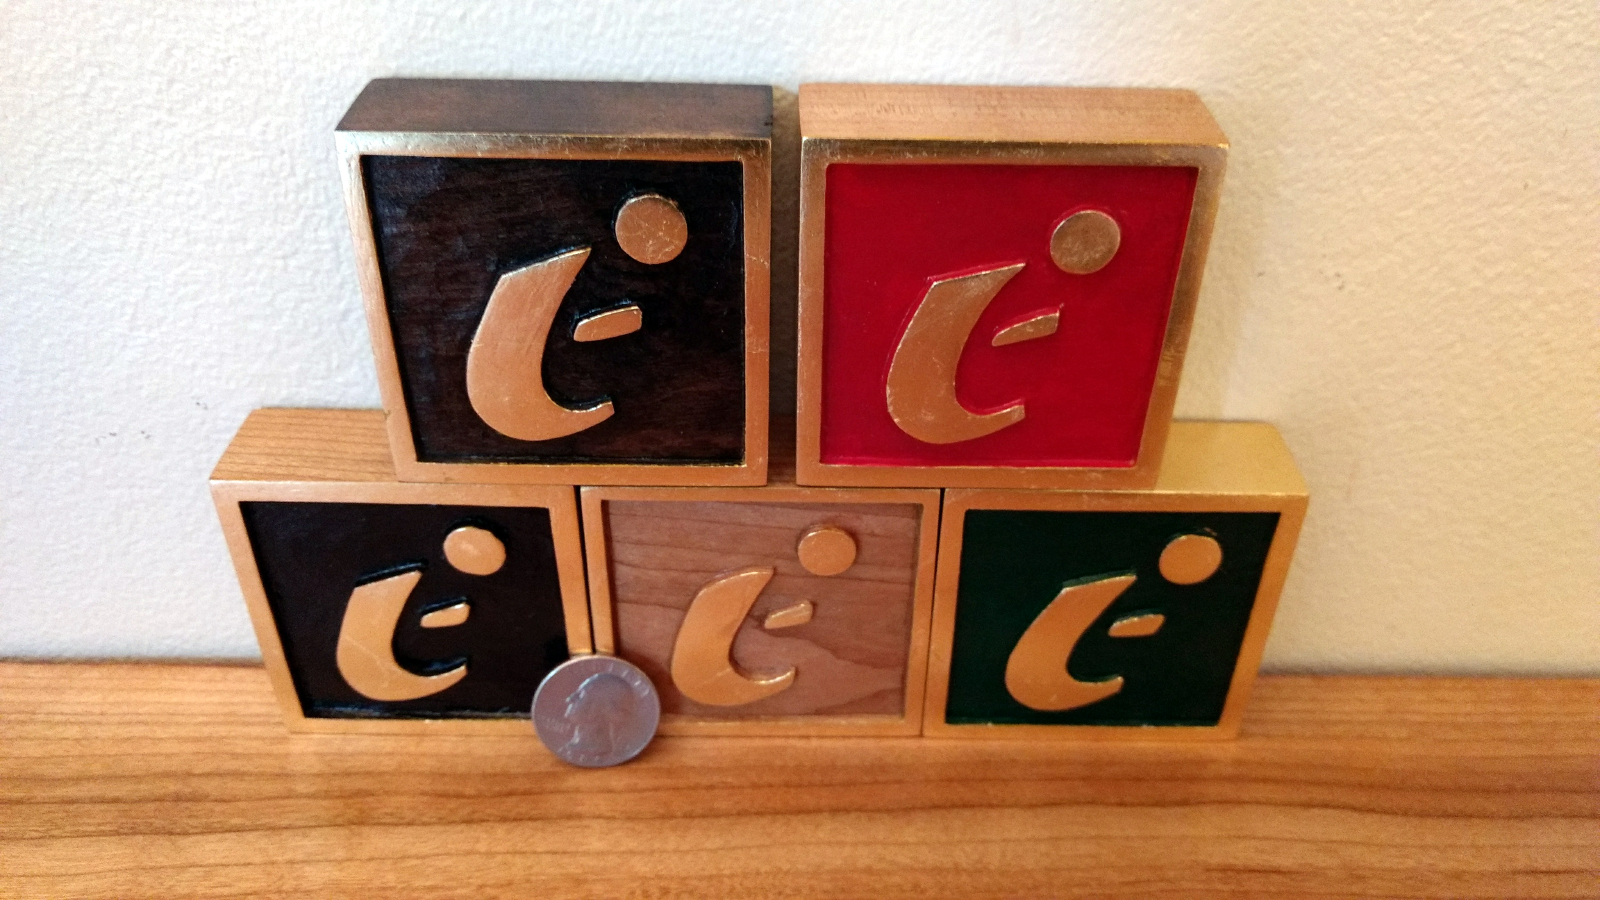
Gilding practice… Practice for a series of signs I’ll show some other day.

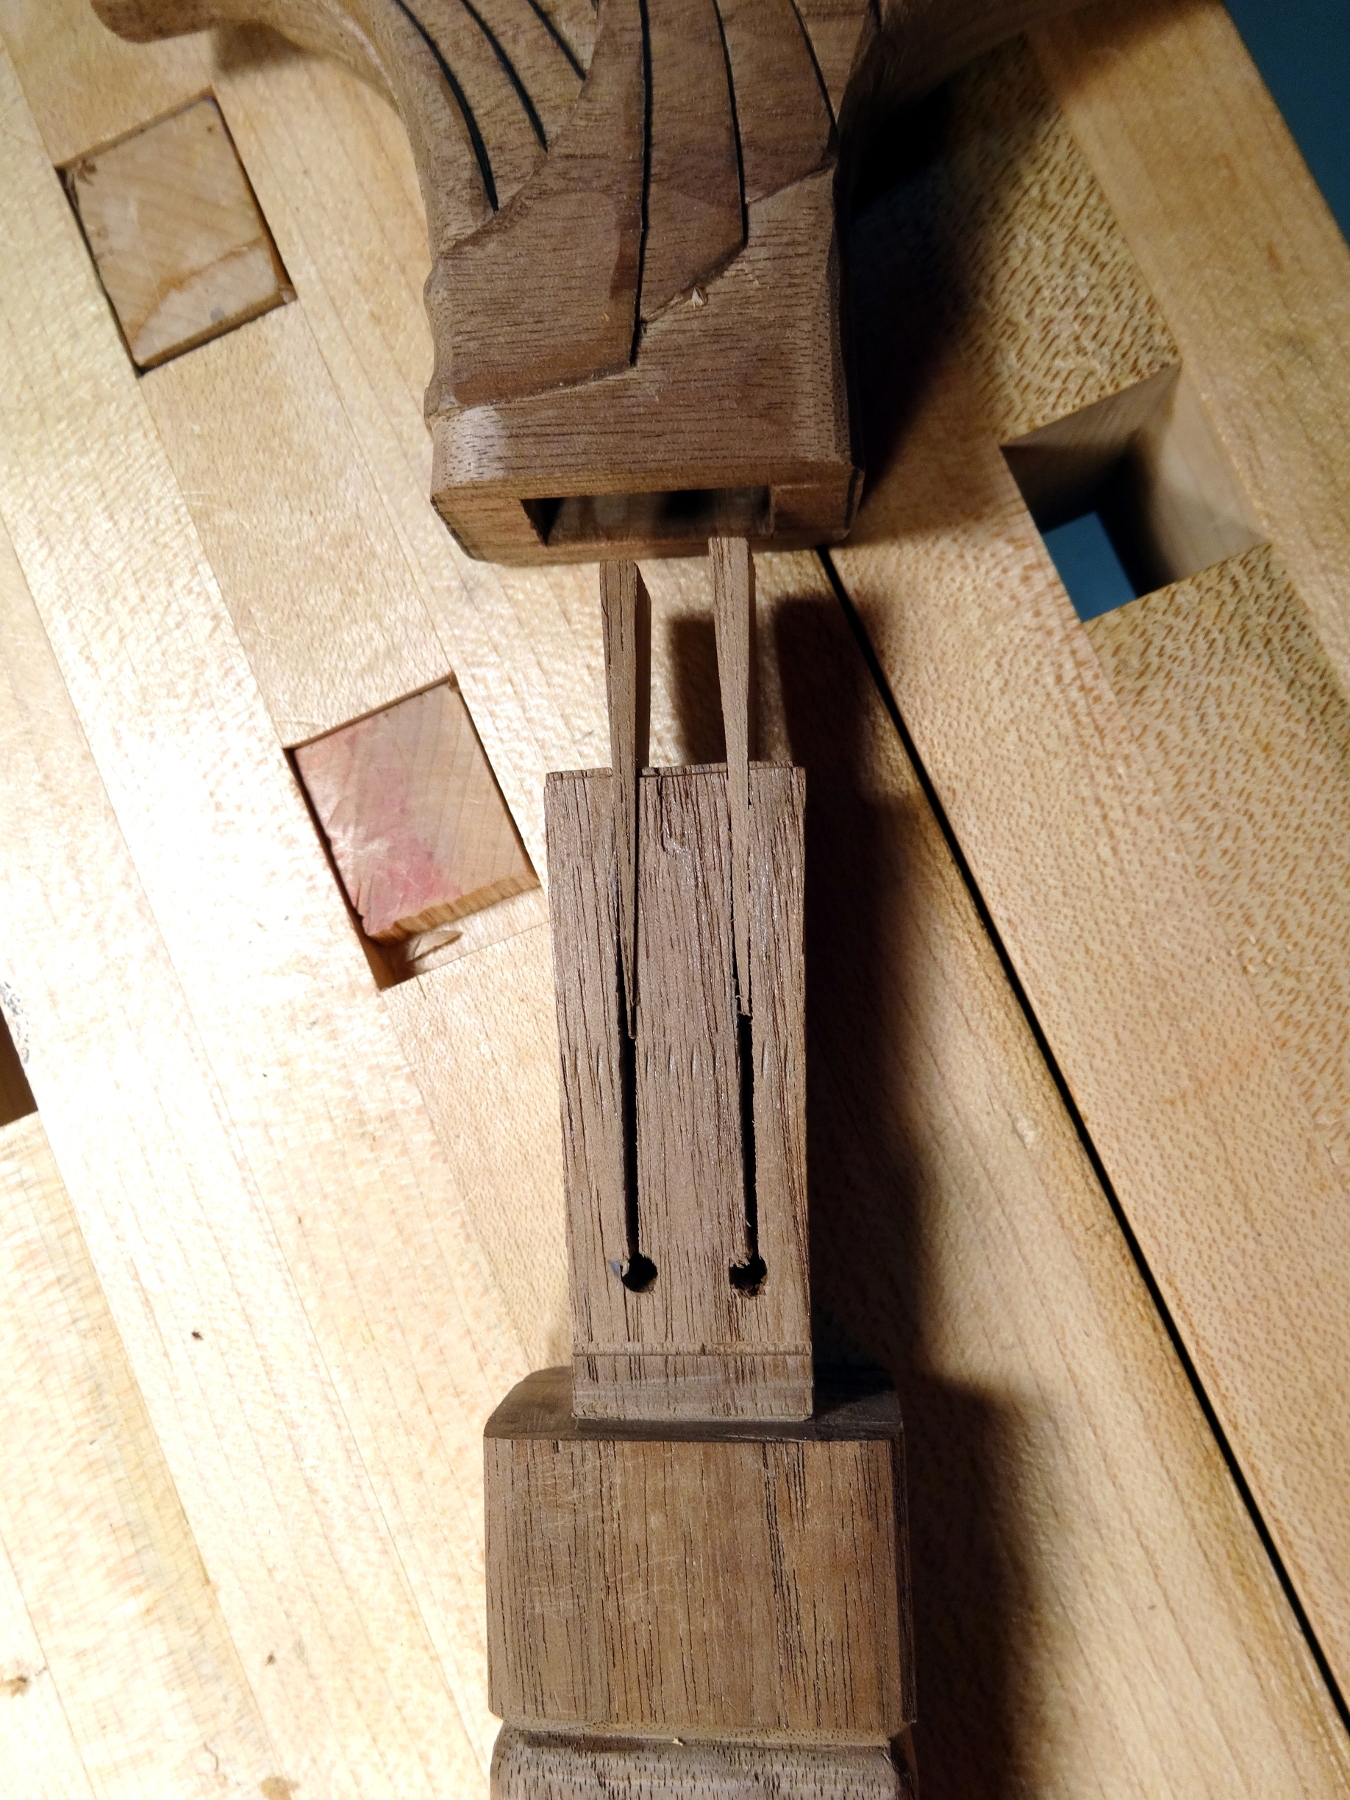
The blocks are cherry. The “E” is my wife’s creation from several decades ago. The carving was the easy part. (Carving depth is about 1/8 inch.)

The top left block was ebonized on all surfaces. Three others have painted central panels (Acrylic artist color). Most edges were left natural, except for the top of the green block, which is also gilded.

Gilding is “composite” gold leaf laid over a yellow burnisher-sealer. (Dux brand from Sepp Leaf Products) The burnisher-sealer layer, is actually 3-5 coats of a chalky paint that fills the wood pores and provides a smooth base for the gold leaf, after a good bit of tedious work with 600-800 wet-n-dry paper.

Sign Painters’ One Shot “Fast Dry Gold Size” gets to the right degree of tack in 75-90 minutes.

I’ve learned that the best way of applying the leaf is to do as John does, slide the leaf gently onto the work at an angle. That minimizes the folding, crinkling, and breaking that happens with other methods of applying the leaf. Immediately after covering the entire object with leaf, I place one of the thin tissues from the leaf booklet over the top of the laid leaf and burnish it with fingertips. I hold the tissue absolutely stationary to avoid scratching the leaf. Within a few minutes, I repeat that fingertip burnishing to assure good adhesion. Then, — wait, wait, and wait some more —. The size takes a good 15-20 hours to cure. When the size is completely cured, I remove the excess gold, often with the aid of a stick cut to resemble a small sword.

After gilding is satisfactory (occasional voids patched), I complete with two coats of Dux Clear Topcoat. This stuff is advertised as “water clear” and it certainly is. Pop the lid off the can and it’s like looking into a can of water.

Special thanks to John Eugster who has been writing about the gorgeous carved and gilded frames he makes for his wife’s beautiful paintings.

Filed Under: gilding, Lettercarving

This Eagle Walks

February 10, 2017 by Bob Easton 6 Comments

photo of eagle head walking caneHistory claims that mankind started in the nearly tropical Garden of Eden. Later, some men moved northward and ended up in places where there is sometimes ice upon the ground. {Why?} One man recently made an unplanned maneuver on the ice and ended up with spiral fractures in both the lower bones of one leg. That will be a long time mending. He’s still not allowed to put any weight on that leg, but at some point will be able to set aside the knee scooter and crutches in favor of a simple walking cane. Maybe this one will help.

The cane is made from American Walnut. The head and the shaft both came from the same 7/8″ thick piece of lumber. The shaft is 1-7/8″ at the top tapering to 7/8″ at the bottom.

The primary concern for any walking cane is that it be safe enough to support a person without failing. The shaft on this one is easily strong enough for most adults. My biggest concern when making it was to ensure that the handle is so well affixed as to not come loose.  It is of tenon and mortise construction, but not a complete through tenon. I didn’t want a tenon sticking through the top of the eagle’s head.

photo of fox wedged tenon about to enter the mortiseThrough tenons are often tightened considerably using wedges. I tightened this tenon with “fox wedging.” No, I don’t know what a fox has to do with it, but that’s what it is called.

Wedges are inserted into slots in the tenon and driven home as the tenon enters the mortise. It’s a self-completing joint that had better be right when it is put together. I’ve never made one of these, but spent a lot of time ensuring enough room inside the mortise for expansion, but not so much as to make the wedging ineffective. (What is half of the wiggle room and how thick do those wedges need to be? Have I tapered the 3″ deep mortise enough? What is “plan B” if this thing gets stuck half way in? What’s “plan C” if it’s too loose, yet to tight to extract and refit?)

It worked on the first try.

The finish is several coats of “Tru-Oil gun stock finish.” That’s a very durable oil / varnish combination that brings out the natural walnut coloring. A coat of furniture wax and a rubber tip complete the cane.

I hope the recipient likes the Art-Deco style.

photo of eagle head walking cane

Filed Under: Woodcarving, Woodworking

Vise Upgrade

December 21, 2016 by Bob Easton 12 Comments

photo of old angled leg viseMy path to woodworking was through the door labeled “boat building.” That led me to make a wonderful 12 foot long English Bench. It’s length and the ability to hold long boat boards on the face aprons made it perfect for that kind of work. It’s been great in every way except one.

The leg vise has always been a compromise. The angle looks interesting, but keeps it just enough off balance as to operate poorly. Over time it has become less effective at holding work, leading me to “speaking in tongues” almost every time I use it. The real problem is the leg construction, laminated, with a half-lap in the middle. As the construction grade lumber aged, dried over the years, and grew brittle, that leg didn’t hold up well.  An attempt to bolster it with  extra screws didn’t help much, and taking it out of the bench to rebuild it was more than I’m willing to do. Time for a change!

St. Peter’s Cross

How about a BenchCrafted Crisscross? They are beautiful machines, a pair of Archimedes levers ingeniously used. Retrofit, or build new? Retrofitting to an angled leg that was already weak was out of the question. Make a new leg and graft it onto the bench. I decided to re-use the existing vise screw and ordered only the Crisscross hardware. Still using construction lumber, I built the leg up with three laminations, and the chop with two. Hand chopping the mortises for the hardware took the most time. Those mortises are conveniently specified to be just less than the thickness of one board. So, I chopped then completely through individual boards before gluing up, and then planed the faces to provide the exact mortise depth: 1-7/16 inch.

Knot Nice!

photo of a knot where we want to place a screw holeMy hardware choice (The “Retro” kit) uses iron blocks to hold the pins at the top of the cross. These blocks are screwed into the mortise with 5/16″ x 18 screws. In laying out the outer board of the chop, I  ignored a knot that I thought was inconsequential. Guess where that knot ended up. Yep, right where one of those screws belong. Slight delay to the program in progress… Chop out the damaged area. Cut a plug with the jigsaw, fit, glue and continue.

The New Crisscross

photo of vise early test before embedding in the benchThis one is not going to bend or flex! The leg is 5-1/2 inches wide, by 4-3/8 inches thick (3 laminations). The chop is 8-1/2 inches wide at the top, by 2-7/8 inches thick. The complete assembly weighs in at 48 pounds, adding a fair bit of substance to a bench that already weighs over 300 pounds. Fitting it to the bench requires cutting away part of the existing apron, chopping out some of the well worn “doubling strip” below the dog holes, and bolting it into position. You’ll see that I left “ears” on the center lamination for bolting with 1/4 inch bolts. A nearby photo shows the vise being tested before starting to modify the bench.

photo shows toe-in of about 1/8 inchBenchCrafted is well known for precision. The instructions for the Crisscross note that it has a built-in toe-in of about 1/8 of an inch, easily achieved “by a careful craftsman.” I must be careful, because mine came out at exactly 1/8 inch. The top of the chop meets the top of the vise, leaving a 1/8 inch gap at the bottom of the chop. Perfect! And, there’s no longer a parallel guide to adjust. The chop wobbles a little as the vise operates, and that wobble is entirely due to the tolerances of the screw. The crisscross arms carry the weight of the chop as though it were weightless.

Mine runs as smoothly as in BenchCrafted’s video. Smooth operator!

photo of leg bolted in place inside the benchOK. Let’s put it in the bench. Getting the bench turned over is very easy. It is very top heavy, built to take a fall, and only needs to be moved past a tipping point. It needed about a 60 pound dead lift to get it moving. And yes, finessing one of the legs as a lever [Thanks Archimedes!] it landed semi-softly. While on its back, I laid out the knife lines for cutting the apron, drilled holes along the top of the piece to be removed, cut and extracted the piece. A bit of chiseling left a clean opening.

Tipping it completely upside down was again easy; only 50-60 pounds of effort needed. There are “doubling strips” under the original bench top. They show a hard life, but this job is not about repairing them. Just chop out enough to make room for the vise. Clean up the excavation and bolt it in.

Thank You Archimedes

OK. Now we have about 350 pounds of top heavy bench that needs to be righted. At age 73, I can dead lift about 90 pounds. That’s not enough to get the job done. Maybe a few friends? Naw, why ask friends to risk their backs (even if I had 3 or 4 friends). Good ideas often arrive while sleeping. I slept on it. Then, I went out and extracted a very fine scissor jack from my F-150 truck. I bolted a length of 2×4 onto the center of the bench top and then clamped a cleat to the edge of the 2×4 as a way of trapping the top pad of the jack.

photo of raising the bench with a scissor jackThe process was a simple matter of these steps:

  • Crank up the jack. (Very little effort needed.)
  • Put something under the bench to support it. (various boards, my saw benches turned on their sides, etc.)
  • Lower the jack.
  • Put some “shoring” boards under the jack.
  • Repeat…

Once the bench was within a few degrees of a tipping point, a long board used as a lever took it the rest of the way. Perfect, and it didn’t strain any of my friends’ backs.

Completing the build

First, check the height of the leg. I aimed for it to be just right, or at worst a slight bit less than needed. It is sitting on a typical garage concrete floor at the place I’ve always positioned the bench. I can slide a piece of paper under the front edge of the leg, for about 3/4 of an inch; no gap anywhere else. Perfect! Good planing.

What next? Complete the chop. I cut the chop to about 1/8 inch shy of the top of the bench, and then completed shaping it, rounding hard edges, etc. The last bit of fine fitting was to plane the apron area around the vice. There was a slight hump there; all flat now. In addition to gaining smooth operation and strong holding power, I also gained capacity. This particular combination of screw and scissors gives a capacity of 11-1/2 inches, more than I’ve ever used.

This vise is fantastic! I tested it with a variety of work pieces and operations. No slippage … PERIOD! Things stay where I want them!

Lastly, making it even better are pads of “Crubber,” a blend of cork and rubber that makes the jaws really “grippy.”

If you are considering a vise upgrade, I’m sure you’ll be pleased with the BenchCrafted Crisscross.

photo of completed vise in place, with chop completely shaped
photo of vise opened to 11-1/2 inch max
photo of Crubber pads


Filed Under: workbench

  • « Go to Previous Page
  • Page 1
  • Interim pages omitted …
  • Page 18
  • Page 19
  • Page 20
  • Page 21
  • Page 22
  • Interim pages omitted …
  • Page 128
  • Go to Next Page »

Primary Sidebar

Footer

Recent Posts

  • New Frame Saw / Scroll Saw
  • Lamppost Sign
  • Goodbye PayPal – Goodbye Bob’s eBooks
  • Anarchist’s Workbench is Done
  • Why we keep offcuts…

Categories

  • About
  • Artwork
  • Boatbuilding
  • Boating
  • bowl carving
  • Boxmaking
  • Clocks
  • Drawings
  • eBook
  • etude
  • Eva Too
  • Eva Won
  • Fiddlehead
  • Fiddlehead model
  • Flying
  • frame saw
  • gilding
  • green woodworking
  • Grinling Gibbons
  • Guns
  • Hand tools
  • Humor
  • kerfing plane
  • Lettercarving
  • Mill Creek 13
  • Model building
  • Power tools
  • Rant
  • resawing
  • scroll saw
  • Shopmade
  • sign painting
  • Stonework
  • Swimming
  • Technology
  • The Wall
  • treadle lathe
  • Uncategorized
  • VSD
  • Woodcarving
  • Woodturning
  • Woodworking
  • workbench

Other stuff

  • About
  • Contact
  • Privacy Policy

Copyright ©2024 · Bob Easton · All Rights Reserved