• Skip to primary navigation
  • Skip to main content
  • Skip to primary sidebar
  • Skip to footer

Bob Easton

Chocolate powered woodworking

  • Home
  • Grinling Gibbons Tour

Bob Easton

Hand lettering – Lightbox

October 12, 2015 by Bob Easton 8 Comments

photo of tracing box

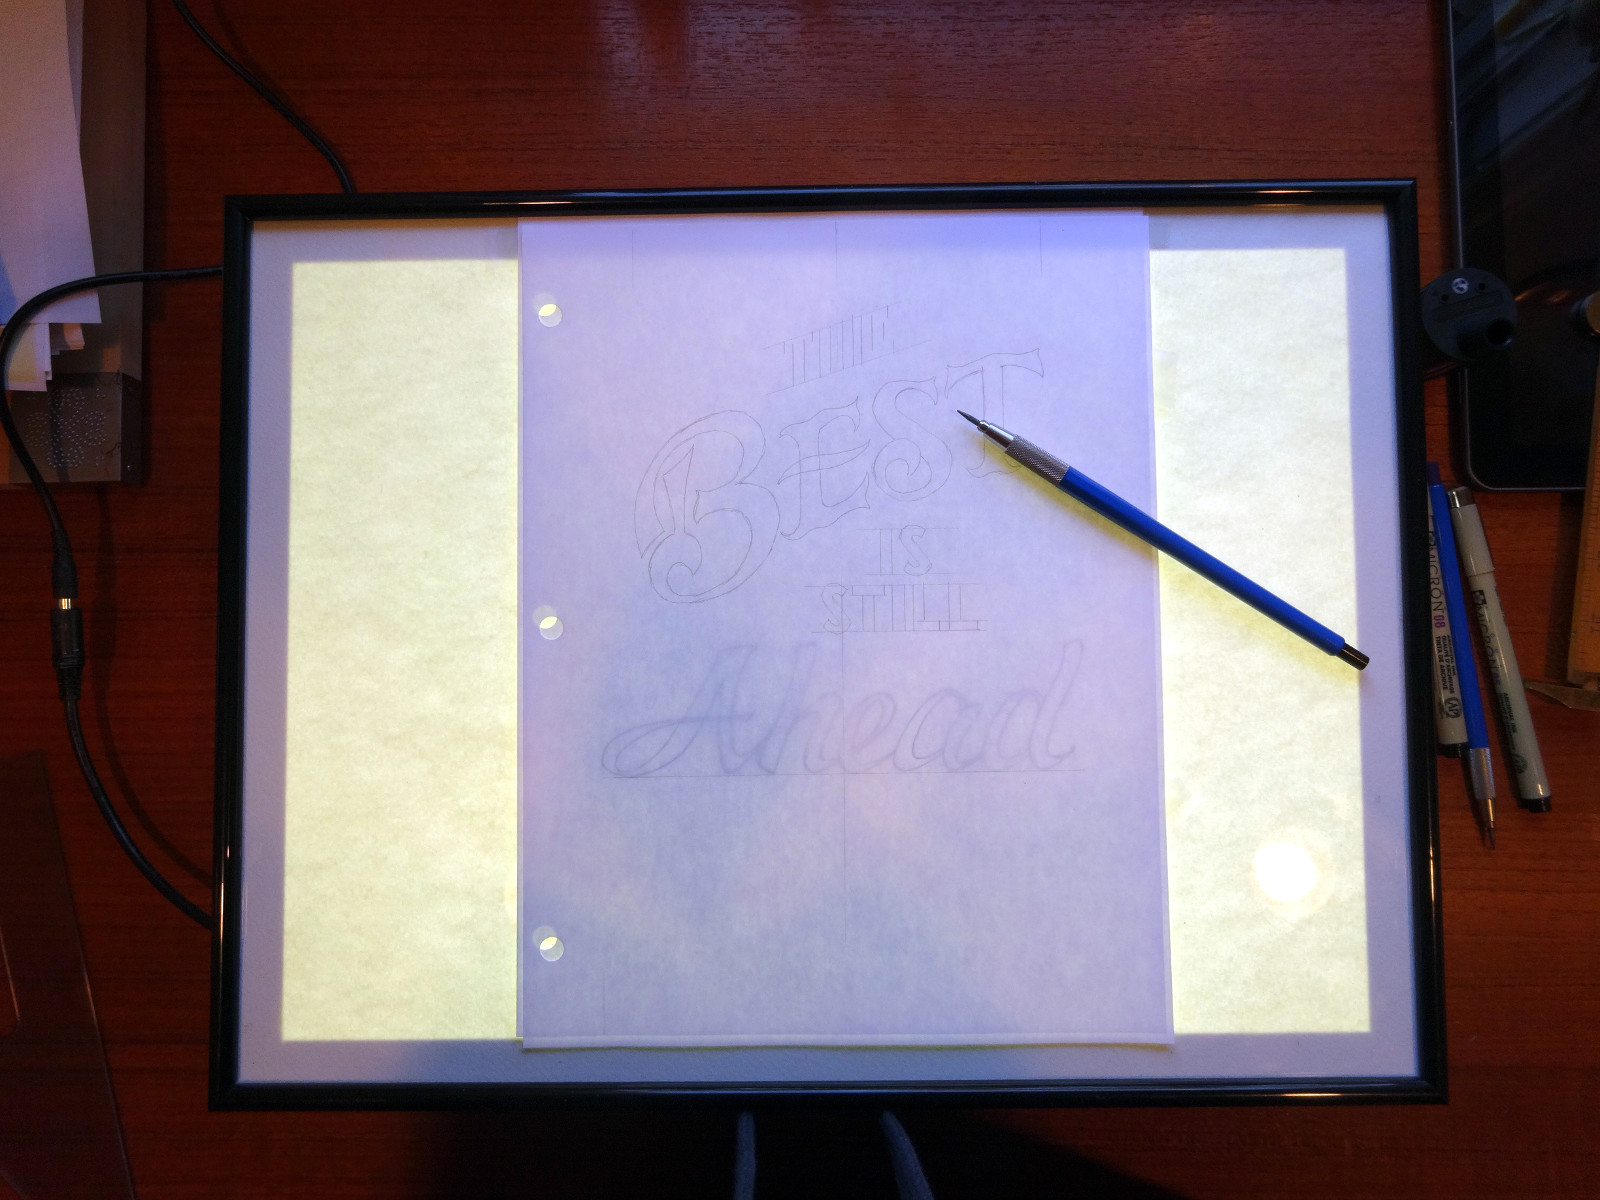
If you are among those who do their drawing and drafting with modern computer tools, move along; nothing to see here.

This is a lightbox for tracing, not a lightbox for photographing objects.

I am among the club of old fogies who still use pencil and paper for all of my hand lettering as well as other design work. Many times, the next iteration is easy to accomplish by tracing from an existing draft. I used to employ a window for tracing. Tape the original to a convenient window, tape the new drawing over the original, trace. It works great, but only in the daytime.

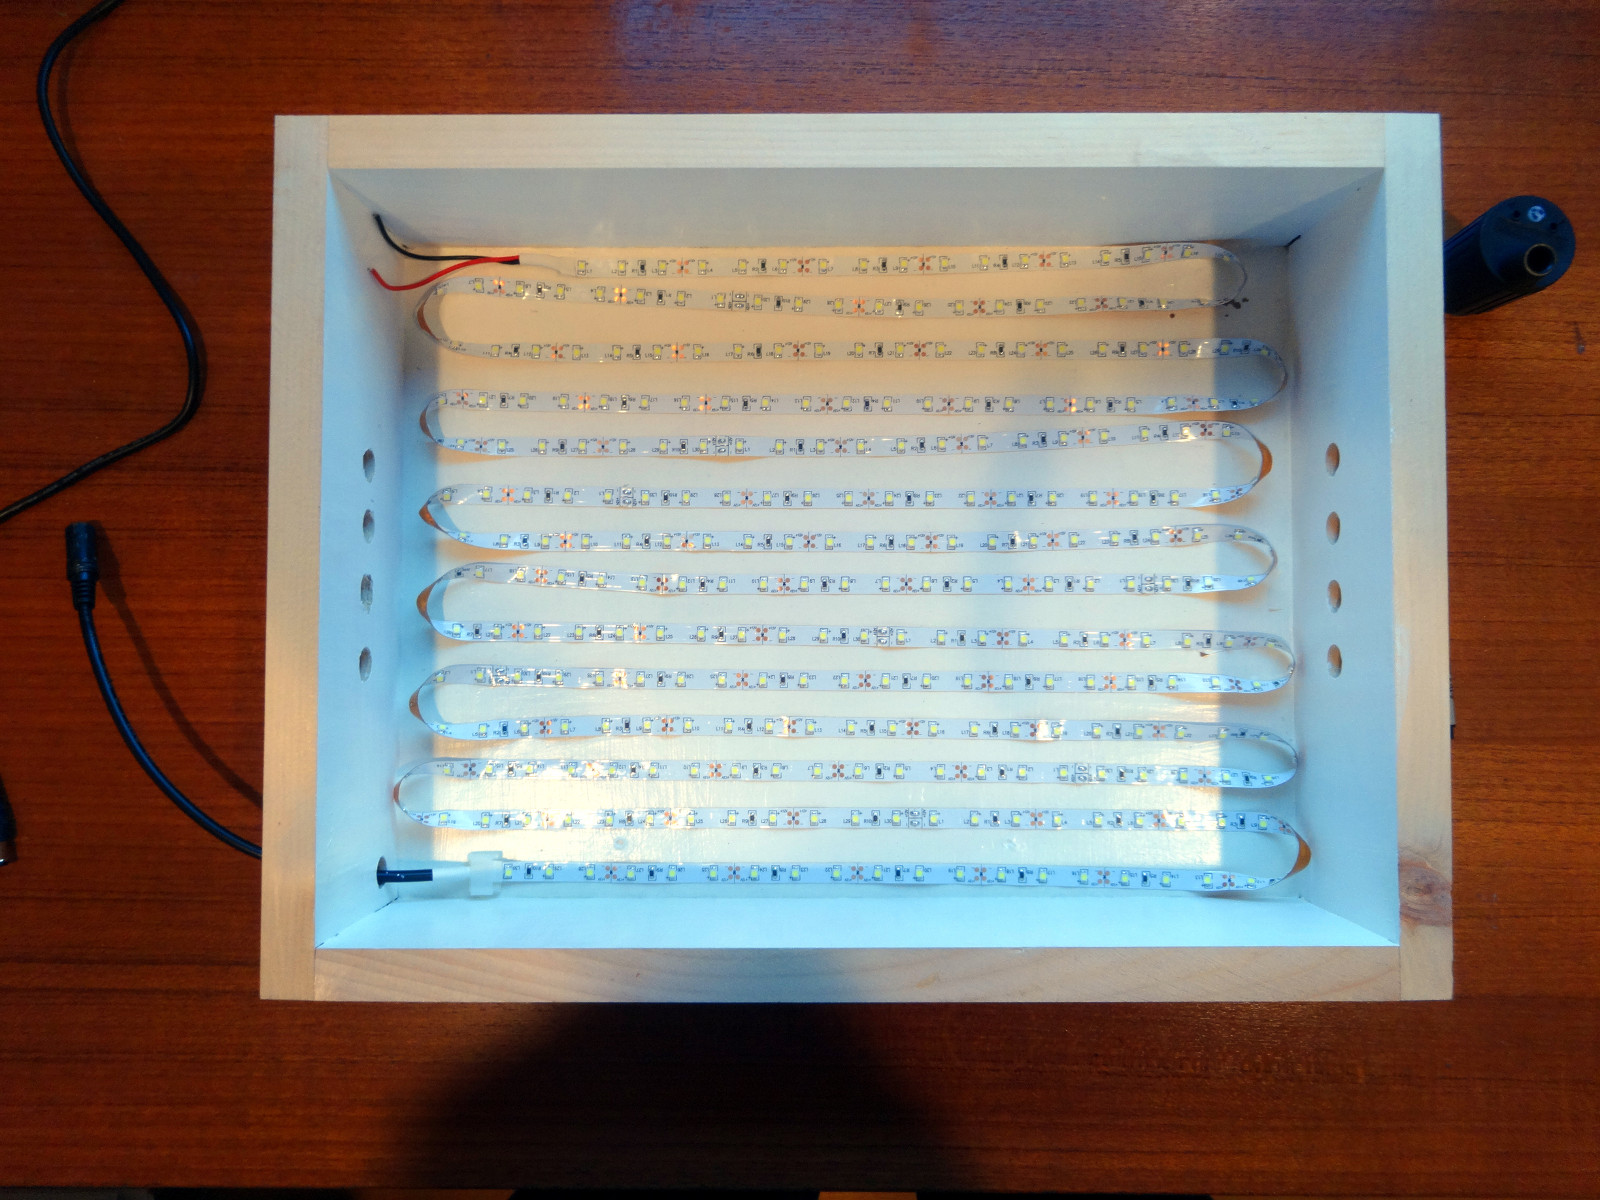
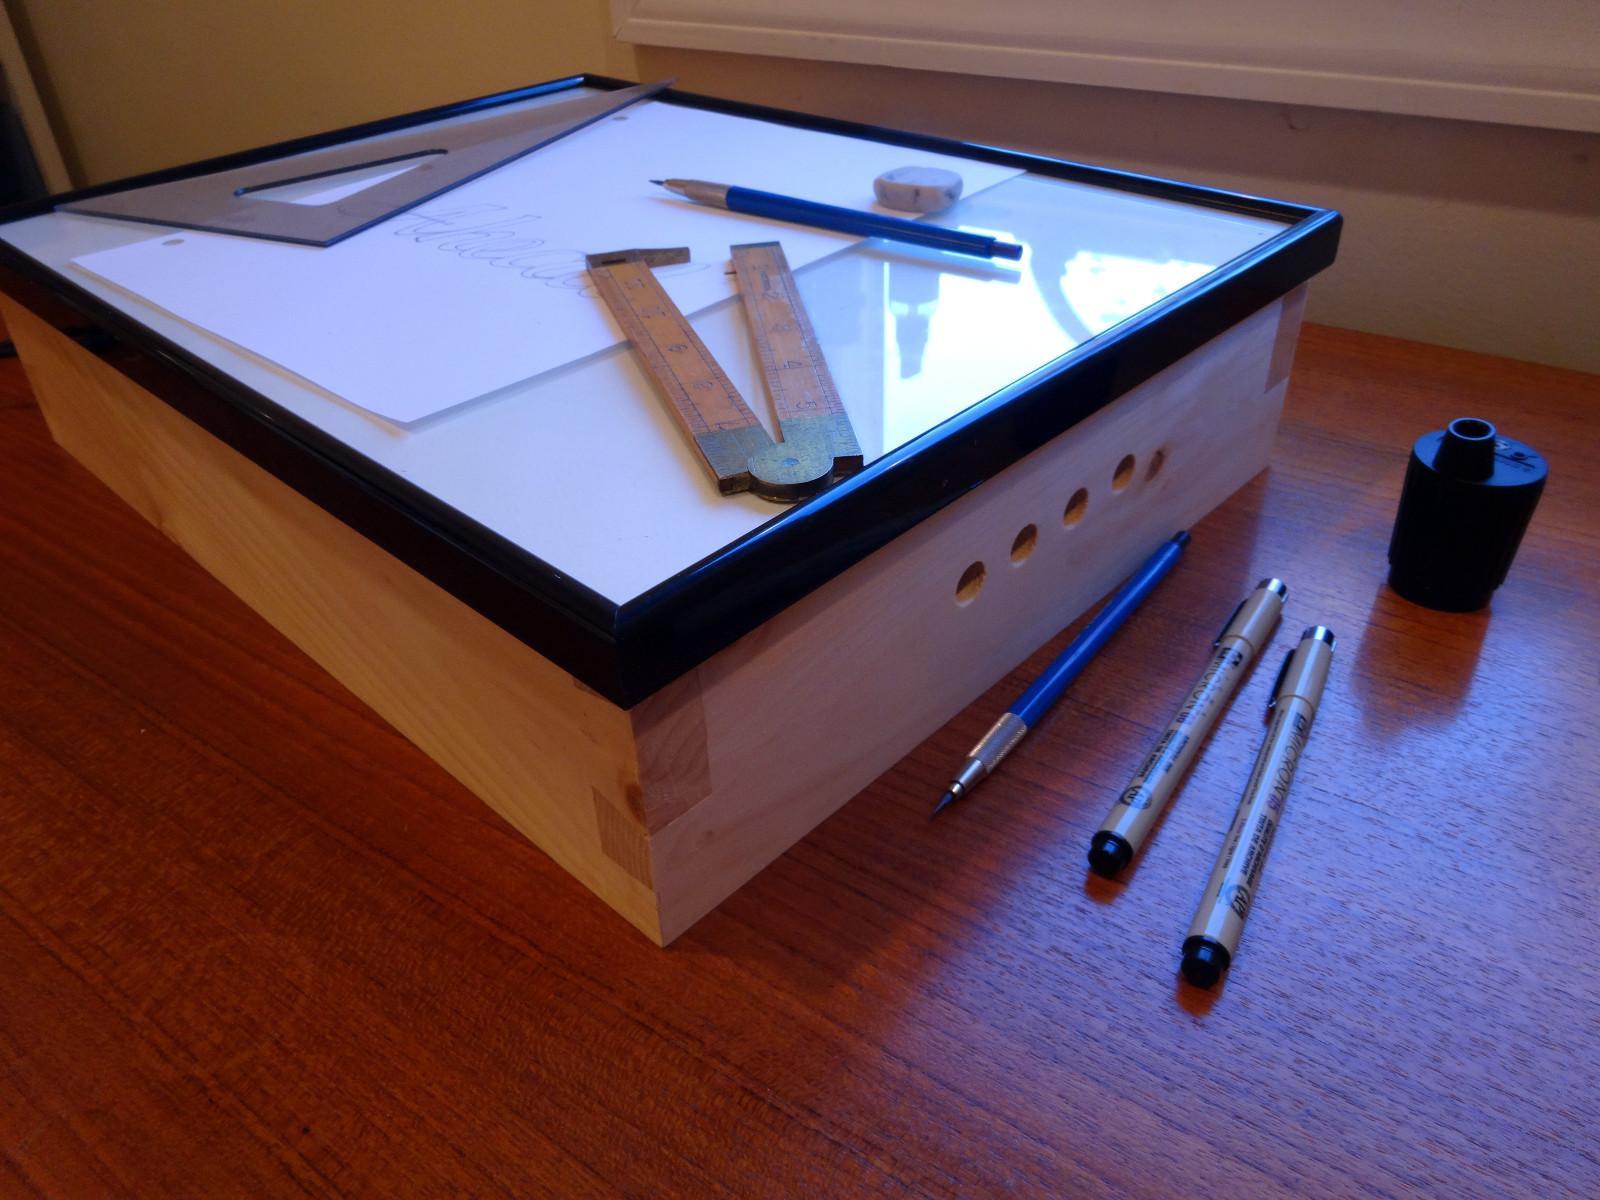
Did I ever mention I have Scots heritage? I inherited the thrifty part of Scotch, not the single malt part :(. This box was made mostly from materials on hand. Rummaging through a stack of unused picture frames, I found a thrifty frame measuring 12″ by 16.” It included the frame, glass, flimsy paper mat, and 1/8″ thick masonite back board. I tossed the mat and kept the rest. Some 1 x 4 pine from the lumber stash provided for the box, constructed to the size of the inside of the frame.

Construction is simple: a single (no stress) dovetail on each corner. The bottom part of each corner, below the dovetail, is mitered. The miter hides the 1/8″ groove that holds the bottom, which is that masonite from the frame. A few 1/2″ inch holes in each end offer ventilation and a place for the power pigtail.

The inside of the box is painted white to maximize light. Light comes from a very thrifty string of LED lights. The associated  12 volt power brick provides exactly enough current for the full 16 feet of lights.. So, I used the entire string. It has an adhesive backing, making installation a 5 minute job.

By the way, if you buy those components, be aware that the string of lights already includes a pigtail on one end that matches the output of the power brick, and a pigtail on the other end made of wires to solder to a power supply. You don’t need to buy any other connectors. (DAMHIKT)

Topping it off is a piece of heavy paper, for watercolor painting, that has good diffusion without blocking too much light, and the glass of course. Yes, the standard single strength glass is strong enough for this sort of work.

It works any time of day or night, better than a window, and doubles as a laptop drafting table.

photo of tracing box interior photo of tracing box - lighted and in use

Filed Under: Drawings, Woodworking

Gilding Hand Carved Lettering – Ebonizing Too

September 29, 2015 by Bob Easton 4 Comments

two gilded p;aques
Every project is a learning experience. These two carvings are just the experimental part of a different project. Several learnings happened here, but I’ll focus on only two, gilding the carved letters and ebonizing African mahogany. This is my first first-hand gilding experience, an activity that used to be one of the common activities of pre-vinyl sign painters.

A Gilding Story

While this is the first time I’ve applied gold, it’s not my first exposure. That was about 55 years ago when I tagged along with Dad as he painted a big “Monroe County Bank” sign on the front window of the building at Kirkwood and College in Bloomington Indiana. By some coincidence, that building is still a bank today. Back in the 1950s, it was the standard thing for a bank to have big bold gold leaf lettering outlined in black.

I don’t recall being there the whole day, but was certainly there for “the break-in.” (I think the statute of limitations has expired.) I know it was after three o’clock in the afternoon. That was closing time for the bank in those days. All of the front office people, tellers and such, had retired to the back of the bank. Maybe they were counting money?

Dad was just finishing the job, which is painted from the inside of the window, and wanted to step outside for a last inspection. As we went together and stepped down the 2 or 3 steps to the sidewalk, we heard a click. That would be the front door of the bank latching behind us. Yes, locked. Dang! His paint kit, complete with wet brushes was locked inside and he didn’t want to leave them overnight. We knocked on the door, and the windows, and the side windows, and the side door, and the back door, and the panel around the “night deposit” chute. No answer! We went to the soda fountain across the square and called from the pay phone. No answer!

No answers to any of those attempts … and paint brushes were drying. Dad searched his pockets and came up with a paper clip. Straightening it, he knelt down by the front door of the bank and picked the lock. We think, but don’t know, the lock on their safe was better than the one on the front door. It didn’t take long for him to wander to the back of the bank, rustle up a manager to tell him he was done. Then he collected his kit and we calmly left.

My Gilding

Forward to today, I’m working on a project that will have gilded lettering. These two plaques are how I learn. They were to test how much surface prep is needed for decent results. For the mahogany plaque, I left the lettering “straight from the gouges” and applied one coat of shellac. I used “1 Shot” Gold Sizing and 23K “patent” gold for these letters. The actual gilding process looks imposing, but is actually very simple (in principle). Apply the sizing, which is much like a slow drying clear enamel. Wait an hour and a half, or thereabouts, for it to get tacky. Then, apply the gold. “Patent” gold is gold leaf that’s adhered to thin paper sheets. It looked like a good thing to start with, as opposed to the other type of gold leaf which is individual leaves which are picked up by a static charged brush and transported to the tacky surface. Once the gold is applied, I use a soft brush to pat it into place and assure it stays put. The same brush whisks away the excess material. Simple. (Oh yeah, since sizing isn’t painted on perfectly, there’s excess to be carefully scraped away with an X-acto blade.)

My goal was to understand how much surface prep was needed for a smooth job. One coat of shellac isn’t enough! Every bit of grain detail, and carving awkwardness really shows. Makes sense; this gold is about 1/6 the thickness of plastic food wrap, really, really thin.

So for the ebonized piece, I carefully sanded the carving. (Did I ever tell you I hate sanding.) I then applied 4 coats of shellac and rubbed it to a smooth finish. There are still unfilled pores, big long ones, at this point. Yet, it is much smoother than the 1 coat attempt. That’s really hard to see in the photo. Taking good pictures of something glossy is another sort of challenge.

These two experiments show me what I need to do for better gilding. And, I’m sure John can chime in and give some pointers, having done a lot of gilded frames for his wife’s art work.

Ebonizing

The sign I’m making is headed to a household where the people favor dark woods. It needs to be on a dark wood, not clear mahogany. Why not ebonize some mahogany and see what happens?

Where do we get ebonizing liquid? Make it. Fill an empty Smuckers jelly jar with white vinegar and stuff in a steel wool pad. Let it ferment for a week or two. Throw away whatever is left of the pad and strain the liquid. The result is a liquid that will stain many varieties of wood (cover your workbench!). Brush on a coat, let dry, repeat until happy. I liked the result after 3 coats.

WARNING: The stuff is NOT toxic, but it smells terrible and tastes worse. Keep it and your food separated and wash your hands after using it.

Once the wood is dry, the stain does not transfer to you, other objects, or fabric. It’s stable. However, the staining action is not deep. It can be scraped off. So, it’s good to finish the wood surface to near its final state before ebonizing.

Other than that, it’s simple. The piece in the photo had 3 coats of ebonizing liquid and was left to dry overnight. At that stage, it appeared very black and flat, like a 1960s hot rod. Four coats of shellac warmed up the color a lot and prepared it for gilding. After gilding, I added one more top coat of shellac.

Filed Under: Lettercarving, Woodcarving

Hand Lettered – Hand Painted – Hand Carved

September 21, 2015 by Bob Easton 4 Comments

Hand carved sign says "plan ahead," but with poor letter spacing. "Plan" is evenly spaced, but "Ahead" barely fits on the sign.

Hand Lettered

Hand lettering is enjoying a resurgence. Decades of vinyl letter signs, “desktop publishing,” computer replicated fonts, and computer generated signs have left us with automated perfection that has become dull and uninteresting. Perfect replication of every line and curve is simply boring. Why? Because something is missing: evidence of a human hand.

thumbnails of hand drawn type on pinterestMy son once asked why I leave facets in my carvings, why I don’t sand them to pristine smoothness. My quick answer was “to differentiate them from cheap Chinese carvings or the stuff that comes from CNC machines.” [It doesn’t hurt that I also hate sanding.] Just as facets left on a carving show us it was carved by a human, so do the little variations in hand drawn lettering make it almost immediately distinctive from computer generated material.

Discerning people are searching for humanity in the things they read, everything from web pages to signs, and a new generation of artists with hand lettering skills are thriving. Witness: these images. Witness:  and these. They’re distinctive, they differentiate, and people are willing to pay handsomely for them.

Witness too the online education available to those wanting to learn hand lettering. One of the best of these is Sean McCabe’s Hand Lettering Course. The mere existence of his course, version 2 at $700 – up from $300 for version 1, shows strength in the resurgence of hand lettering.

Hand Painted – a Tribute to Sign Painters

Until 1982, nearly every sign you saw was hand either painted, or if needed in mass, lithograph printed. Just as today signs were everywhere, on store fronts, inside every kind of store, on churches, concert halls, theaters, hotels, on the sides of trucks, … everywhere.

Sign painters made them, by hand, with paint and brushes, hand lettered from “alphabets” in their heads. Not fonts, alphabets; the printing industry used fonts. Sign painters used alphabets. Sign painters were the ultimate hand letterers.

Dad was a sign painter and a photographer. Sign painting was his mainstay while he built up a solid photography business. He worked for a sign company, C.W. East, in Bloomington Indiana for a couple of decades during the middle of the last century.  His primary work was paint on metal, outdoor advertising signs of all sizes, and signs on trucks. He had all manner of alphabets flowing from his mind through super flexible long bristled brushes. All of it was “hand lettered” before “hand lettering” became the term it is today. For many things, like the hundreds of ICC numbers on trucks, he used a simple chalk layout. For more precise larger work, he sometimes made a paper pattern and “pounced” it before painting. But in the end, it was all hand lettering, by eye, that made up the overwhelming bulk of his work … and fed a family with 4 children!

My introduction to lettering was watching him at work. No, as a child I didn’t get to visit the sign shop much, but he often had showcard work or silkscreen stencil work that he did in his home studio. I recall spending the better part of one summer cutting silkscreen stencils from his drawings, a story for another day. I’ll also save for another day a story about a gold gilded sign on glass.

Dad completed his move from sign painting to photography by the early 1960s. He left sign painting behind except for occasional jobs.

1982?

That’s when computer driven plotters started cutting vinyl letters. Sign painting was never the same after that. Dad was gone by then, never learning about how much his former trade changed. Nor, did he see what “digital” did to photography.

Recently, Faythe Levine and Ed Ruscha, exploring “hand made” work of all kinds, settled on sign painters as one genre they wanted to document. One of their results was a film…

book cover - Sign PaintersA companion to the film is a book of the same name. It is a collection of vignettes profiling 25 sign painters. The common theme running through the material laments the 1982 arrival of a computer driven plotter that cut vinyl letters. Thousands of sign painters abandoned hand painting for vinyl. Fortunately, for those of us who appreciate hand lettering, many did not.

Wander over to Vimeo, a video publishing service, and search for “Sign Painter.” There are 235 results, short videos about sign painters, many of them quite young and apparently thriving. Here too, there are discerning customers willing to pay more for hand painted signs.

Hand Carved

My interest in hand lettering is enjoying a resurgence too. I’ve hand carved a few signs in recent years, and have enjoyed making them. I’ll be doing more.

Old signs become art.
I want to make signs that turn into art.
Phil Vandervaart – Sign Painters film

To be clear, for me “hand carved” means with chisels and gouges, NOT with routers, sand blasters or CNC machines. And before there’s hand carving, there’s hand lettering. I draw and redraw lettering with good old paper and pencil and drafting tools until I get the look I want. Then, I might scan the last drawing and use the computer to store the pattern that can be used again.

The carving at the top of this page is my rendition of a drawing at the end of the Forward section of the Sign Painters book. My sign is hand drawn and hand carved on mahogany. 4 1/4″ x 10 1/2″. Acrylic paint in the letters and shellac finish.

Filed Under: Lettercarving, Woodcarving

  • « Go to Previous Page
  • Page 1
  • Interim pages omitted …
  • Page 24
  • Page 25
  • Page 26
  • Page 27
  • Page 28
  • Interim pages omitted …
  • Page 128
  • Go to Next Page »

Primary Sidebar

Footer

Recent Posts

  • New Frame Saw / Scroll Saw
  • Lamppost Sign
  • Goodbye PayPal – Goodbye Bob’s eBooks
  • Anarchist’s Workbench is Done
  • Why we keep offcuts…

Categories

  • About
  • Artwork
  • Boatbuilding
  • Boating
  • bowl carving
  • Boxmaking
  • Clocks
  • Drawings
  • eBook
  • etude
  • Eva Too
  • Eva Won
  • Fiddlehead
  • Fiddlehead model
  • Flying
  • frame saw
  • gilding
  • green woodworking
  • Grinling Gibbons
  • Guns
  • Hand tools
  • Humor
  • kerfing plane
  • Lettercarving
  • Mill Creek 13
  • Model building
  • Power tools
  • Rant
  • resawing
  • scroll saw
  • Shopmade
  • sign painting
  • Stonework
  • Swimming
  • Technology
  • The Wall
  • treadle lathe
  • Uncategorized
  • VSD
  • Woodcarving
  • Woodturning
  • Woodworking
  • workbench

Other stuff

  • About
  • Contact
  • Privacy Policy

Copyright ©2024 · Bob Easton · All Rights Reserved