• Skip to primary navigation
  • Skip to main content
  • Skip to primary sidebar
  • Skip to footer

Bob Easton

Chocolate powered woodworking

  • Home
  • Grinling Gibbons Tour

Bob Easton

Best Brooms Ever

March 4, 2015 by Bob Easton 14 Comments

The shop was almost warm enough to be bearable today, and it needed a good sweeping.

Decades ago, we lived in the middle of Indianapolis, Indiana. A blind man would show up at our house occasionally carrying a dozen or so brooms over his shoulder. He sold brooms made by “Industries for the Blind.” We enthusiastically bought from him because his were really well made brooms of sturdy, thickly padded, broomcorn. They lasted almost forever, more years than I remember. They were the best brooms ever. We left Indianapolis over 30 years ago and there are no blind men walking around selling good brooms where we live now. In that time, the last of the blind-made brooms have worn out.

The last of the real broomcorn brooms I bought at a big-box store was so flimsy, it wouldn’t support its own weight. I’ve witnessed a steady decline in the quality of store bought brooms, seeing broomcorn get thinner and thinner and finally being replaced by plastic bristles, set in plastic heads, attached to plastic handles. They don’t behave like brooms and break too often. Pure junk!

photo of 2 brooms

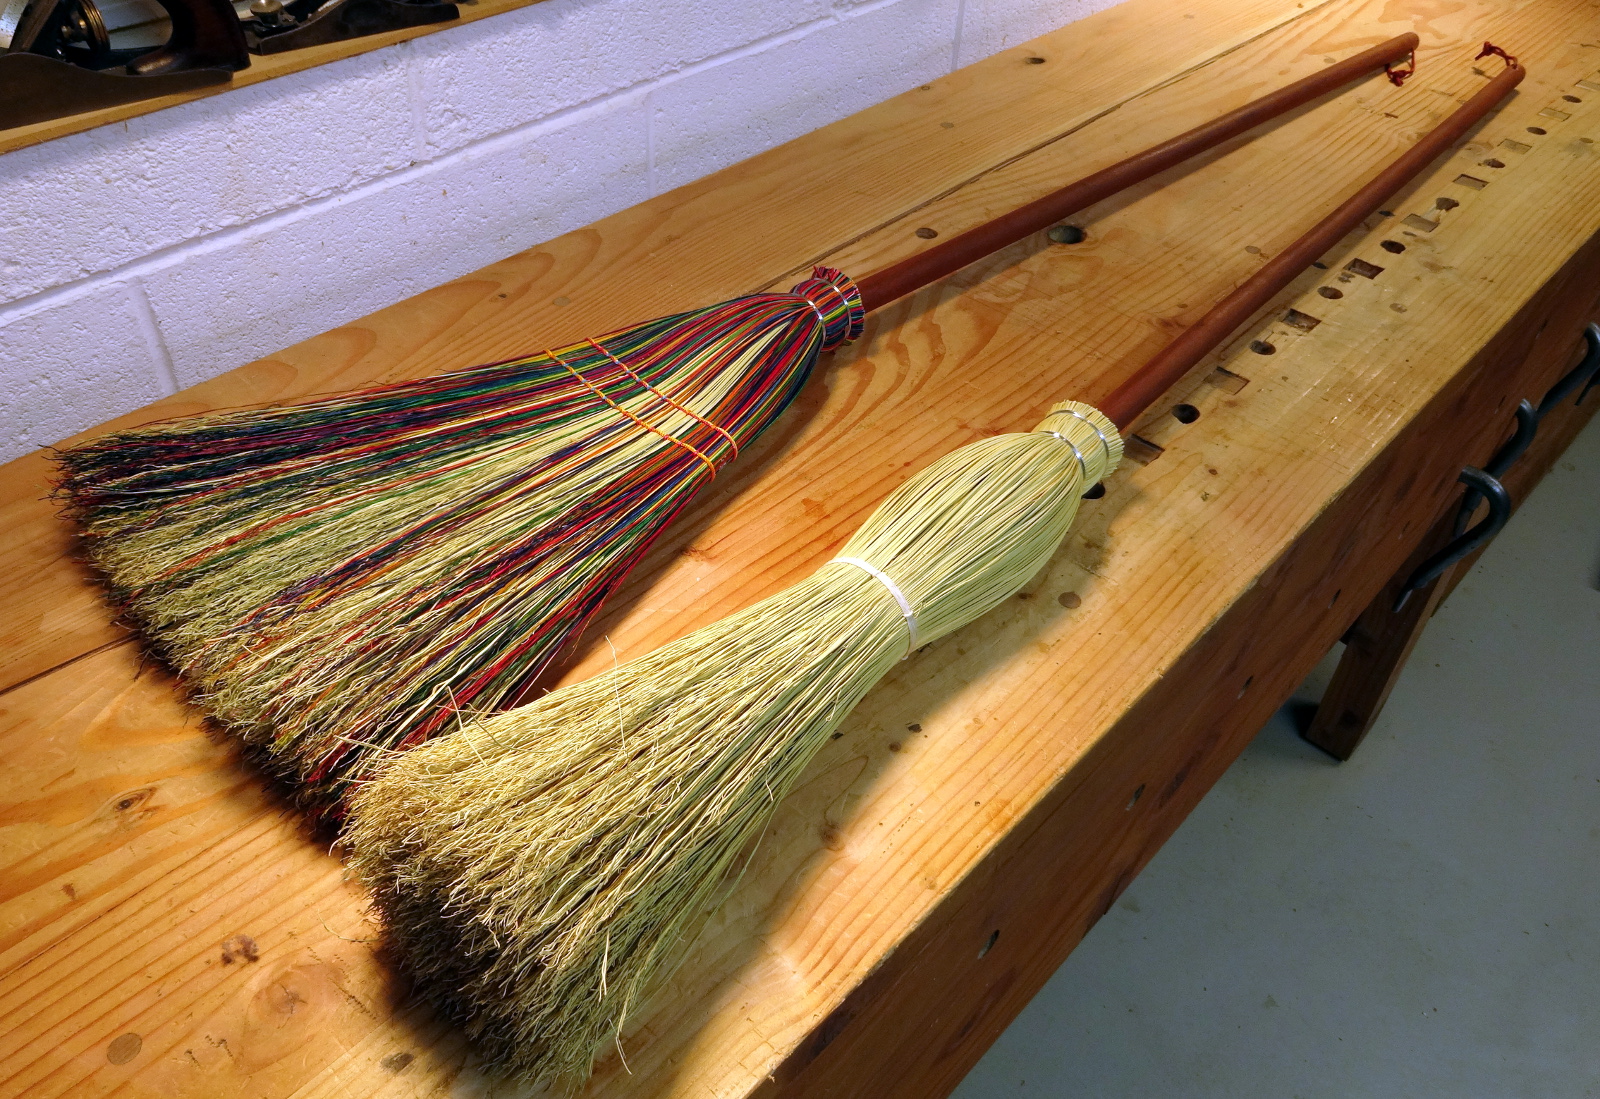
So, I went on a hunt. The answer to my search was not “handmade,” “blind-made,” “sturdy” or any of the other “durable” words, but “broomcorn!” Two new brooms from Broomcorn Johnny’s now hold my praise for the best brooms ever. Brian Newton is the artisan who operates the broom shop named Broomcorn Johnny’s in Brown County, Indiana. We’ve had two of his brooms long enough to know they’re the new “best.” The flat one is what he calls a “cabin broom.” The round one has about the same amount of broomcorn but is tighter wound and great for heavier work. The flat one stays in the house / cabin. The round one just cleaned up the shop better than any broom I’ve had in the past 15 years and hangs there now. (Cabin brooms are available in plain or in a range of color schemes.)

These brooms seem expensive at $60 – $70 each. Yet, I know they’ll easily outlast the $12 box-store brooms by a factor of 8 -10. That makes them a real bargain, and very attractive too.  Highly recommended, and I have no financial gain from this recommendation.

Filed Under: Woodworking

Words

February 26, 2015 by Bob Easton 10 Comments

Work In Progress – (still) in progress. Yes, since October…


Filed Under: Boxmaking, Lettercarving, Woodcarving

Kerfing Plane – Done

October 27, 2014 by Bob Easton 9 Comments

There are a lot more pictures this time because I read that a lot of people avoid saw making, rehabilitation and sharpening. I want to show that it’s within easy reach of anyone who wants to try and doesn’t care to wait while saws take long trips to the sharpener and back.

photo of completed plane

We can find many sharpening guides and tutorials online. Nearly all are very useful. For this particular saw plate, I followed Paul Seller’s recent tutorial about cutting saw teeth. The method worked wonderfully!

The plate itself is roughly 10″ by 1.5″, recycled from an old Disston that I cut down to make my frame saw a few years ago. Cutting to this shape was simple hack sawing. The tooth edge was smoothed “flat and straight” with a simple single-cut mill file. I decided to cut it to the same pattern I use for other resawing work, 5 TPI, zero rake, no fleam … just a dead simple aggressive rip pattern.

My ever handy Stanley No. 36 1/2 R rule has multiple scales in  8, 10, 12, 16 parts to the inch. The 10 scale made easy work of laying out a guide. The series of pictures walks through a number of steps, with notes about each. (Click any photo to start a larger slideshow.)

photo of marking the cutting guide
The 10 to the inch scale of a Stanley rule is used for marking out 5 TPI.
photo of cutting set up and two hack saws
The little no-name saw was OK for cutting the guide but gave up when it came to the plate.
photo of saw plate after saw cuts
After making the tooth spacing cuts
photo of two cutting aids
Which to use, the one with 6 moving parts and adjustments that can sometimes loosen, or… ?
photo of toothing set up
Saw filing setup. The adjustable lamp is the most important part.
photo of partially cut teeth
When looking from the edge doesn’t show what you expect, look from the side and seek those glints of light from unsharp teeth.
photo of applying set
Coarse tool, set for a gentle #8.
photo of completed plane from the nose
Finished plane – toe end
photo of completed plane from handle side
Finished plane – business side – What big teeth you have.
photo of completed plane from fence side
Finished plane – fence side
photo - making the first cut
First cut. The angle is off a bit.
photo of first kerfs
Kerfed all around. The slight angle is noticeable at the corners.
photo of first test result
First resawn board. Close enough for government work, but not for me.

End result? A small piece of pine became the test victim. I set the fence to produce a kerf 3/32″ from the edge and went at it with only casual concern. What will this thing do without a lot of fussy attention? Cutting was easy once the initial grabbing was overcome. Hint: start from the far end as one does when planing a molding. You can see in one of the pictures that the kerf is not absolutely square. It’s tilted slightly. Despite that, I ended up with two boards that have less than 1/32″ of roughness left from the cut.
photo of first test result

It will be perfect after I make an adjustment to either the face of the fence or to my right elbow.

UPDATE: It was my right elbow that needed adjustment. The plane is perfect when the monkey pushing it holds it correctly.

Filed Under: Hand tools, kerfing plane, resawing, Shopmade, Woodworking

  • « Go to Previous Page
  • Page 1
  • Interim pages omitted …
  • Page 28
  • Page 29
  • Page 30
  • Page 31
  • Page 32
  • Interim pages omitted …
  • Page 128
  • Go to Next Page »

Primary Sidebar

Footer

Recent Posts

  • New Frame Saw / Scroll Saw
  • Lamppost Sign
  • Goodbye PayPal – Goodbye Bob’s eBooks
  • Anarchist’s Workbench is Done
  • Why we keep offcuts…

Categories

  • About
  • Artwork
  • Boatbuilding
  • Boating
  • bowl carving
  • Boxmaking
  • Clocks
  • Drawings
  • eBook
  • etude
  • Eva Too
  • Eva Won
  • Fiddlehead
  • Fiddlehead model
  • Flying
  • frame saw
  • gilding
  • green woodworking
  • Grinling Gibbons
  • Guns
  • Hand tools
  • Humor
  • kerfing plane
  • Lettercarving
  • Mill Creek 13
  • Model building
  • Power tools
  • Rant
  • resawing
  • scroll saw
  • Shopmade
  • sign painting
  • Stonework
  • Swimming
  • Technology
  • The Wall
  • treadle lathe
  • Uncategorized
  • VSD
  • Woodcarving
  • Woodturning
  • Woodworking
  • workbench

Other stuff

  • About
  • Contact
  • Privacy Policy

Copyright ©2024 · Bob Easton · All Rights Reserved