• Skip to primary navigation
  • Skip to main content
  • Skip to primary sidebar
  • Skip to footer

Bob Easton

Chocolate powered woodworking

  • Home
  • Grinling Gibbons Tour

Bob Easton

Name Boards for Canoes

August 14, 2011 by Bob Easton 2 Comments

Learning Lettercarving – parts 2 to 376 have been cancelled. It’s not that I’ve quit Chris Pye’s course. I’m just continuing over in a dark corner of the shop and won’t bore you with details.

Needing to break out of the Practice, Practice, Practice regimen, I decided to actually make something. Long ago, I gave up on making name plates for the two canoes, not wanting to resort to die-cut plastic letters or something else equally dull. Now, I have a better alternative, carved “Name Boards.” On larger craft they might also be called “Quarterboards.”

(As always, click on the pictures to see the full / larger views.)

photo collage - sawing, planing, etcI always resort to the scrap pile for first of a kind projects … erm, prototypes. That way, if they turn out poorly, they’re still scrap! The scrap pile is fresh out of old growth mahogany (the preferred material for name boards), or any growth mahogany for that matter. The pile did include off-cuts from the cedar planking used on Eva Won. Voila! Light weight material that might actually finish up nicely. These were pieces already dimensioned to about 5/16″ thick, and there were enough of them to easily make 4 boards, two for Eva Won and two for Eva Too.

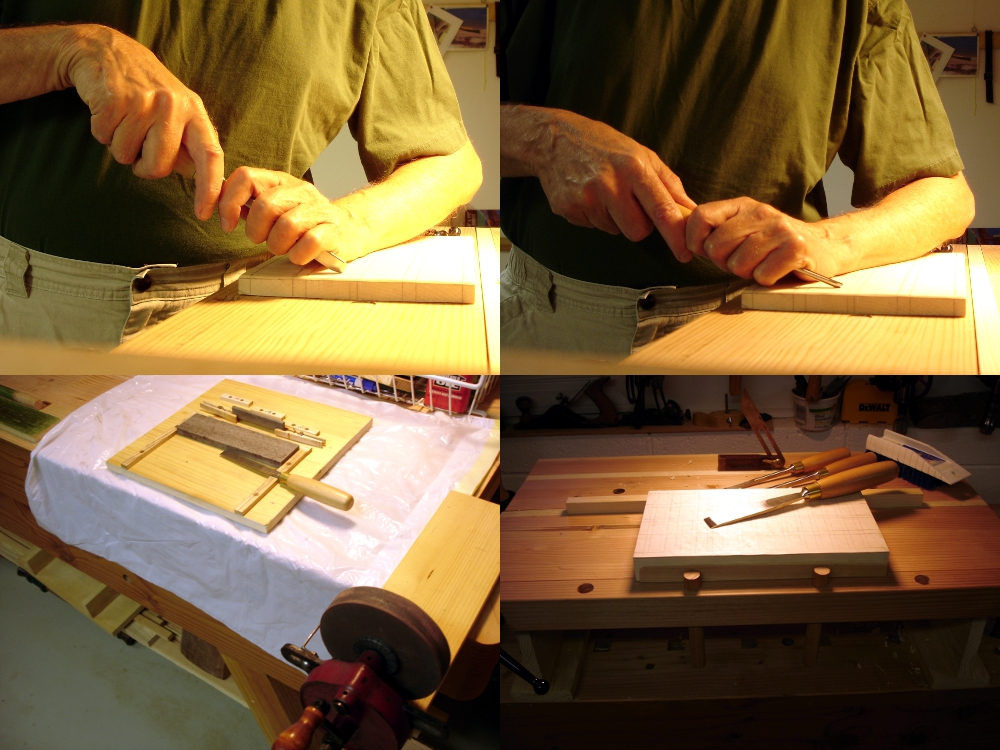
Prep is easy. Rough cut the length. Rip to desired widths. Plane the long edges smooth. Cut the curvy parts with the curvy saw. Cleanup the broad curves with the dreaded sanding block.

photo collage - layed out boards and carving with mallet and chiselLayout took a lot more time than wood prep, not unusual I guess. A double course of borders, each about 1/4″ defined the space remaining for lettering. I drew up paper patterns for the lettering, primarily so I could fold them in half lengthwise to find the center of the text. Not being as clever as Kari about making a transfer tool, I just used dividers to pick measures off the paper and then drew the letters directly on the wood. A small shop made straightedge, shop made square and a bevel gauge made this work easy despite being tedious.

The lettercarving is done with chisels and mallet in the classic incised style. With cedar being very soft, there were many areas where the mallet wasn’t really needed. However, here’s where extremely sharp photo of completed name boardsedges really matter. The cedar’s texture runs from imminently carvable to imminently crushable. In places it is soft and stringy and only a slicing cut will work. So, cedar has become the new test bed for my chisels and gouges. After sharpening, I always test the sharpness with a couple of plunge cuts and a couple of cross grain slices. If those cuts can be made smoothly in this cedar, the tools are sharp enough for self-apendectomies.

Once the letters are carved, some pinwheel ornaments are placed around the future screw holes. Then, the borders are lowered in two steps.

photo of helicopter toysNext, finishing. Just checked; there’s no gold leaf in the paint locker.
Finishing and mounting on the boats in another entry.

P.S. Also made good use of the off-cuts from these pieces. We’ll be visiting a swarm of grandkids soon. Some low-tech “helicopters” might entertain them a few minutes.

Filed Under: Boatbuilding, Eva Too, Eva Won, Lettercarving

Learning Lettercarving – part 1 of ???

July 8, 2011 by Bob Easton 1 Comment

Practice is something often thought of as preparing to do or learning to do. We even have a quotation: “Practice makes perfect.” Then, there are doctors and lawyers. (hmmmm?)

Having been at this lettercarving learning activity for a few weeks now, and not yet carved a complete word, something tells me there could be a very great number of parts to such a series. That is, if I were willing to document all of them for you. I won’t.

photo of book coverMy virtual teacher is Chris Pye, a British carver of the traditional school. His book, “Lettercarving in Wood: A Practical Course” is the lettercarving “bible” for traditional techniques. His book teaches both incised lettering and raised (relief) lettering. Incised lettering is more exacting than relief by an order of magnitude and consumes the lion’s share of the instruction. Chris’ emphasis in the book is with the traditional / architectural style found originally on Trajan’s Column in Rome.

Chris also presents a short version of “All you need to know are 4 techniques” in a DVD made as part of a Rob Cosman series: Rob Cosman Master Craftsman Series “Woodcarving #2 Letter Carving with Chris Pye” DVD. The DVD is very good at showing the actual motions that are sometimes difficult to imagine from words alone. photo of Rob Cosman DVDOn the other hand, a DVD can offer us about an hour of illustration, while a book can offer many more hours of detail. If you’re interested in learning these traditional techniques, get both. (Be prepared to wait for the book. The more recent US publication is out of stock everywhere, and Amazon took only three months to get me a copy from the original British publisher.)

The four basic techniques (straight elements, serifs, junctions, circles) are explained and demonstrated on the DVD, but make up 23 lessons in the book. [As an aside, Chris has recently started a new site, Woodcarving Workshops which consists of a growing collection of excellent videos. These videos are self-produced to a very high standard. Instead of long rambling things where one can sit through every single (often numbly boring) cut, these videos are short, clear, and concise. Unfortunately, none cover incised lettercarving and Chris believes he is constrained from producing on that topic by the two previous publications, thinking those publishers might sue should he produces competing material. My opinion is different, that web videos are a new publishing genre. Yet, I don’t know what “exclusive” arrangements he has in his other contracts.]

photo - 4 frame collageMy practice, so far, is to start with a big thick piece of Heinecke’s northern basswood, 7 inches by 12 inches by 2 inches. Layout some practice exercises (vertical trenches illustrated). Repeat them until I gt the hang of the particular exercise, or the surface is full. Once full, a large #9 gouge hogs off the work, and #6 and #3 gouges are used to level the surface back to something approaching flat. Why not just plane it down quickly instead? Because the gouge technique is also used for lowering backgrounds in relief carving and is a good way to introduce another type of practice. Rinse, lather, repeat, until the board is too thin for further practice.  Then, start a new block. There are several hundred letters inside a practice block, all reduced to chips for the compost pile, and to (let’s hope) some modest level of lettercarving skill.

Oh yes, there are pictures along the way, some documenting interesting problem areas. But, you don’t get to see those… (at least not yet.)

Filed Under: Lettercarving

Commissioning chisels

June 27, 2011 by Bob Easton 4 Comments

Lettercarving needs a different set of chisels and gouges than those used for small in-the-round carving. Consequently, there are quite a few brand new Ashley Iles tools on my bench. These carving tools are superb, strong enough for very heavy work, and comfortable in hand. They arrive almost sharp enough for immediate use; a little stropping takes them the rest of the way. However, their cutting angle is steeper than I prefer. To Ashley Iles’ credit, they grind to an angle suitable for hardwoods, a safe choice for creating a strong edge, about 30 degrees. Much of the lettercarving work, especially raised letter relief carving, wants a lower angle. Notice how the lower angle lets more of the forward hand rest steady upon the work, and eases the wrist angle of the other hand. They really push noticeably easier. (The only tool left with a high angle the v-tool, which requires more courage to regrind.)

photo collage of chisel angles and sharpening stationSo, I’ve been “commissioning” these new chisels and gouges. My sharpening has long been based on the “scary sharp” sandpaper technique. I took this time, with a lot of work to be done, as the time to switch to stones. My choice is oilstones, from coarse India stones to translucent Arkansas stones. Yes, I considered water stones, all the rage these days, but decided against them because there are many narrow gouges that make trenches in the stones and require very frequent flattening. Those narrow tools won’t cause the same havoc with Arkansas stones. My new sharpening station is as simple as I can make it, a hand cranked wheel that gets held in the end-vice when needed, and a single board with several fixtures. Stones are kept in place with simple fences. There’s room in that corral for a 1/2 inch thick piece of glass for those times when I want to sharpen plane irons held in a sharpening jig. The 3 little strips on the back side are depth stops for putting plane irons into the sharpening jig. The spring clips are for holding slipstones. All very simple, easy to use, and easy to put away.

In other news – “Man Caves”

Amanda DeMatto wrote me a few months ago, asking about my garage workshop (discovered earlier in this blog). She is a freelance writer who sometimes publishes in Popular Mechanics. Her latest features 7 interesting garage conversions which she has titled “Ultimate Garage: The 7 Most Extreme Man Caves.” I never imagined my simple workshop would be considered “extreme,” but she gives it space in photos 15-19. THANKS Amanda!

Filed Under: Lettercarving

  • « Go to Previous Page
  • Page 1
  • Interim pages omitted …
  • Page 61
  • Page 62
  • Page 63
  • Page 64
  • Page 65
  • Interim pages omitted …
  • Page 128
  • Go to Next Page »

Primary Sidebar

Footer

Recent Posts

  • New Frame Saw / Scroll Saw
  • Lamppost Sign
  • Goodbye PayPal – Goodbye Bob’s eBooks
  • Anarchist’s Workbench is Done
  • Why we keep offcuts…

Categories

  • About
  • Artwork
  • Boatbuilding
  • Boating
  • bowl carving
  • Boxmaking
  • Clocks
  • Drawings
  • eBook
  • etude
  • Eva Too
  • Eva Won
  • Fiddlehead
  • Fiddlehead model
  • Flying
  • frame saw
  • gilding
  • green woodworking
  • Grinling Gibbons
  • Guns
  • Hand tools
  • Humor
  • kerfing plane
  • Lettercarving
  • Mill Creek 13
  • Model building
  • Power tools
  • Rant
  • resawing
  • scroll saw
  • Shopmade
  • sign painting
  • Stonework
  • Swimming
  • Technology
  • The Wall
  • treadle lathe
  • Uncategorized
  • VSD
  • Woodcarving
  • Woodturning
  • Woodworking
  • workbench

Other stuff

  • About
  • Contact
  • Privacy Policy

Copyright ©2024 · Bob Easton · All Rights Reserved