
Noisy sanding machines are forbidden in my shop. I have a hearing loss, and don’t want any more. So, I hand sand. Yes, it takes a lot longer, but it also takes longer to make a mistake. And then there’s the fuel source; Milky Way bars are more easily justified.
Some people remarked that the glassed deck looks great. It does, but as they say in the commercials for cheap gadgets on TV, “Wait! There’s More!” Very simply, epoxy has no UV protection. It needs to be protected with either paint or varnish. (Ah, you thought we were done, didn’t you? Oh-No.) And of course, before it can be painted, it needs more surface prep. You see, epoxy has a lot higher viscosity than paint. It does not flow much (good; fewer runs), nor does it level nicely (uh-oh). When rolled on thin in several coats, it actually builds upon the weave of the fiberglass fabric, creating a surface that is textured or “printed through.” That surface needs to be smoothed prior to painting or varnishing.

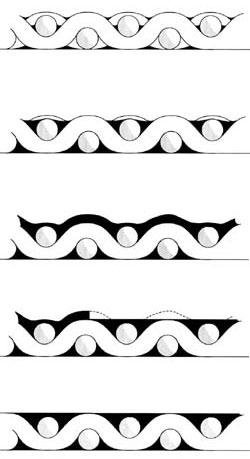
My concern, having never done this, was about accidentally sanding through the fabric and weakening the stuff that holds the boat together. A fellow calling himself “Laszlo” answered my question with words that helped me know what to expect. Here, I’ll supplement the words with pictures. Trying to avoid excess weight, I was careful in filling the weave and rolling on 3 thin coats of epoxy. That left a “printed through” surface where one can see either things that look like bubbles at the tops of fabric intersections, or pin holes at the openings of the fabric weave. I was confident that there was actually enough epoxy applied, as depicted by the third part of this CLC diagram.

OK. Let’s take it down. The builder’s manual suggests starting with 80 grit. I thought that awfully harsh, but I can assure you it is not. Cured epoxy is very hard stuff. A milky Way bar gets one to the stage where the tops of the pattern are coming off, but there’s still a regular pattern of shiny spots remaining.![]()

Keep going. I continue working 80 grit until 95% of the shiny spots are gone. Then, I step down to 100 to start removing the 80 grit scratches and the remaining shiny spots. Then to finer grits. The goal is an evenly dulled surface, like that of wax paper. It will go clear again if / when varnish is applied over it.![]()

In an area that I knew could be easily repaired, I kept going to find the condition Laszlo described. He said that just before you start to sand into the fabric, you’ll see the fabric weave appear as whiter spots. Wetting the surface will make the spots disappear, but they’ll appear again when dry. At this point, you’re not into the fabric yet, but just above it. Stop sanding! [I didn’t need any repairs. 🙂 ]
Now that I know what to look for, I am no longer concerned. Knowledge is power and it’s good that we have forums to share the knowledge. Thanks Laszlo!
OK. What about areas where there is fabric overlap? Now that we know what to look for, that’s easy. Sand through the top layer of the overlap and stop before getting into the lower layer.
About the title of this post: what’s that all about? We live within walking distance of a commuter rail line that will carry us to New York City. We visit occasionally and really enjoy not driving or parking in the city. One of the most tedious things I can remember is Eugene O’Neill’s play “Long Day’s Journey Into Night.” It’s a terrible thing, tediously redundant, about a family that’s become completely dysfunctional due to drug and alcohol addictions. The play depicts one long day of this family’s life, full of anguish, accusations, attempts at resolutions, and more of the same over and over again. Did I say it was tediously redundant? Oh, the tedium of it all! The version we saw was in 1986 starring Jack Lemmon as James Tyrone, which he did superbly. An innovation in this revival was director Jonathan Miller’s decision to have some parts of the dialog be delivered by people talking over each other … which is very common in New York anyway. That actually shortened the play from 3 1/2 hours to only 3 hours. Despite this innovation, it lost little of the feeling of tedium.
This sanding process has a similar amount of tedious redundancy. At the moment I’m partly through the 80 grit and on my way to 100, 150, 220 for the hull, and further for the deck. See why I mentioned 438 Milky Way bars in a previous post?
About the hearing loss: It takes only about 12 minutes to change a tire on a KC-135 Stratotanker, less if you arrive to find its engines already running, idled down to minimums, and a crew eager to be on its way. (Killing the engines means another pre-flight and probably filing a new flight plan.) The crew chief jacked the bogie while I set about changing the tire. I had hearing protection, but not enough, plugs, no cans. I was changing the front starboard tire and wheel on the starboard bogie, with engine #3 about 5 feet directly behind me. Remove the safety wire from the hubcap screws – remove the screws and hubcap – remove the safety wire from the nuts of two bolts that lock the large wheel hub nut from turning – remove the lock bolts and their nuts – remove the hub nut – ensure the flight crew has the disc brakes locked – wiggle the wheel and outer bearing off the axle – pull off the inner bearing – push on a freshly cleaned and repacked inner bearing – wiggle the new (about 200 pound) wheel on, aligning brake keys with the notches in the brake rotors – push on a freshly cleaned and repacked outer bearing – install and tighten the hub nut, aligning castellations with lock bolt holes – reinstall the locking bolts and their nuts – tie the nuts with safety wire so they don’t loosen – reinstall the hubcap and tighten its screws – tie down the hubcap screws with safety wire – drop the jack – gather up the tools, old wheel and other parts – get out of the way. 8 minutes 20 seconds! Forty some years later I benefit from the marvels of ultra miniature electronics which compensate for much of the hearing loss. Yet, I can assure you from my ever present tinitus that engine #3 was idling at 8520 rpm and engine #4 was idling at 8780. No more loud machines for me!


