• Skip to primary navigation
  • Skip to main content
  • Skip to primary sidebar
  • Skip to footer

Bob Easton

Chocolate powered woodworking

  • Home
  • Grinling Gibbons Tour

Hand tools

Goodell-Pratt Eggbeater

October 2, 2009 by Bob Easton 73 Comments

I found the Goodell-Pratt number #259 (I originally thought 5 1/2B) eggbeater drill at Liberty Tools in Liberty, Maine. Liberty Tools is a galoot’s paradise where one has little choice but to spend money. This drill went for $28. We put it to use immediately at the Wooden Boat School, drilling and setting screws on the boats we were building. We quickly discovered that it’s a very versatile drill. In addition to the usual drilling action, there is a fast / slow selector that alternates gearing ratios. The fast speed is great for drilling pilot holes and most screw setting. Switch to slow when more torque is needed. Then, there’s a ratchet mechanism too. See the R I L indications on the round plate under the hand crank? R and L set ratcheting for Right or Left. The I setting locks up tight, no ratcheting. This makes the drill very handy for working in tight spaces where’s there not enough room to fully spin the crank. Quite a nice eggbeater!

Other than wiping the handle clean so it didn’t stick to my hands, the way shoes stick to the floors in movie theaters, we did no other clean up. There is a patent date of Aug 13 1885. The next patent date found on that model drill is 1905. So, this one was manufactured sometime between those two dates. (Update: the ratchet mechanism was added in the early 1920s, making the 5 1/2B into the #259. Thanks Rick.) It had a fair amount of grunge, but not bad enough to affect smooth operation. We used it at the school. I then brought it home and used it in building a workbench and the first boat. Still no clean up. (Click the picture on the right to see 100+ years of “ambiance.”)

photo of goodell-pratt eggbeater photo of eggbeater in use

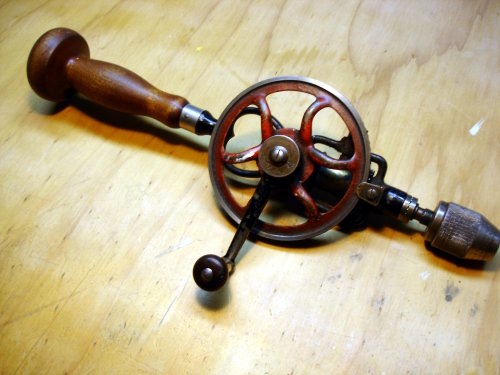
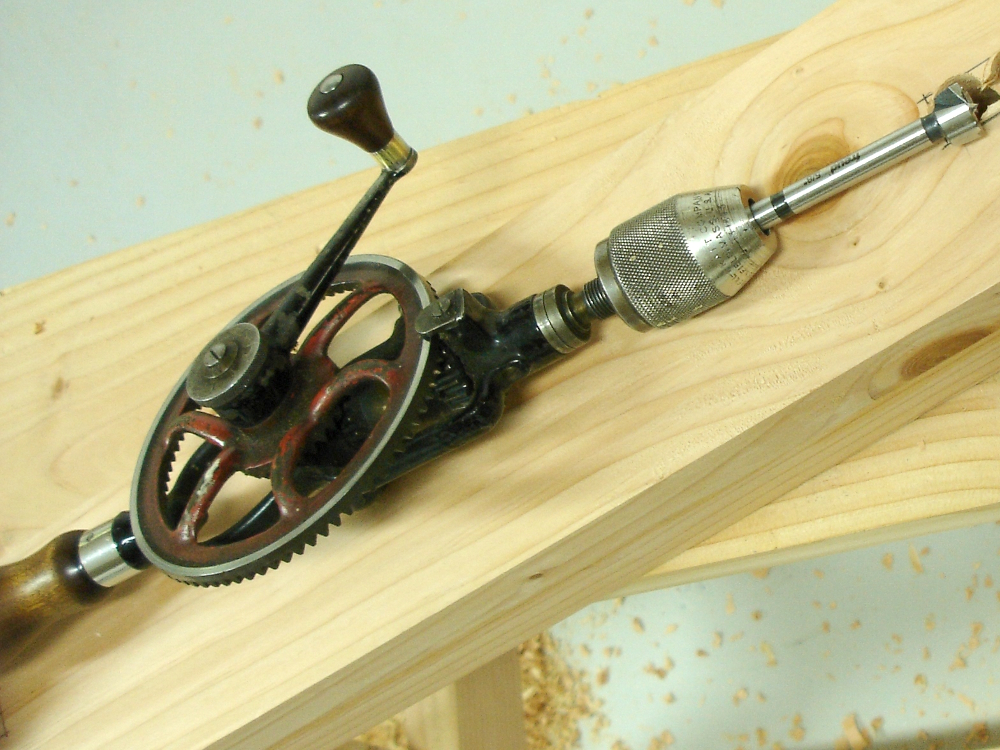
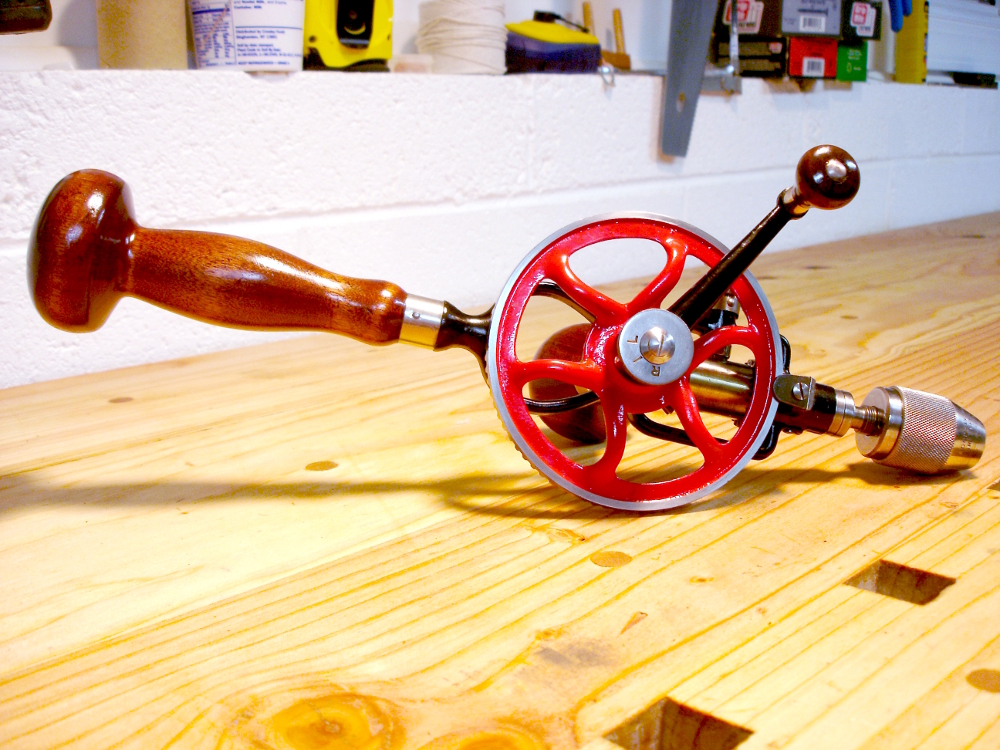
Being between projects, I’m following Stephen Covey’s habit #7: Sharpen the Saw. Actually, the saw was sharpened last week. This week I refurbished the eggbeater. Here’s where the traditional collectors will howl. Instead of doing the minimal (don’t harm the patina) restoration, I stripped it down, polished, and repainted. It’s not a collector’s item. It’s “a user.” So, I’m not worried about the howls. Three coats of fresh paint went on the metal parts. a new side knob of mahogany replaces the one that was lost. A bit of red stain brought the knobs and handles into harmony before receiving three coats of Minwax Polycrylic satin finish. Polishing the bare metal parts brought back their luster. One of the compression springs inside the chuck was badly deformed. I wound a new one from the steel core of a well used guitar string. (Don’t ever throw away used guitar strings.) Lubed and reassembled, the drill runs as smoothly as one could want, and looks almost as nice as Wictor Kuc’s. Ready for another hundred years.

photo of refurbished eggbeater photo of refurbished eggbeater

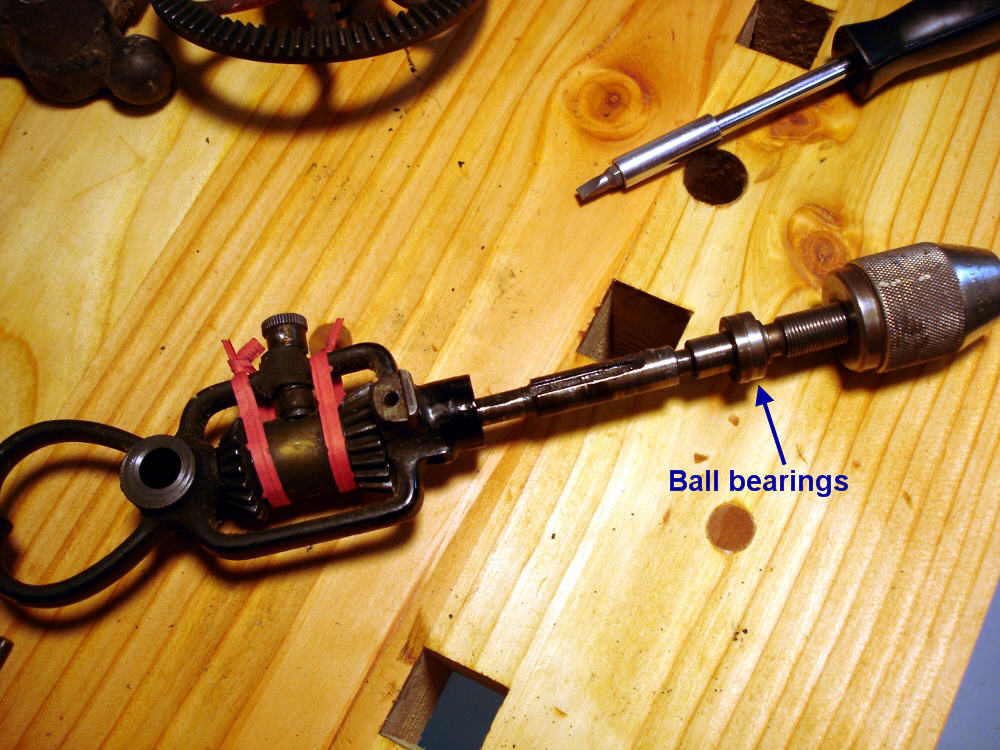
Update: A discussion over at the Sawmill Creek forums has Mike asking about the speed shifter on a Millers Falls drill. Although different in how the speeds are selected, I’m guessing the internal mechanism is similar. Following are 4 pictures showing my cautious step-by-step disassembly of the shifter. It turns out to be a simple device. The internal sleeve has ears on each end and is keyed to the collet shaft. Those ears engage either one pinion or the other. The little shift wheel on the frame moves a peg that slides the sleeve to one pinion or the other.

shifter disassembly 1 goodell pratt speed shifter 2

goodell pratt speed shifter 3 goodell pratt speed shifter 4

Filed Under: Hand tools

Small Boatbuilding Hand Tools

September 9, 2009 by Bob Easton 5 Comments

Over at the WoodenBoat Forums, a newcomer asks about hand tools for small boat building. I don’t know exactly what he considers small, a dingy or canoe, or a small Trumpy. I do know, however, a lot about the tools I used to build the Fiddlehead canoe. This list worked for me and might work for other amateur boat builders. (I doubt professionals would easily give up using power tools, which they think do the work faster.)

Bench and bench accessories

benchIt’s the single most used tool in the shop. Mine is a 12 foot long “English Bench” taken from Chris Schwarz’s book Workbenches from Design & Theory to Construction & Use. The 12 foot length is comfortable for the size of the shop and is suitable for planing boat lumber up to 16 feet long (with some lumber shuffling of course). The bench dogs, full width planing stop on the end, and the bench hook are all shop made accessories. The Gramercy holdfasts are from Tools for Wood Working. The bench is further described in a series of blog entries.

Layout

layout toolsMost work starts with some sort of layout. Starting at the left edge and proceeding roughly clockwise, we have:

  • A shop built marking gauge with two beams, one for pencil, the other for a scribe. It is made of cherry and roughly to a plan found here.
  • The black plastic bodied compass / divider is an AccuScribe, which can be found at a number of woodworking tool outlets.
  • The compass / divider I like more is the vintage 8 inch Bemis & Call steel compass found in an antiques shop in Liberty Maine. Cost = $10. It once belonged to someone named C L Beckett who stamped that name on each leg.
  • The oak thing is a shop built center marking gauge, handy for resawing.
  • A utilitarian 25 foot Stanley rule.
  • A chalk line is useful for marking long rip lines on lumber. Strictly for rough cutting.
  • A utilitarian try-square, a couple of small machinist squares, and a 6 inch rule.
  • Two bevel gauges, one an ancient Stanley #25 (from Sandy Moss I think), the other shop made from a hacksaw blade and a rivet.
  • Lastly, a very fine Pattern Pilot marking knife from Bob Zajicek at Czeck Edge Hand Tools. It is probably more useful for cabinet makers than for boat building, but is a gorgeous tool nonetheless.

Planes

planesAll of my planes are refurbished vintage planes. Over the life of any sharp edge tool, one will sharpen it many many times. Sharpening is an essential skill and is not difficult to master. In my view, knowing all you can know about a tool, including how to refurbish it, is only an incremental step beyond sharpening. I like to refurbish tools, bringing them back to life and putting them back to work. I am careful in what I buy and where I buy it in order to make the most of what I refurbish. My planes include (left to right):

  • A Stanley (Bailey) #7 Jointer plane. Type 16 (1933-1941) with 1935 iron. From Jon Zimmer. $145. While in Maine, I roamed the antique tool stores and found dozens of these for prices in the $70-$80 range. Each and everyone had a flaw of some sort that ruled it out. I eventually found this one from Jon, and don’t regret paying him more for finding a better tool than I could find by wandering around.
  • A Stanley (Bailey)#5 Jack plane. Type 16 (1933-1941) with 1935 iron. From Jon Zimmer. $120.
  • A Stanley (Bailey) #3 Smooth plane. Type 15 (1931-1932). From Jon Zimmer. $80.
  • A Stanley #60 Low Angle Block plane. Circa 1900. From Sandy Moss. $50.
  • A Stanley #40 Scrub plane. Circa 1910. From Jon Zimmer. $80.
  • A Sargent #79 (copy of Stanley #78) Fillister and Rabbet plane and accessories. Circa 1925. From Sandy Moss. $35.
  • A Stanley #51 Spoke Shave.  Circa 1920. From Sandy Moss. $20.

I’m sure there are trustworthy vintage tool dealers on Ebay, but I haven’t found time to sort them out of the world’s largest yard sale.  Likewise, I haven’t found all of the trustworthy dealers on the internet. However, I do trust and have done business with each of these folks: Jon Zimmer, Patrick Leach, Sandy Moss, Walt Q, and Bob Kaune.

For those who have not refurbished an old plane, Bob Smalser’s excellent tutorial will get you started: “Rehabilitating Old Planes”

Chisels and shaping tools

chiselsThere are surprisingly few. The bench chisels are Narex. They were surprisingly inexpensive (less that $30 for the set of 4), and surprisingly good. It’s all about good steel, and these are tough and hold their edges very well.

The little carving chisels were for carving the fiddleheads on the ends of the boat’s stems. They are not of high quality steel, so I won’t reveal their pedigree.

The only other shaping tools I use are a Stanley Surform and a half-round cabinet maker’s rasp.

Oh yeah, and sandpaper.

Saws

sawsSome are store bought. The yellow handled Stanley has carbide teeth and works OK. I use it only for rough cross cutting. There aren’t a lot of high-precision straight cuts in boat building. Hey, we’re making boats, not grand pianos. A simple hack saw does the metal stuff. The little razor saw is handy once in awhile.

My real workhorses are shop made. The big frame saw was cut down from an antique Disston D-8 rip saw, and made roughly to Josh Clark’s design. I use it for ripping long lumber, and for resawing. Resawing is so valuable for boat lumber; getting two (or more) boards for the price of one is wonderful. See my resawing tutorial for more. The bow saw is a delightful, lightweight, highly maneuverable saw made from plans found at Gramercy Tools. I use it constantly and can’t say enough good about it.

Good learning resources for rehabilitating and sharpening saws are:

  • Bob Smalser’s saw straightening and rehab tutorials on the Sawmill Creek forums
  • Peter Taran’s saw sharpening primer on the Vintage Saws site
  • Bob Rozaieski, of Logan Cabinet Shoppe, has a very good saw sharpening video.

Drilling

drilling toolsMy Goodell-Pratt #5 1/2 B , eggbeater sees constant use, for both drilling and screw tightening. It dates to about between 1886 and 1905. I found it at Liberty Tools in Liberty Maine, for $28. Liberty Tools is a real neat place, but you have to go there; no mail or Internet ordering. The drill was, as most are, missing the side knob, which I fabricated. It has two speeds, and a ratcheting mechanism that works in both directions. It’s almost as fast as other hand drills, is a lot more accurate (no overrun), and doesn’t ever have dead batteries.

The Stanley #923 brace does the heavier work. It wants to have square shank bits for the best work. It came from Walt Q for $25.

I find the Fuller bits indispensable. There are hundreds (sometimes thousands) of screws used in boat building. Most are silicon brass and are known to fracture easily if not fed into the right size hole. Every screw hole is prepared with one of these bits. Screws are also waxed before driving. I have had no breakage problems.

Other stuff

clampsA few dozen odds and ends include screwdrivers, pliers, and not nearly enough clamps. The orange and blue clamps are from “the Borg.” The lap clamps are shop made and did exactly what they were made for.

All in all, that’s not very many tools. A small collection can do a lot of work.

Oh yes, there was one electron murdering tool used for building the boat. Before I built my frame saw and bow saw, I used a Rigid 14 inch band saw to cut the inner stems and to resaw a few strips of cedar for the laminated bulkheads. Since those cuts, and after making the new hand saws, the only use I’ve had for the band saw is quickly cutting waste wood down to disposable size.

Filed Under: Boatbuilding, Hand tools, Woodworking, workbench

A New Marking Knife

May 14, 2009 by Bob Easton 1 Comment

knifeA beautiful new Pattern Pilot marking knife from Bob Zajicek at Czeck Edge Hand Tool is now hard at work in my shop. (Click image for a larger view.)

Making my own tools is something I enjoy, especially of I can make ones that function well and also look great. I’ve had drawings for marking knives waiting in the “to do” queue for quite some time and have been content to simply use pencils for the time being.

That changed last week when Al Navas ran a contest on his “Sandal Woods” blog. Al often has drawings for tools provided by his sponsors. I was very fortunate to win the marking knife as one of his Safety Week drawings. THANKS Al!

The knife is superb. It’s edge is keen and it feels great in the hand. Not only does it work very well, it is drop-dead beautiful. Maybe because I’m partial to blonds, I find the olive wood simply gorgeous. There aren’t any dovetails in the small boats I’m building, nor are there many straight lines. Yet, there are lots of ways to use this knife.

Not only is Bob Zajicek a very fine tool smith, he’s also a fortune teller. Along with the knife he sends not one, not two, but three plastic point guards. They are easily misplaced among the clutter of a busy project and the spares are appreciated.

Now, I can make marks that are 6 times more accurate than I can saw. A delightful tool. Very highly recommended! THANKS Bob!

Filed Under: Hand tools

  • « Go to Previous Page
  • Page 1
  • Interim pages omitted …
  • Page 9
  • Page 10
  • Page 11
  • Page 12
  • Page 13
  • Interim pages omitted …
  • Page 15
  • Go to Next Page »

Primary Sidebar

Footer

Recent Posts

  • New Frame Saw / Scroll Saw
  • Lamppost Sign
  • Goodbye PayPal – Goodbye Bob’s eBooks
  • Anarchist’s Workbench is Done
  • Why we keep offcuts…

Categories

  • About
  • Artwork
  • Boatbuilding
  • Boating
  • bowl carving
  • Boxmaking
  • Clocks
  • Drawings
  • eBook
  • etude
  • Eva Too
  • Eva Won
  • Fiddlehead
  • Fiddlehead model
  • Flying
  • frame saw
  • gilding
  • green woodworking
  • Grinling Gibbons
  • Guns
  • Hand tools
  • Humor
  • kerfing plane
  • Lettercarving
  • Mill Creek 13
  • Model building
  • Power tools
  • Rant
  • resawing
  • scroll saw
  • Shopmade
  • sign painting
  • Stonework
  • Swimming
  • Technology
  • The Wall
  • treadle lathe
  • Uncategorized
  • VSD
  • Woodcarving
  • Woodturning
  • Woodworking
  • workbench

Other stuff

  • About
  • Contact
  • Privacy Policy

Copyright ©2024 · Bob Easton · All Rights Reserved