• Skip to primary navigation
  • Skip to main content
  • Skip to primary sidebar
  • Skip to footer

Bob Easton

Chocolate powered woodworking

  • Home
  • Grinling Gibbons Tour

treadle lathe

Treadle Lathe – Tool Rest & New Pulley

October 9, 2012 by Bob Easton 5 Comments

Dovetails smuvtails! Every woodworking blog I read raves about dovetails. Dovetail this, dovetail that, fast dovetails, no-measure dovetails, 7 degree dovetails, 11 degree dovetails. Gheesh, you’d think woodworking revolves around dovetails. C’mon folks. Go take a close look at real 18th century furniture and the quality of dovetails in that stuff. The pre-machine era dovetails were a far distance from the holy grail woodworkers pursue today. Most of them were semi-hidden anyway, not as prominently featured as today.  OK, rant over.

photo of tool rest and collar

I don’t build furniture, so I’ve never felt compelled toward dovetail perfection. Then, along comes this plan that shows a tool rest held together with what? A dovetailed joint. Yes, I practiced a bit and did more than the one shown here. I’m happy getting it to look a bit better than Dave Letterman’s front teeth. It is a surprisingly solid join. No wiggle! This particular part of the lathe is very close to the plan, except for part thickness. The plan calls for full inch stuff, which I don’t have and did not want to go get. I did upgrade from constriction fir to red oak for the rest and the clamping collar. I’m using simple fir for the wedges, seeing them as sacrificial. This rest has a fair degree of movement and positioning capability. The plan shows a hole in the far end of the horizontal piece, which is intended to hold a bolt upon which a face rest can be built. I’ve skipped that for now.

photo of tool rest mounted on the lathe

OK Ralph. The first real turning is a good drive pulley/wheel to replace that fence finial.

photo of square block before being drilled

The challenge was to make a piece with a 5/8″ axial hole. Having neither a jawed chuck to hold a turned piece, nor a way to feed a drill bit along the center line, I improvised. The turning block comes from a section of laminated material identical to the lathe feet, essentially a pair of 2x4s, about 7 inches long. I drilled a 5/8″ hole through the center of the block with an auger bit, being careful to just pierce the far end with the lead screw. That small hole in the far end served as a centering point for the spur drive bit.

photo of a work in progress

A live center slipped into the end of the block with the start of the 5/8″ hole. Then, came the bit of the old fogie learning to hop about on one leg whilst pumping the treadle with the other and trying to learn how to manage turning tools while bouncing, swaying, and fighting off vertigo. My wife stopped by to watch and snicker for a few minutes, and fortunately got bored and left.

photo of completed pulley/wheel

I messed about quite a while trying out several new Wood River turning tools. As an aside, these tools arrive needing a good honing. Actually that’s not difficult, and once honed they seem to work well.  Yet, I’m a novice turner and anything that can change the shape of the wood impresses me.

Yes, I made a variety of “interesting” surfaces along the way. My best work was with a 1/2″ roughing gouge. My worst, of course, with the skew. I don’t yet have a parting gouge, so ended up hand sawing the ends away.

photo of new drive wheel in place

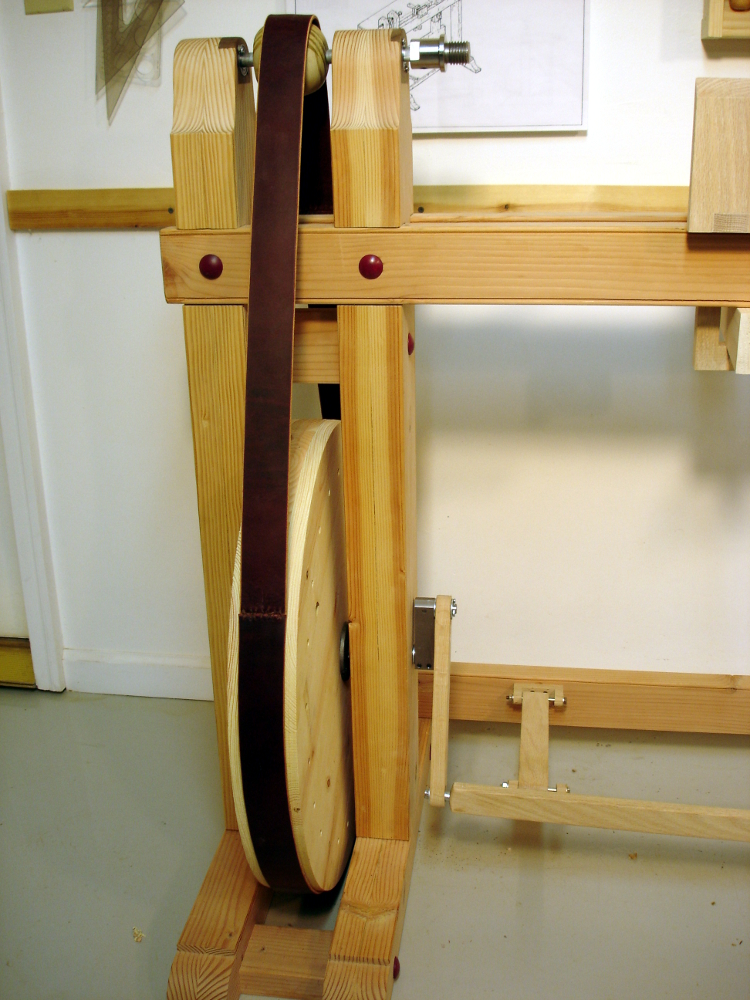
The temporary ball pulley/wheel demonstrated the value of a crested surface in helping keep the belt running nicely. So, I made this piece with a crest, although not as extreme as the temporary part. I decided to use the same simple mounting, a screw through the wheel into a hole in the spindle. The wheel ends up a bit smaller than the earlier part, requiring the belt to be shortened a bit and restitched.

The first turning can be called mostly a success. Mostly because even though it was round while between centers, it is not perfectly round when mounted on the spindle. As careful as I was in the improvising, the spindle hole did not get perfectly mounted between centers. I suspect it is due to “play” in positioning the tail puppet. I’ll have to learn how to make that more precise.

Now, I’m like the dog that caught the car. What next?

Lastly, a few words for Kari: Here’s a lathe you can like. Human power can’t get it turning fast enough to hurl heavy objects at your head. If/when you catch the point of a skew chisel, there’s not enough momentum to grab the chisel out of your hands and throw it back at you. Instead, the belt slips until you easily regain control. In short, it is a non-lethal lathe.

Filed Under: Shopmade, treadle lathe

Treadle Lathe – Drivin’ It

October 7, 2012 by Bob Easton 9 Comments

My first “up close and personal” acquaintance with a steam traction engine was several(?) decades ago at an Antique Tractor show in Portland Indiana. More recently, I watched a 1913 Case engine drive a threshing machine at the Dakota County (Minnesota) fair late this summer. When these engines drive threshing machines or saw mills, power transfer is by use of a very wide and tremendously long fabric belts. I once asked an engine operator about how taut to make the belt. He advised, “only taut enough to keep it from slipping. Any tighter stresses axles and bearings.” The following video (not mine) shows an engine driving a threshing machine.

photo of drive belt mounted and ready to useWander around and look at shopmade wooden treadle lathes. You’ll find all manner of drive “belts.” Many use rope or leather cords. In doing my research, I saw a lot of lathes where the builder used extra idlers to add tension, usually to cords or ropes. Those look like very fussy contraptions.

Instead of using a narrow cord or rope, I decided to model my drive after the traction engines, with a wide leather belt. My intent was to eliminate the need for a fussy tension idler and to keep tautness to something less than a gnat’s ass stretched over a rain barrel. My drive belt is 2″ wide material from Tandy. The longest belting strips they offer are 72″ long. It takes the better part of two lengths to make this belt.

I made it long enough to be a snug, but not particularly taut, fit over the flywheel and temporary spindle pulley. It doesn’t slip, and the rounded shape of the spindle pulley sure keeps it on track.

Filed Under: Shopmade, treadle lathe

Treadle Lathe – Spindle

October 7, 2012 by Bob Easton 3 Comments

You saw a quick shot of the spindle in an earlier post. Let’s take a closer look.

photo of spindle bearings

The spindle rides on 3 bearings. Two are ball bearings that sit in the walnut bearing blocks. The third bearing is a thrust bearing at the leftmost end. The thrust bearing offers a low friction way to absorb lateral pressure. The race that absorbs the pressure has a center hole too small for the spindle to pass through. The bearing ring in the middle is a very tight fit on the end of the shaft. The outer race has the same fit as the ball bearing. A photo details the parts for folks who haven’t seen this sort of thrust bearing.

photo of a fence finial

OK. What are we going to use for a drive pulley? There aren’t a whole lot of commonly available things of a decent diameter already having a 5/8″ hole bored through them. Hey, I could make one on a lathe! But, what to use to drive the lathe to make a drive pulley? Wander the aisles of the home center, asking “what about this, that, the other thing over there?”

Found it! A finial for a fence post looks like just the thing. Cut off the ball part. Bore a hole through it.

photo of temporary drive pulley

Fix it to the spindle, and get going. …and only $3.42. With all the boring I’ve done with the brace and Russel Jennings augers, I’ve gotten fairly good at putting holes near where I want them. Finding the center of a not-so-round pressure treated ball, and then drilling dead on the center was a near impossibility, and I lived up to that expectation. It’s not perfect. Yes Jeremy, it does wobble a bit, but it’s not headed for 70mph. Fixing it to the spindle is done with a couple of 1/8″ holes driven into the ball and partly into the spindle and #8 by 1-1/2″ wood screws. Crude but practical for a very temporary drive pulley.

Filed Under: Shopmade, treadle lathe

  • « Go to Previous Page
  • Page 1
  • Interim pages omitted …
  • Page 7
  • Page 8
  • Page 9
  • Page 10
  • Page 11
  • Interim pages omitted …
  • Page 14
  • Go to Next Page »

Primary Sidebar

Footer

Recent Posts

  • New Frame Saw / Scroll Saw
  • Lamppost Sign
  • Goodbye PayPal – Goodbye Bob’s eBooks
  • Anarchist’s Workbench is Done
  • Why we keep offcuts…

Categories

  • About
  • Artwork
  • Boatbuilding
  • Boating
  • bowl carving
  • Boxmaking
  • Clocks
  • Drawings
  • eBook
  • etude
  • Eva Too
  • Eva Won
  • Fiddlehead
  • Fiddlehead model
  • Flying
  • frame saw
  • gilding
  • green woodworking
  • Grinling Gibbons
  • Guns
  • Hand tools
  • Humor
  • kerfing plane
  • Lettercarving
  • Mill Creek 13
  • Model building
  • Power tools
  • Rant
  • resawing
  • scroll saw
  • Shopmade
  • sign painting
  • Stonework
  • Swimming
  • Technology
  • The Wall
  • treadle lathe
  • Uncategorized
  • VSD
  • Woodcarving
  • Woodturning
  • Woodworking
  • workbench

Other stuff

  • About
  • Contact
  • Privacy Policy

Copyright ©2024 · Bob Easton · All Rights Reserved