Learning Lettercarving – parts 2 to 376 have been cancelled. It’s not that I’ve quit Chris Pye’s course. I’m just continuing over in a dark corner of the shop and won’t bore you with details.
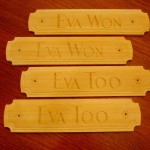
Needing to break out of the Practice, Practice, Practice regimen, I decided to actually make something. Long ago, I gave up on making name plates for the two canoes, not wanting to resort to die-cut plastic letters or something else equally dull. Now, I have a better alternative, carved “Name Boards.” On larger craft they might also be called “Quarterboards.”
(As always, click on the pictures to see the full / larger views.)
 I always resort to the scrap pile for first of a kind projects … erm, prototypes. That way, if they turn out poorly, they’re still scrap! The scrap pile is fresh out of old growth mahogany (the preferred material for name boards), or any growth mahogany for that matter. The pile did include off-cuts from the cedar planking used on Eva Won. Voila! Light weight material that might actually finish up nicely. These were pieces already dimensioned to about 5/16″ thick, and there were enough of them to easily make 4 boards, two for Eva Won and two for Eva Too.
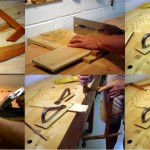
Prep is easy. Rough cut the length. Rip to desired widths. Plane the long edges smooth. Cut the curvy parts with the curvy saw. Cleanup the broad curves with the dreaded sanding block.
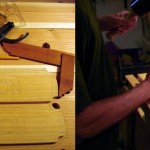
 Layout took a lot more time than wood prep, not unusual I guess. A double course of borders, each about 1/4″ defined the space remaining for lettering. I drew up paper patterns for the lettering, primarily so I could fold them in half lengthwise to find the center of the text. Not being as clever as Kari about making a transfer tool, I just used dividers to pick measures off the paper and then drew the letters directly on the wood. A small shop made straightedge, shop made square and a bevel gauge made this work easy despite being tedious.
The lettercarving is done with chisels and mallet in the classic incised style. With cedar being very soft, there were many areas where the mallet wasn’t really needed. However, here’s where extremely sharp  edges really matter. The cedar’s texture runs from imminently carvable to imminently crushable. In places it is soft and stringy and only a slicing cut will work. So, cedar has become the new test bed for my chisels and gouges. After sharpening, I always test the sharpness with a couple of plunge cuts and a couple of cross grain slices. If those cuts can be made smoothly in this cedar, the tools are sharp enough for self-apendectomies.
Once the letters are carved, some pinwheel ornaments are placed around the future screw holes. Then, the borders are lowered in two steps.
 Next, finishing. Just checked; there’s no gold leaf in the paint locker.
Finishing and mounting on the boats in another entry.
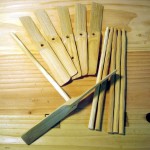
P.S. Also made good use of the off-cuts from these pieces. We’ll be visiting a swarm of grandkids soon. Some low-tech “helicopters” might entertain them a few minutes.
Many, many years ago I bought some “low-tech” helicopters like you show on your web site. The kids that visit me LOVE it and I’d like to get some to pass out. Would you be willing to make up a bunch and sell them to me? I’d be most appreciative!
Take care, look forward to hearing from you,
Len
Hello Len,
Thanks for the comment you left on my blog. All things considered, I can’t make up a bunch of those toys at a cost you would find reasonable. There’s just too much work between the material I have on hand (none of it the right size or thickness) and getting them made for you.
However, I did a bit of searching and found a source that advertises them for what I think is a reasonable price, about 2 bucks apiece. Scroll about halfway down the following link, looking for “Whirlygig.”
http://prairiewindtoys.com/folktoys.html
Thanks again, and best wishes for a fine Thanksgiving,