• Skip to primary navigation
  • Skip to main content
  • Skip to primary sidebar
  • Skip to footer

Bob Easton

Chocolate powered woodworking

  • Home
  • Grinling Gibbons Tour

Clocks

Regulator Clock

April 18, 2014 by Bob Easton Leave a Comment

Since my 47 year old mechanical school clock left home, there’s been an empty spot on the wall where eyes land several times a day, finding little but a faded outline and silence. It’s time to change that.

Jeweler's clock

Back when clocks and watches actually had mechanical things inside, watchmakers and watch repairers (often jewelers) needed an accurate timepiece from which to set and check times. “Regulators” were accurate enough, probably not quite as accurate as H4, or other chronographs used for navigation, but close.

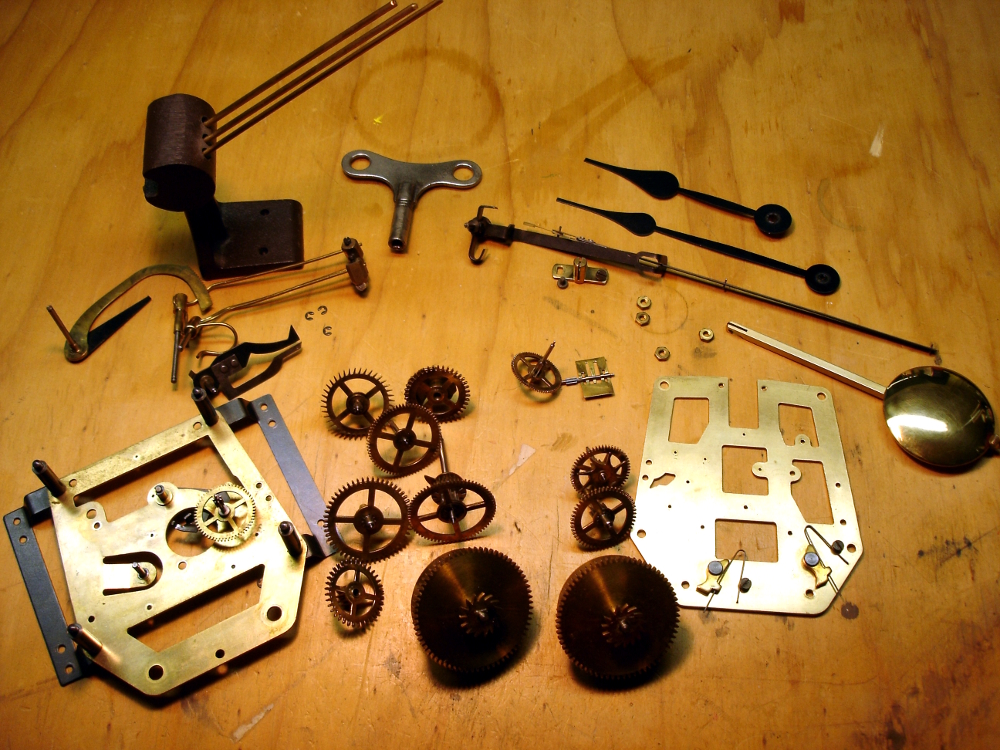
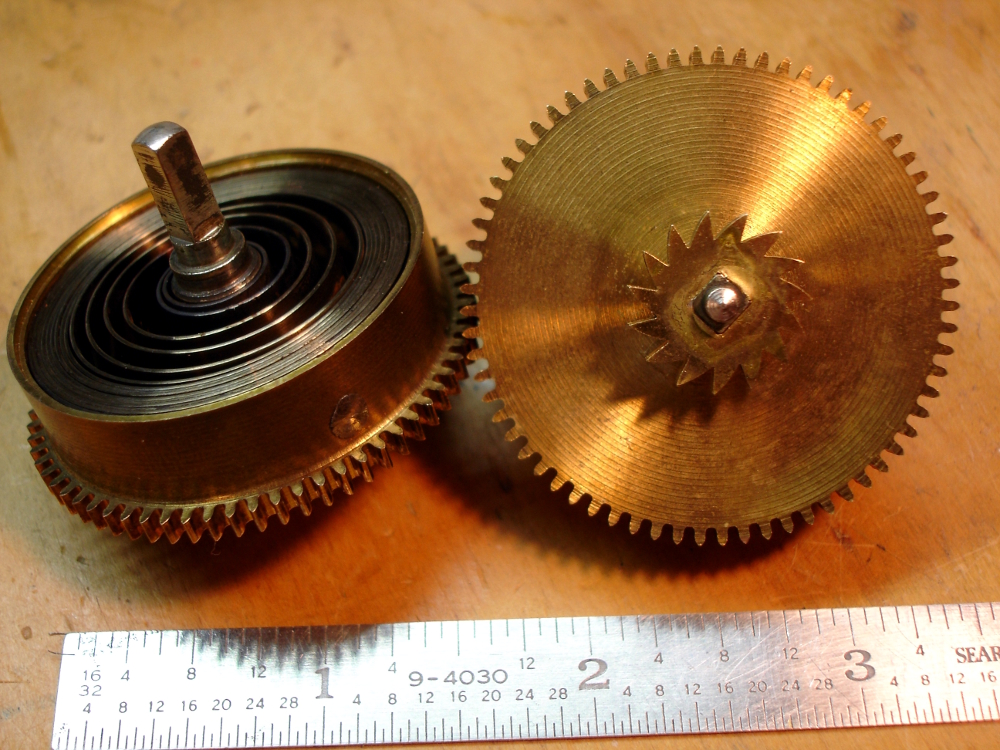
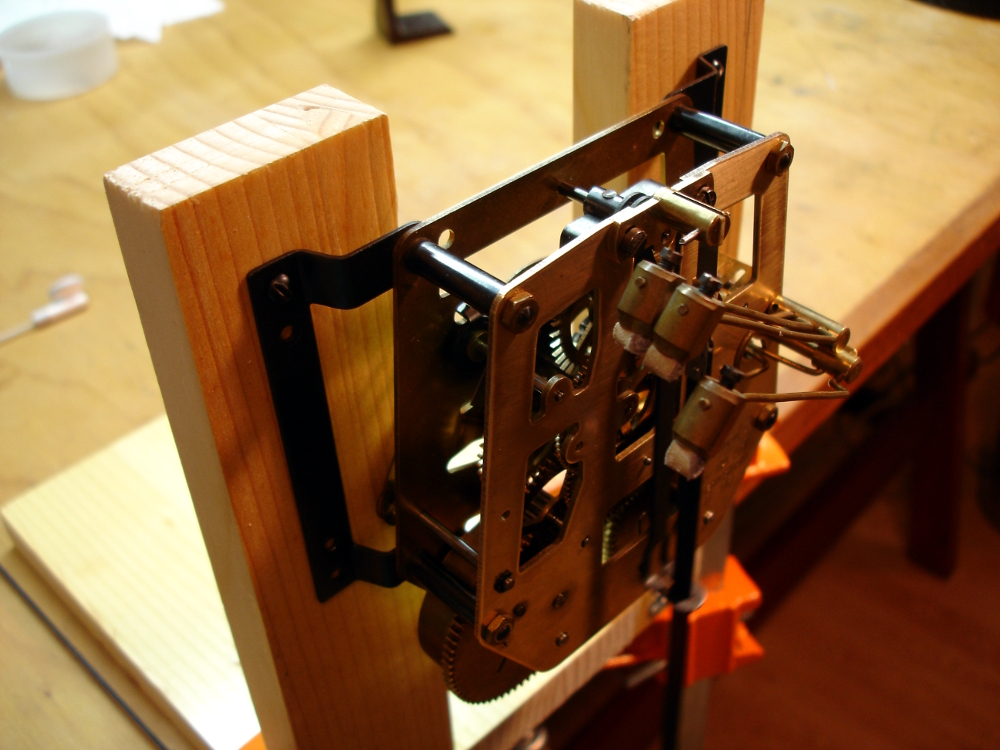
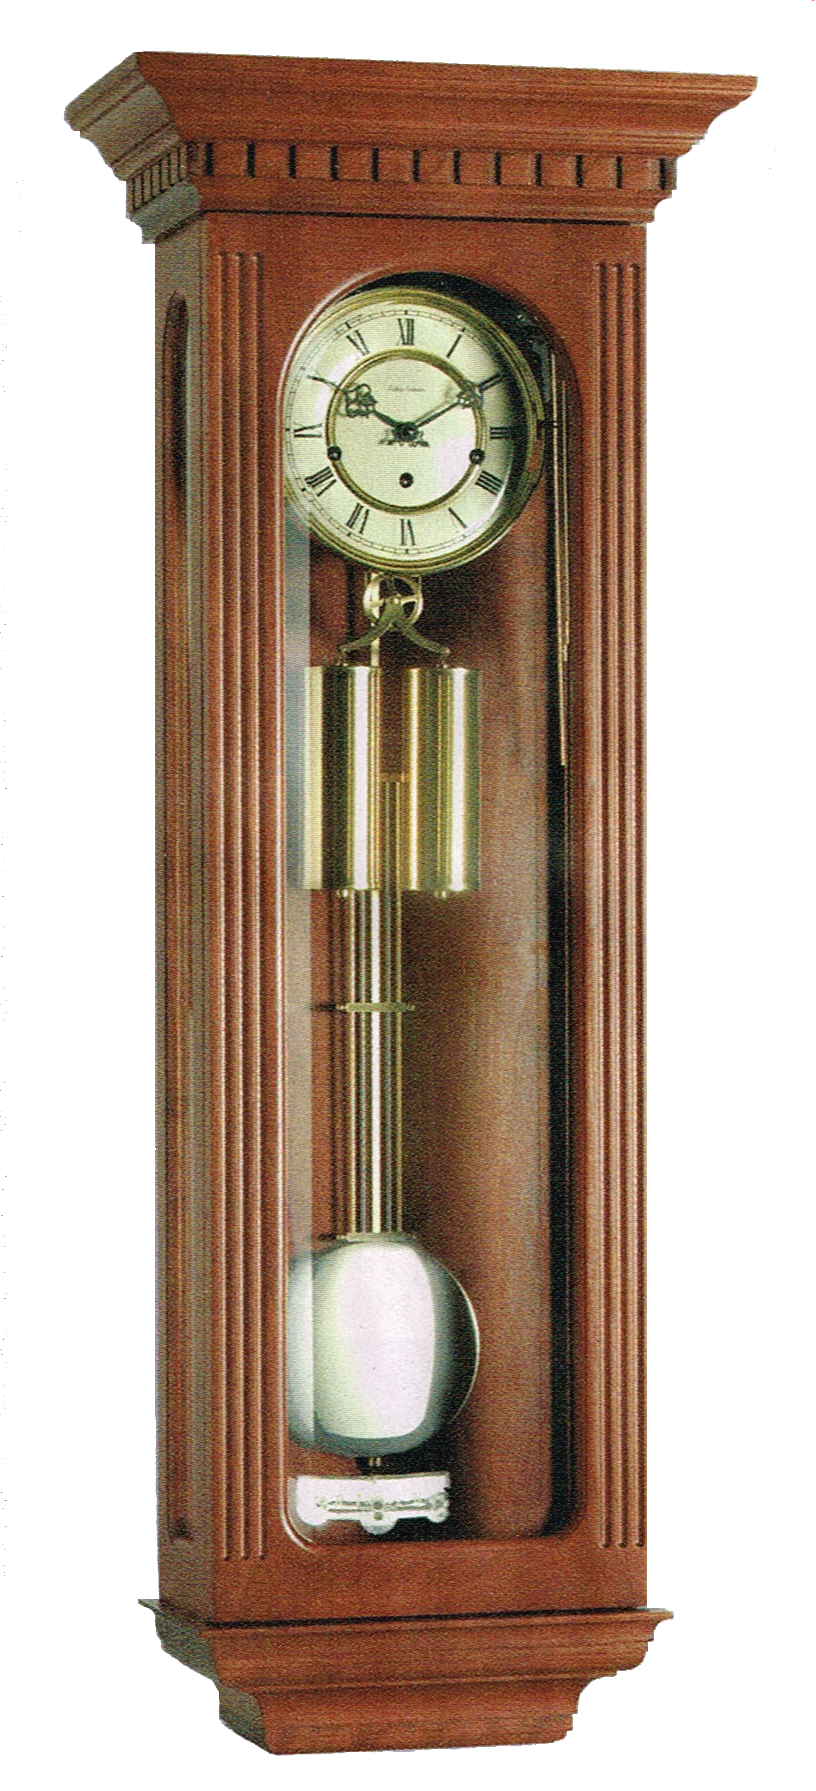
Many case styles exist for regulators. Two of my favorites are movements with longer pendulums, the Vienna Regulator and the Jeweler’s Regulator. Here we have a Jeweler’s Regulator that has been offered for many years by Klockit. I’ve admired it for as many years, keeping it on my bucket list as one of the clocks I want to build. Nope! I am NOT building a kit. Klockit offers drawings for this clock, 8 large sheets. I’m working from those drawings and using some Cherry that I bought last year. However, I will be using the mechanical movement components the clock was designed around, a Hermle regulator movement. When I built that school clock 47 years ago, mechanical movements were very plentiful and reasonably affordable. That was a decade and a half before the rise of quartz movements. The transition to quartz is now nearly complete and mechanical movements are becoming rarities. Demand has fallen, resulting naturally in fewer choices and dramatically higher prices.  So, I caught this one during a 20% discount sale before its cost escalated yet more.

Rarely do I build from plans. In this case, I’ll stick close to the plan but will make some alterations, specifically to allow some carving. At the moment, I’m thinking the biggest change will be replacing the dentil molding in the crown with egg and dart. Maybe more…

In any case, we now see the reason I jumped on that set of hollows and rounds a while back. They were bought for clock moldings. Learning curves ahead…

Other articles in this series…

  • Regulator Clock – Done
  • Regulator Clock – Woodworking completed
  • Regulator Clock – Scratching the frames
  • Regulator Clock – Door Hinged
  • Regulator Clock – Case Dry Fitted
  • Regulator Clock – Jelly Side Down
  • Regulator Clock – Case Frames – 2
  • Regulator Clock – Glass – 2
  • Regulator Clock – Case Frames – 1
  • Regulator Clock – The Works work
  • Regulator Clock – Glass
  • Regulator Clock – Tongue & Groove planes
  • Regulator Clock – Completed Mouldings
  • Regulator Clock – Stick Mouldings
  • Regulator Clock – Plate Mouldings
  • Regulator Clock – Egg and Dart Moulding
  • Regulator Clock – Eat Dessert First
  • Regulator Clock – original description
  • Regulator Clock – Stock Prep
  • Regulator Clock – Plans for Moldings
  • Taming the Rabbet

Filed Under: Clocks, Woodcarving, Woodworking

A Clock is Running Again

October 28, 2009 by Bob Easton 6 Comments

clockThis lull between boat building projects is a good time to complete a project that was set aside a few years ago. Back when the Emperor Clock Company had a very wide range of offerings (1968), I put together a School Clock from their supplies. The case is a design from Albert Neely Hall who produced a great many “Craft Patterns” in the first half of the twentieth century. I built the case from Cherry and installed a mechanical, spring driven movement. The movement is a pendulum regulated 8 day clock. It chimes out “bim-bam” counts on the hour, and a single “bim-bam” on the half hour.

The clock ran for 37 years with virtually no attention, other than winding once a week. Once a year I would stop the clock for an hour for the fall change from Daylight Savings Time to normal time. The change in 2005 didn’t work out so well. Restarting the clock left it running for no more than a couple of minutes. Well, that’s no surprise. 37 years of no maintenance probably means dried out oil and various other bits of accumulated tarnish.

Many horological specialists recommend simply replacing a movement of this age. That’s because the replacement costs less than the (professional) labor needed to clean or repair an old movement. Being neither a horological specialist nor a professional clock restorer, and also discovering that the original manufacturer, Jauch, no longer exists, I decided to ignore that advice and clean and restore it myself.

clock disassembledThat was back in 2005.  I got as far as removing the movement, making some drawings and photos of it, tearing it down to pieces, and then setting it aside until … Did you know that a circlip, an unladen European circlip, can travel up to 20 feet unassisted? …  until I found the time to learn enough about what to do next.  Most of my learning is thanks to The National Association of Clock and Watch Collectors which has an excellent collection of information and some very helpful forums.

The movement was actually in quite good shape. None of the pivots had excessive wear and there were no other major problems. Cleaning was mostly a matter of ultrasonic cleansing to remove grime and polishing of pivot and bearing points.

mainspringsThe big challenge, other than flying circlips, was cleaning the drive springs. They are cased in barrels and I was advised to be very careful removing them from the barrels. Stories of springs bounding out of control and slashing through various body parts convinced me to heed the advice. The proper tool for the job is a winder. Commercial versions are available for a mere $200 (plus sleeves, plus shipping, plus etc.). The more affordable answer came in the form of a homebuilt design by Joe Collins, one of the NAWCC members. So, there was a detour to to the woodworking (and metal working) shop to build an instance of Joe’s winder.

The winder cost about a tenth of the commercial version and did its job very well. I have no pictures of it in use because controlling the tension of the springs was a lot more important than taking pictures. mainspring winderBasically, the sequence is: Clamp the spring barrel in the v shaped jaws. Oh yeah, this is after removing the gear on the end of the arbor, and removing a cap from the barrel, both with their own forms of entertainment. Attach the crank shaft to the winding stem. Crank the spring up tight enough to allow a sleeve to be shoved into the barrel. Unwind the spring into the sleeve. Pull the sleeve, spring contained, out of the barrel. Capture the outside end of the spring with a hook on an arm at the side of the barrel. Tighten enough to allow the sleeve to be pulled away. Lastly, unwind the spring. You can watch Joe demonstrating the winder in a video here. The spring can then be cleaned, polished, lightly oiled and replaced into the barrel by reversing the removal process. Building the winder took quite a few hours. Using it took about 6 minutes.

movement on the test standReassembly was the simple process of putting all the parts back in their proper places (including multiple hunts for flying circlips) and adding very tiny drops of oil only to the pivot points. It’s really handy to have a test stand, making it much easier to put the movement on the stand rather than back in the case for testing. I can now take the movement off the test stand, remove the pendulum and strike levers (3 circlips), separate the plates, adjust wheel positions in the strike train, and put it all back together in about 10 minutes (excluding circlip search and rescue time). That comes from practice. The time train has the larger number of wheels, but is very straightforward. The strike train is another matter. I learned by trial and trial, and trial, that the strike train can be assembled in such ways that the hours strike but the half hours don’t, the half hours strike and the hours don’t, and clock strikes bam-bim instead of bim-bam.

The case got bit of refinishing with danish oil and, of course, the brass and glass got a good cleaning. It’s all back together now (including all circlips), hanging on the wall again, and keeping good time. It’s good to hear the familiar bim-bam once more.

Yes Heidi, your “claim tag” is still firmly attached.

Filed Under: Clocks

  • « Go to Previous Page
  • Page 1
  • Interim pages omitted …
  • Page 6
  • Page 7
  • Page 8

Primary Sidebar

Footer

Recent Posts

  • New Frame Saw / Scroll Saw
  • Lamppost Sign
  • Goodbye PayPal – Goodbye Bob’s eBooks
  • Anarchist’s Workbench is Done
  • Why we keep offcuts…

Categories

  • About
  • Artwork
  • Boatbuilding
  • Boating
  • bowl carving
  • Boxmaking
  • Clocks
  • Drawings
  • eBook
  • etude
  • Eva Too
  • Eva Won
  • Fiddlehead
  • Fiddlehead model
  • Flying
  • frame saw
  • gilding
  • green woodworking
  • Grinling Gibbons
  • Guns
  • Hand tools
  • Humor
  • kerfing plane
  • Lettercarving
  • Mill Creek 13
  • Model building
  • Power tools
  • Rant
  • resawing
  • scroll saw
  • Shopmade
  • sign painting
  • Stonework
  • Swimming
  • Technology
  • The Wall
  • treadle lathe
  • Uncategorized
  • VSD
  • Woodcarving
  • Woodturning
  • Woodworking
  • workbench

Other stuff

  • About
  • Contact
  • Privacy Policy

Copyright ©2024 · Bob Easton · All Rights Reserved