• Skip to primary navigation
  • Skip to main content
  • Skip to primary sidebar
  • Skip to footer

Bob Easton

Chocolate powered woodworking

  • Home
  • Grinling Gibbons Tour

Hand tools

Bring It a Little Closer

December 29, 2012 by Bob Easton 5 Comments

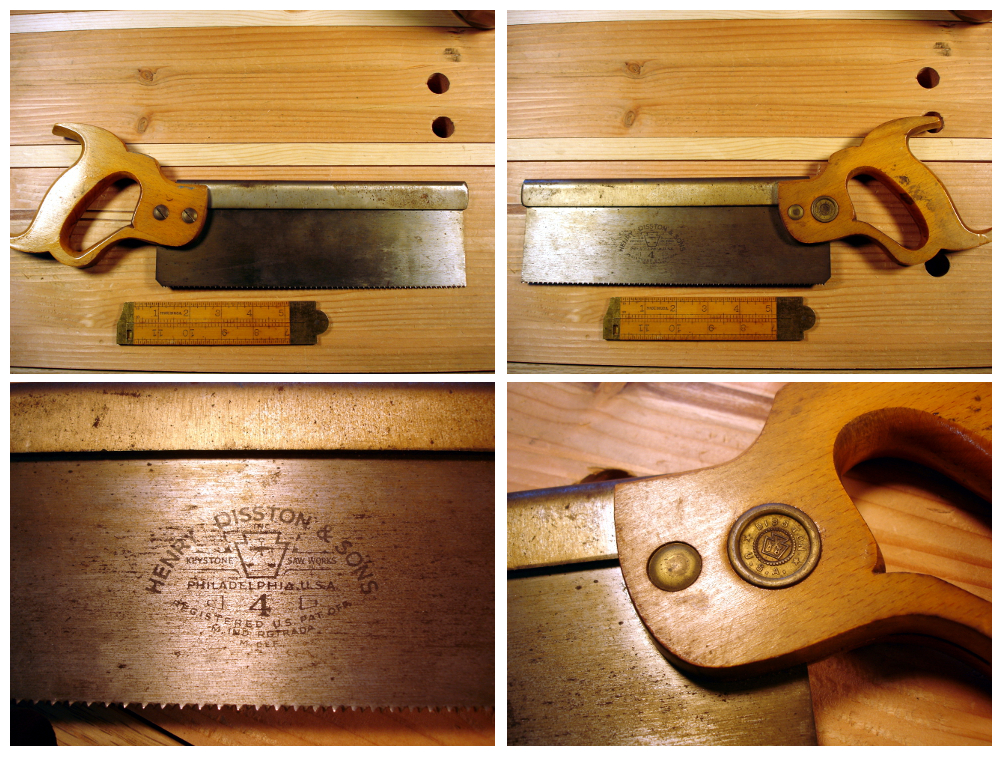
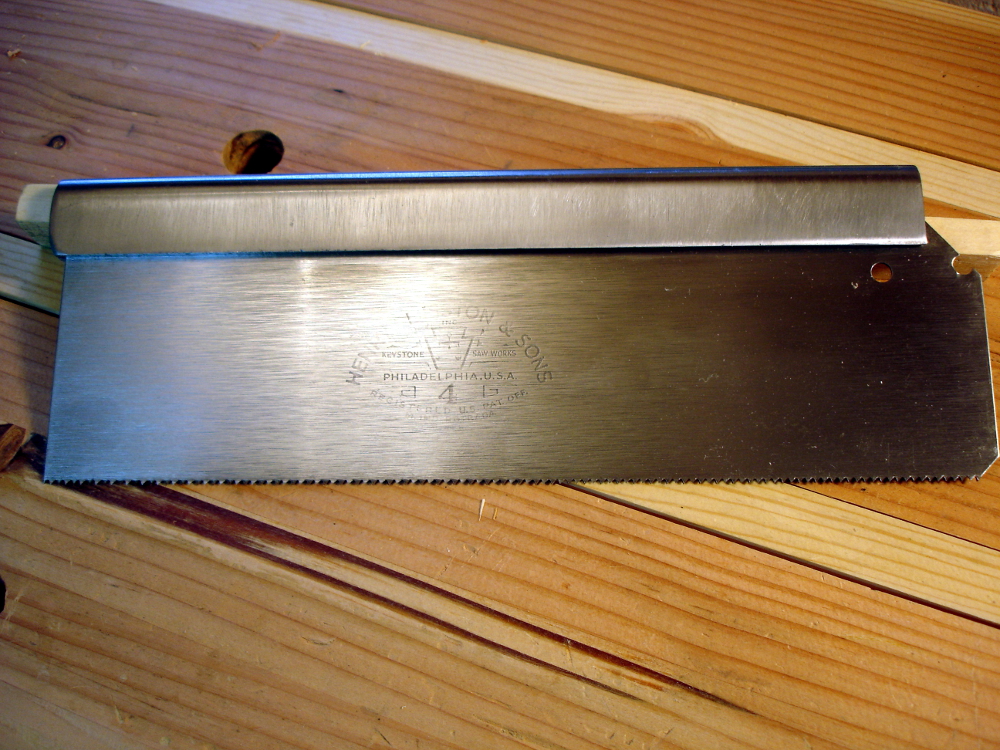
In a comment on the post about refurbishing the Disston saw, Ralph mentioned he had trouble focusing on things that small. I’m not sure whether “focus” meant a real vision problem, or interest that wanders away. If a vision problem, this might help…

photo of block and lamp
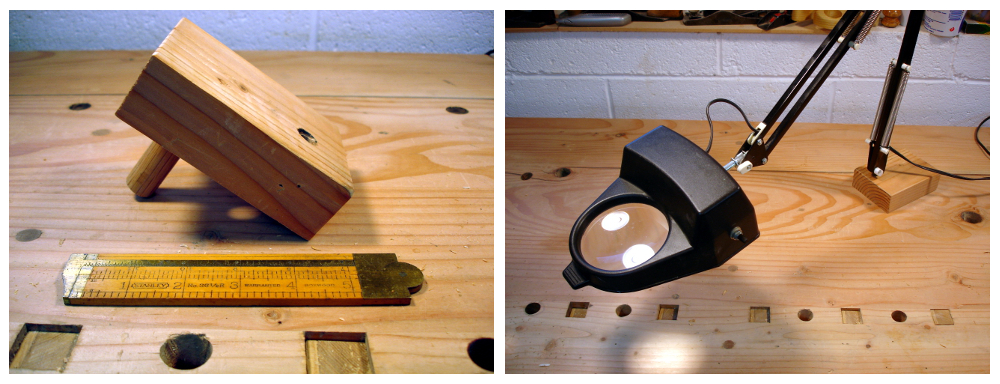
I’m shamelessly stealing the idea from Megan Fitzpatrick who recently wrote about updating her bench. She included pictures of how a ubiquitous magnifying lamp was adapted for use on the workbench. The lamp stands on a column 1/2 inch in diameter. My bench as a whole bunch of 3/4 inch holes for holdfasts. I took a block of scrap 2 by something. drilled a 1/2″ hole all the way through, flipped it over and drilled a 3/4″ hole most of the way through, and glued a 3/4″ piece of dowel in that hole. Now, I can locate that magnifying lamp almost anywhere.

Filed Under: Hand tools, Shopmade

Saw Restoration – Disston D4

December 28, 2012 by Bob Easton 4 Comments

It’s time to do something about a woefully inadequate saw collection. Other than my shopmade frame saw and shopmade turning saw, my other saws are modern disposables that probably wouldn’t be good enough for a rough carpentry contractor.

Mass production of western style handsaws started a nose dive in the middle of the last century and have brought us to cheap, colorful, plastic handled blister raisers with brittle teeth that can’t be sharpened. Yes, there are a few premium western saw makers currently making superb saws. If those are your fancy, a good Google search will find many of them for you. For myself, I like refurbishing older tools. So, it was off to eBay to find my first goal, a small back saw suitable for fine joinery.

photos of Disston Nbr 4 sawThis Disston Nbr. 4 is has a 10 inch blade, has a plate depth of 2.5 inches under the back, plate thickness of 0.031″, is filed for 12 teeth per inch rip, and has a steel back. The blocky, semi-ugly beech handle dates it to after 1940. There’s no stamping on the back (also after 1940), and the etch on the plate dates it to the post WW II era.  Disston was sold in 1956, placing that as the most recent date possible for this saw. This saw had a very easy life. It was barely used and apparently kept in a comfortable place. The handle seems to have original factory finish, with no chips or other damage, not even significant scratches, but some runs. There’s a little bit of donor paint and other stains. The blade has minor rust, a bit of pitting, and “patina.” The teeth are still relatively sharp. The tooth line has an ever so slight bow. The spine has no visible bowing. Before I did anything with it, I tried a few test cuts and found it maybe 20% slower than the spectacular yellow and black Stanley utility saw.

photo of clenaed up bladeSince it is neither rare nor collectable, and screams won’t be heard if I don’t leave it “pristine,” I intend to refurbish it in the manner pursued by Andy “Brit.” That means a very shiny plate. After disassembling, the first stop was in an Evapo-Rust bath. This is the very first “eco friendly” clean-up product that actually has the strength to do what it advertises. Mild rust was gone quickly. Then it’s off to the polishing. I used garnet paper starting at about 250 grit, then wet-n-dry to 600, followed by Abralon sanding pads to 4000. The purists will be upset with losing part of the etch, but it’s a “user” not a collector’s item. That slight bow was removed by clamping the saw in my really simple “saw vise” just above the tooth line and then tapping along the spine with moderate hammer blows buffered by an oak block.

photo of handle restylingThe handle is actually beyond semi-ugly. It is downright ugly and uncomfortable too. It wants some serious reshaping. Any self-respecting saw handle would like to look the part, and I wanted to soften some hard lines, and have a finish that did not includes the runs and curtains of the original poor manufacture. Search around and you’ll see that classic handles had a nib on the top, a lamb’s tongue on the bottom, and curves that actually flowed nicely. Out came my marker, turning saw, a few gouges and a couple of rasps. Reshaping it was so much fun that I lost track of time, maybe and hour or two. Finish is three coats of shellac followed by paste wax applied with steel wool. Satin s-m-o-o-o-o-o-o-t-h! The brass finished up relatively quickly with the Abralon pads followed by rottenstone in wax and buffing.

photos of completed sawLastly, comes sharpening. I’m constantly amazed at how many people think saw sharpening some mysterious art. I see it as a fundamental skill for anyone working with hand tools. Why send something out to be sharpened? Why bear the expense and delay. (Some of those premium saw makers offer sharpening services, but have backlogs measured in weeks and months.) Learning to sharpen a saw is something that can be accomplished in only a couple of hours and is a lifetime skill that improves whenever you use it. Once you know how, you can sharpen a saw in less time than it takes to stand in line at the post office. Learn here, or if you’re a member of Paul Seller’s Woodworking Masterclasses online school, learn here. Also, be aware that rip filings do cross cutting surprisingly well, so you can do a lot with the simplest filing technique. I used Seller’s advice and filed the first dozen teeth at the toe of this saw with 10-12 degrees of rake. The next dozen teeth were filed at 5-8 degrees of rake, and all the rest at zero degrees of rake. The idea is to use the toe for easy starting and to have aggressive rake for the remainder of the blade. Time: about 20 minutes. The saw arrived with quite a lot of set. Some disappeared in the filing, but a noticeable amount remained. Test cuts now make this saw about 20% faster than the spectacular yellow and black Stanley utility saw. It cuts rip very smoothly and cross cut slightly less smoothly, but acceptably fast. It’s faster in hardwood than in softwood, indicating I need just a little more set. … tomorrow’s improvement.

All done, I’ve sharpened some skills, saved an old saw from a trip to the land fill, gained what I consider a premium saw, and did it for about 1/10th the cost of a new premium saw.

Just wait til you see the next one…

Filed Under: Hand tools

Hollows and Rounds – All Chalked

March 11, 2012 by Bob Easton Leave a Comment

photo of 25 planesSince the previous entry about these planes, a stack of dull irons sat next to the sharpening station. From time to time, in between other activities, I’d pick up an iron, hone it, mount it and test it. Upon testing OK, the number stamp on the end of the plane was filled with chalk, indicating it’s ready to use. They’re all finally honed and chalked.  Big THANKS to Richard Darjes, a commenter on the original H&R post, for the chalking tip. (click image for a larger view)


Filed Under: Hand tools, Woodworking

  • « Go to Previous Page
  • Page 1
  • Interim pages omitted …
  • Page 3
  • Page 4
  • Page 5
  • Page 6
  • Page 7
  • Interim pages omitted …
  • Page 15
  • Go to Next Page »

Primary Sidebar

Footer

Recent Posts

  • New Frame Saw / Scroll Saw
  • Lamppost Sign
  • Goodbye PayPal – Goodbye Bob’s eBooks
  • Anarchist’s Workbench is Done
  • Why we keep offcuts…

Categories

  • About
  • Artwork
  • Boatbuilding
  • Boating
  • bowl carving
  • Boxmaking
  • Clocks
  • Drawings
  • eBook
  • etude
  • Eva Too
  • Eva Won
  • Fiddlehead
  • Fiddlehead model
  • Flying
  • frame saw
  • gilding
  • green woodworking
  • Grinling Gibbons
  • Guns
  • Hand tools
  • Humor
  • kerfing plane
  • Lettercarving
  • Mill Creek 13
  • Model building
  • Power tools
  • Rant
  • resawing
  • scroll saw
  • Shopmade
  • sign painting
  • Stonework
  • Swimming
  • Technology
  • The Wall
  • treadle lathe
  • Uncategorized
  • VSD
  • Woodcarving
  • Woodturning
  • Woodworking
  • workbench

Other stuff

  • About
  • Contact
  • Privacy Policy

Copyright ©2024 · Bob Easton · All Rights Reserved