• Skip to primary navigation
  • Skip to main content
  • Skip to primary sidebar
  • Skip to footer

Bob Easton

Chocolate powered woodworking

  • Home
  • Grinling Gibbons Tour

Shopmade

Treadle Lathe – Makin’ Parts

February 25, 2010 by Bob Easton 3 Comments

Overnight temperatures in the workshop are slowly rising toward the minimum needed for epoxy work (for boat building). Spring might be coming. Song birds are returning their joy to the neighborhood. Boy are those babies getting a surprise today. We have 12-18 inches of crystalline global warming falling from the skies today and tomorrow. So, work continues on the treadle lathe.

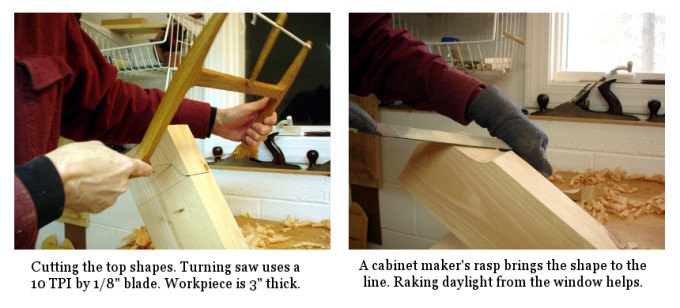
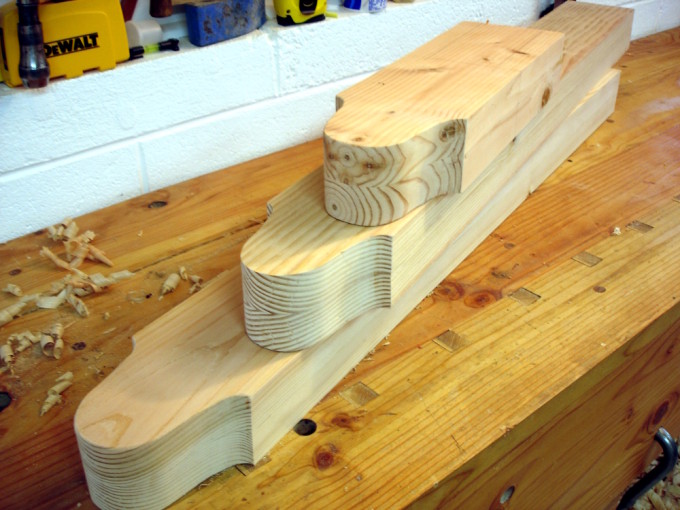
When I was making the flywheel, I doubted the ability of my trusty turning saw to do a good job with the wheel’s thick stock. I wimped out and used the bandsaw to ensure a round wheel. Wanting ogee curves on the tops of the headstock and tailstock posts, I decided to give the turning saw a try.  These posts are the same thickness as the wheel.

The only difference between these cuts and the wheel was the level of perfection needed. It turns out that the saw, using the 10 TPI 1/8″ Gramercy blade, acquitted itself quite well.

On a piece of cardboard carton (empty pasta box) I drew a curve that pleased me. I traced around that to position the pattern on both sides of all three of the parts. Sawing close to the line was not at all difficult. Yes, it was slow going but cost only a couple of Milky Way bars. A Nicholson 2nd cut cabinetmaker’s rasp was my tool of choice for completing the shaping.

Boatbuilders often use beading to dress up the plain parts of small boats, usually the thwarts. The beading shows good craftsmanship and also eases the comfort of bare legs sitting on the thwarts. Stephen Shepherd recommended beading in his lathe bench plan notes. So, I want to use beading on some of the parts.

Having never done it, I researched (of course), and determined a scratch stock is the tool of choice for such work. More research found me many ways of building a scratch stock tool. I ended up eliminating all but two, a design by Tom Casper in the October 1999 issue of American Woodworker (a bunch of them online thanks to Google Books), and a design by our beloved Village Carpenter, Kari Hultman.

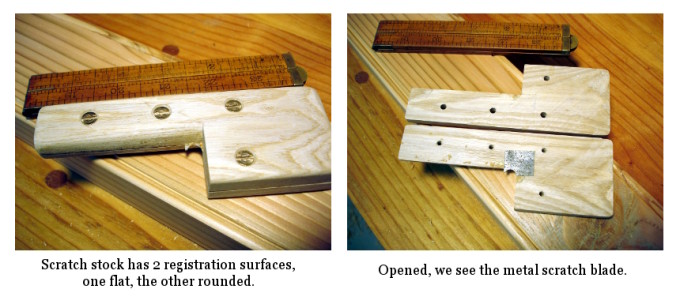
As much as I like the simplicity of Kari’s approach, I thought the design with two reference surfaces would be easier to control. I made it from a bit of Ash. The basic “L” shape was cut first.

Then, I fitted the screws, removed them, and resawed the tool into two pieces. Rounding the long fence face, and rounding over all the other edges completed the stock. The scratch blade is a bit of saw blade cut to a small square and then filed with a rattail file.

It works surprisingly well. It’s a good way to improve the appearance of this marginally acceptable lumber. Now, the real reason for beading is to strengthen the part. A piece of lumber with sharp square edges is subject to splintering as it transitions through humidity changes. Splintering leads to splitting. Splitting leads to twisting and warping. Knocking off the sharp square edge significantly lessens the potential for splintering and all the rest. Hence, strengthening the piece, while making it more attractive.
Filed Under: Shopmade, treadle lathe

Treadle Lathe – Plans and Lams

February 23, 2010 by Bob Easton 3 Comments

The last 15 years of my previous career were spent in the world’s finest commercial research laboratory. From there, I learned a method of working that leads me to do a good bit of research at the start of a project, to learn a great amount about a subject before starting the actual work. I continue that practice with my woodworking projects, often collecting many more plans and articles than one could ever use, and then building to none of them.

Plans

My first article about building a lathe touched quickly on the sources of a few plans for lathes. By “plans,” I mean publications that include measured drawings or enough detail to be useful as construction guides. Here are a few more details along with some of my opinions.

Roy Underhill’s treadle lathe article describes a lathe built from discarded lumber salvaged from the dumpster outside a university dorm. This article comes to us compliments of the Woodworking magazine blog, originally published in the October 2000 issue of Popular Woodworking magazine. Underhill’s usual humor augments the constructon details for a lathe is smaller and lighter than the one Roy often demonstrates on Woodwrights Shop TV program. It fits very well with the idea of using standard size construction lumber and has a number of features that simplify construction, such as connecting the pittman arm directly to the flywheel instead of fabricating a metal crank. While a nice feature, it requires the flywheel be cantilevered, and I wonder about the durability of such an arrangement. An appealing added feature is a lightweight scroll saw attachment. I definitely want to use this idea, but will build one a lot more robust.
All in all, this is a fine article with a very complete cut list, good instructions, and a bit of Roy’s humor. It strikes me as a fine “starter” treadle lathe.

Steve Schmeck keeps a website covering a variety of topics, many of them environmentalist in nature. His lathe plans have been available for several years. Steve’s lathe is quite a bit like the pictures published in the first of these lathe articles, substantial in size, but still manageable for transport in his van. It lacks the diagonal braces shown on some designs. An added feature of Steve’s lathe is an optional tension adjuster that alleviates the chore of resewing a stretched drive belt. Like all of the lathes I considered, construction is from construction grade lumber with hardwood mixed in where you think appropriate.
You bike riders might want to check out Steve’s homebuilt “Woody” recumbent bike. Yep, a wooden bike.

Mike Adam’s lathe is somewhat similar in size and construction to Steve Schmeck’s. He does the various bearings and the crank a bit differently, housing bearings in hardwood inserts. His foot pedal is a full width frame, not just a single board as in the previous designs. Being a bit klutzy, this wider pedal holds appeal for me. Mike’s spoked wheel looks great, but he admits it was too difficult to construct and needed additional balancing once done. That’s why I decide on a solid wheel. While updating this article, I find that Mike’s web presence has sadly disappeared.

Update (Oct, 2022): Stephen Shepherd’s website has disappeared from the interwebs. A couple of years ago, I heard he was having health problems. I certainly wish him well and will leave his link here in case he gets back on the air.

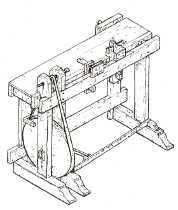
Followers of Stephen Shepard’s Full Chisel blog will recognize Stephen as a restoration specialist and expert artisan for nineteenth century woodworking (from the turn of the century until “the unpleasantness between the states”). Stephen’s plans are available from his own online store. True to form, Stephen’s plans are excellent, drawn from an 1805 exemplar. They are very complete, comprising eight 11″ by 17″ plates and 4 pages of commentary. This lathe is distinctly different from the others, being a combination lathe and workbench. The wheel is more forward, pivoting from within the headstock uprights instead of from diagonal braces further back as in all the other designs. A bench surface extends rearward for 12 inches beyond the spindle centerline and is the full width of the lathe. A small vise attaches to the back edge of the bench. It is a clever design for those pressed for space. Also interesting are the several purpose built, hand wrought, chucks. They appeal, but will require finding a blacksmith.

Lastly, I referred to web material by Howard Ruttan. His is, alas, not a set of plans, but a comprehensive FAQ with yet more links to research.

Lams

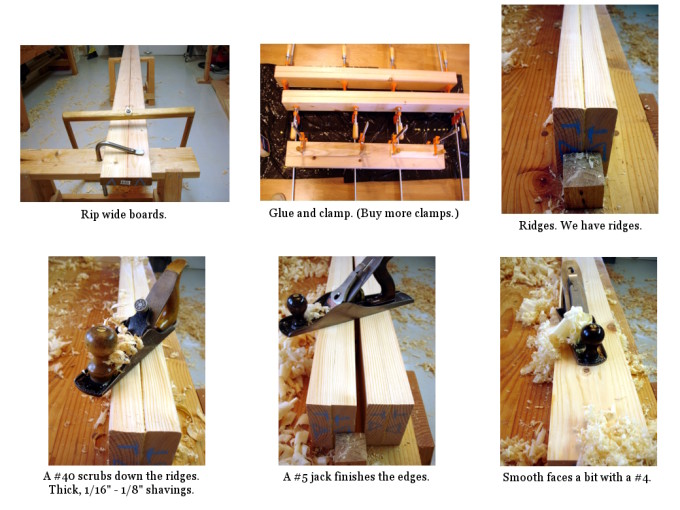
Many of the lathe components need to be thicker than typical construction lumber. Thus, we laminate. My nearby home center stocks the usual number 2 lumber that’s useful for framing. Like most of this stuff, the narrower pieces are the worst available, often being milled from trees barely large enough to contain a single 2×4. I buy much wider boards and rip them to the widths I want. One good feature of most of their lumber is that it is reasonably dry and does not need a lot of acclimation.

The lamination process is simple. It consists of these steps:

  • Plane the intended faying surface enough to ensure a good join. This is most useful to remove cupping; planing only the faces that will join each other. The jointer plane is your friend here.
  • Rip.
  • Glue and clamp (currently using yellow carpenters glue). When laminating, ensure stability by having the outer edges of the board, the edges toward the bark, face each other. The end grain should look like this: )))(((
  • Plane off the crowned edges (if any), using first a scrub (#40) and then a jack (#5).
  • Remove most of the surface uglies with a smoother (#4).

Effort and energy cost: about one Snickers bar per 10 foot lamination.

Filed Under: Shopmade, treadle lathe

Treadle Lathe – the Wheel

February 19, 2010 by Bob Easton 4 Comments

The one point of agreement in the many plans I’ve collected is having a flywheel of 24 inch diameter.

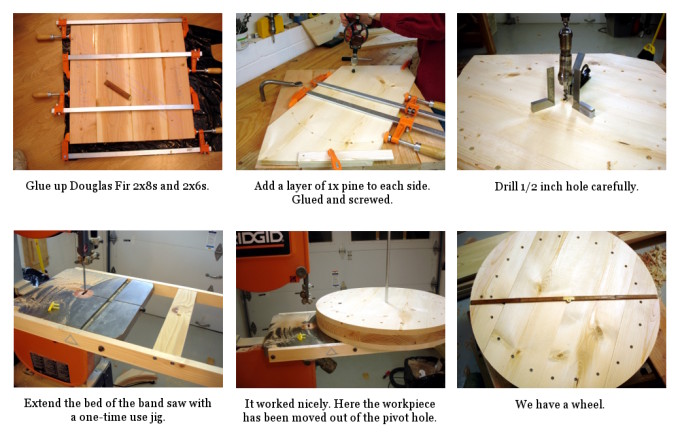
Construction varies with the different plans, some with interesting spokes and rims, some solid. I chose solid: easy. I like easy. It wants to be a substantial wheel, the heavier the better. Two layers of 2-by lumber would do it. However, that would leave a seam in the middle of the wheel. What if I decide to drive it with a cord rather than a flat belt. Wouldn’t that seam invite trouble as a gutter is routed for the cord? To avoid that eventuality, I used 2-by material for a middle layer, and then attached 1-by material on either side. Yellow carpenter’s glue and a bunch of countersunk screws bring the layers together, each offset by 60 degrees.

Now, let’s make it round. I really really really like doing as much as possible with hand tools. I have a great turning saw that uses Gramercy blades. However, this wheel presents 3 problems. First, the coarsest Gramercy blade is 10 TPI and 1/8 inch wide. That seems a bit skimpy for this cut. I would prefer 6-8 TPI and 1/4 inch wide, a size not available. Second, a wheel really needs to be round with a nicely perpendicular edge, something I imagined hard to achieve by hand. Third, I don’t have enough Snickers bars on hand to power that much sawing.

So, it’s time to dust off the band saw … and extend its table. It didn’t take much to knock together a one-time use table extension that has a pivot hole 12 inches from the blade. It took longer to find the screws than to make the extension. The table on this Rigid saw has holes tapped for 6mm by 16 screws. How many of you can find 4 of those in your loose parts collection? I did. 🙂

There it is, a simple wheel. It weighs 24 pounds. I don’t know if that is heavy enough.

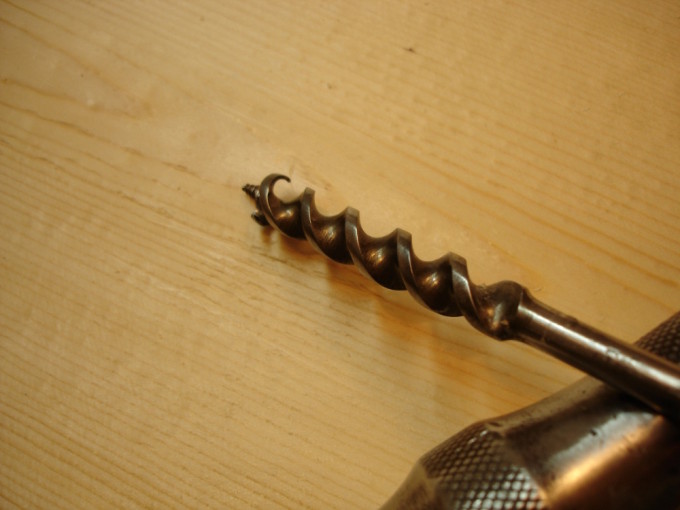
Oh, before I quit, let me show you one very sweet hand drill bit. I learned from my fellow galoots over at the Saw Mill Creek forums that it might be a Cook (US patent) or Gedge (UK patent) pattern. Most of the hand drill bits we see these days are either Russel Jennings or Irwins, with spurs pointing toward the tip. This bit has the spurs turned back toward the shank. It makes a very easy entry, and better yet makes a very clean exit. There’s no tearout at the exit; no need to stop before exiting and drill back from the other side. It seems that Ransom Cook patented this pattern a few weeks before Jennings, but maybe didn’t have as good a marketing department. The Jennings bits prevailed.

Chasing another of the patent references made by Jeff in the forums, I see a patent by James Swan, some 20 years after Cook’s. Swan’s improvment was to extend the cutting edge from out at the curl all the way into the screw. My bit is indeed a Swan. This one came to me as one of a handful of odd bits that Patrick Leach threw in the box when I bought the Stanley brace. It’s the only one of that pattern I have. After using it, I’m wanting more.

Filed Under: Shopmade, treadle lathe

  • « Go to Previous Page
  • Page 1
  • Interim pages omitted …
  • Page 16
  • Page 17
  • Page 18
  • Page 19
  • Page 20
  • Interim pages omitted …
  • Page 22
  • Go to Next Page »

Primary Sidebar

Footer

Recent Posts

  • New Frame Saw / Scroll Saw
  • Lamppost Sign
  • Goodbye PayPal – Goodbye Bob’s eBooks
  • Anarchist’s Workbench is Done
  • Why we keep offcuts…

Categories

  • About
  • Artwork
  • Boatbuilding
  • Boating
  • bowl carving
  • Boxmaking
  • Clocks
  • Drawings
  • eBook
  • etude
  • Eva Too
  • Eva Won
  • Fiddlehead
  • Fiddlehead model
  • Flying
  • frame saw
  • gilding
  • green woodworking
  • Grinling Gibbons
  • Guns
  • Hand tools
  • Humor
  • kerfing plane
  • Lettercarving
  • Mill Creek 13
  • Model building
  • Power tools
  • Rant
  • resawing
  • scroll saw
  • Shopmade
  • sign painting
  • Stonework
  • Swimming
  • Technology
  • The Wall
  • treadle lathe
  • Uncategorized
  • VSD
  • Woodcarving
  • Woodturning
  • Woodworking
  • workbench

Other stuff

  • About
  • Contact
  • Privacy Policy

Copyright ©2024 · Bob Easton · All Rights Reserved