• Skip to primary navigation
  • Skip to main content
  • Skip to primary sidebar
  • Skip to footer

Bob Easton

Chocolate powered woodworking

  • Home
  • Grinling Gibbons Tour

Holiday Interlude

January 12, 2009 by Bob Easton Leave a Comment

madrid

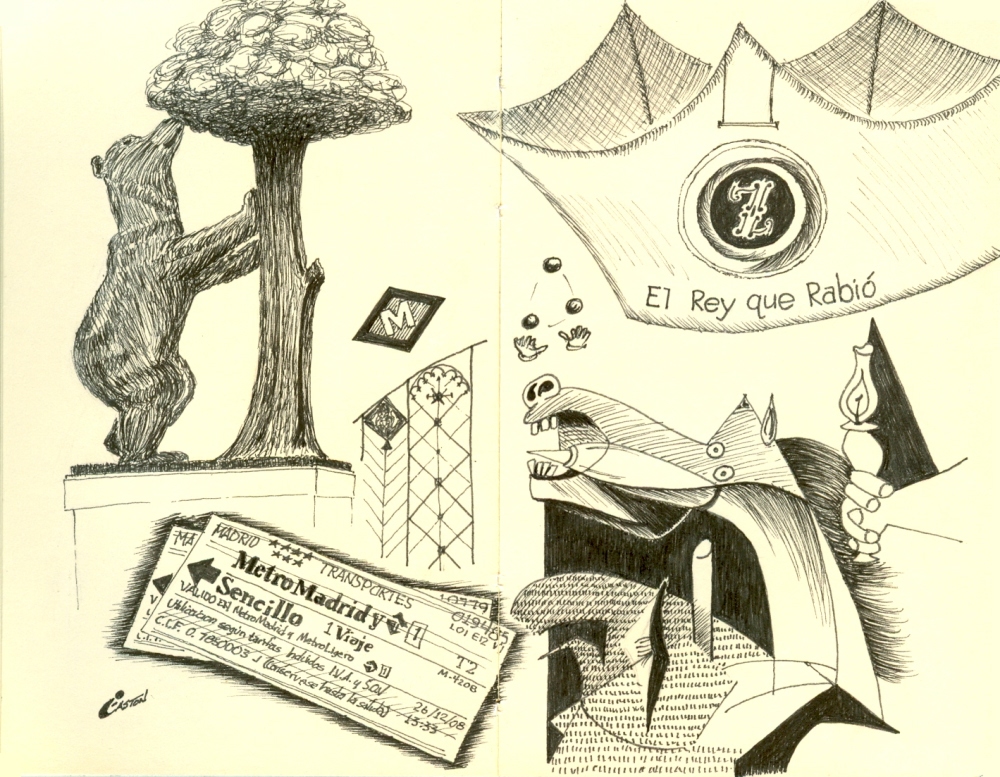
We traveled a bit. This is one of the points along the way. People familiar with Madrid will recognize most of the objects in the drawing. The crown might lead some to learn about Zarzuela, a form of operetta unique to Madrid. “The King Who was Rabid” is a delightful comedy, supplemented by a dancing chorus that is highly skilled in acrobatics, tumbling, trapeze artistry, and juggling, as well as the usual singing and dancing.

Moleskine pocket notebook – 7 by 5 1/2 inches

Micron pens (005 to 2)

Click on the image to show a larger version.

Filed Under: Artwork, Drawings

Resawing Boat Lumber – Fleam, Rake, and Set

December 18, 2008 by Bob Easton 3 Comments

resaw results

There’s been a lot more sawing since the last post, and a lot more learned about saw tooth shapes.

The first board resawn is four and a half feet long and will be used for decks. I tried three different saw blades while cutting this piece. I started with the blade shown in the previous two posts, the frame saw blade from Frog Tool Co. It worked well, but not as fast as I expected. I picked up that old Disston hand saw and used it for about six inches, and found it to be significantly faster. It was a bit harder to keep on the straight and narrow. Next, I whacked off a length of 4 TPI bandsaw blade and tried it. It cut pretty fast but was virtually uncontrollable, wandering wildly away from the line no matter how kindly I spoke to it. I abandoned it quickly and finished the job with the hand saw.

The photo on the right shows the sawn surface. Imagine the black line as the cutting edge of the saw blade. and the arrow as direction of movement. We’re looking at the board lying flat with a raking light shining across it. Those neat furrows on the right side were left by the Frog Tool blade. This is the first time I’ve seen anything like that surface. The smoother surface on the left is from the handsaw. Size reference: the board is 8 1/4 inches wide and 1/2 inch thick.

saw teeth patterns“What big teeth you have, Grandma.” It’s all in the teeth.

The “Fast cutting rip and cross-cut” blade from Frog Tool co. is actually a cross-cut blade. Note the drawing for cross-cut teeth. Each tooth has angles filed into the leading and trailing edges, making it behave like a chisel. These angles are called fleam. The leading edge of the teeth lean back from vertical about 15 degrees. This is the rake angle and is typical for cross-cut saws. Steeper is more aggressive; shallower is less aggressive.

The Frog Tool blade is filed cross-cut. That is, it has fleam. However the rake angle is quite a bit relaxed and is the same on both sides ot the tooth. This rake gives the blade the very interesting capability of being able to cut equally well in either direction. I’m guessing that the less aggressive rake is what yields those furrows, by letting teeth slip and slide more easily over the softer and harder parts of the wood’s grain.  Having fleam is what makes it slower than the Disston hand saw.

Now, let’s look at rip filed teeth. They have no fleam. Instead they have a flat edge that tears rather than slices. That works well when cutting along the grain. The typical rip has a rake of 8 degrees, quite a bit more aggressive than the typical cross-cut tooth.

Lastly, we should understand set. Set is the angle a tooth’s tip is canted to one side or the other. Set alternates down the blade, one tooth left, the next right. It’s purpose is to widen the kerf the saw produces, to keep the blade from binding, and to ease waste extraction. Set isn’t a huge factor if there’s the right amount of it. Too little, the blade binds. Too much, the blade wanders. Imbalanced, the blade goes off line to one side or the other. Set was not a factor in the performance of any of the blades I tried.

Resawing is actually a ripping operation, so there’s little surprise that a saw optimized for ripping cuts faster. My next steps are to follow Harry Strasil’s advice and convert that old Disston rip saw into a frame saw. It is a 1900 era handsaw with 5 TPI. The blade saw a lot of pitting once upon a time but was refurbished. It’s been sharpened enough times to leave teeth a variety of sizes. It arrived here surprisingly sharp, but can be better. Cut down and cast into the frame it can do this resawing job and still be used for most ripping tasks.

I’m part way through reshaping and sharpening, following Pete Taran’s very well written guide at Vintage Saws. As an aside, Pete Taran is almost single handedly responsible for a revival in crafting high quality western hand saws.

Filed Under: frame saw, Hand tools, resawing, Woodworking

Resawing Boat Lumber

December 15, 2008 by Bob Easton Leave a Comment

harry-strasil-avatar
Harry’s self portrait

My question about resawing very long lumber was answered some time ago on the Sawmill Creek Forums with a very fine suggestion by Harry Strasil. He offered good suggestions about using a saw table and stool for holding the work, and described very precisely how to build a frame saw tuned for the job . One of his other entries has a couple of pictures of using such saws and benches.

As shown in my previous entry, I built a frame saw somewhat similar to what Harry described. I varied from his suggestion by using a purchased blade instead of cutting down an old rip saw.  As an aside, I recently acquired an old Disston D-8 rip saw from fleabay. The blade had undergone enough pitting that the engraving has almost completely disappeared, so I can’t date it from the engraving. At some point there was a chemical restoration that stopped the rusting and left the blade in pretty good shape. The saw nut with the Disston medallion dates between 1896 and 1917. That saw cuts so well that I decided to keep it for ripping rather than cut it down as Harry suggested.

center marking tool center marking gauge

Along the way, I took a short diversion to make a marking gauge. The usual marking gauge is used to mark a prescribed distance from an edge. For this work, the task is to mark the center line along the board’s edges. The tool doesn’t need to be very refined. Rough sawn cedar flitches are far from smooth, so anything that will rumble along those rough surfaces is fine. It’s a simple self-centering gauge made of two pieces of birch dowel, a scrap of oak, and a bit of six penny nail. It would work okay as a simple rectangular slug, but I like a little more shape, and this shape actually makes it easy to cant the gauge to hug the lumber. The shape is inspired by DaVinci.

Hint for anyone making one of these: If you use an aggressive auger (in a brace) to bore the holes for the pins, it is a very good thing to bore those holes in the oak stock before cutting it to length or making any decorative shapes. Don’t ask how I know.

resaw bench

The bigger puzzle was how to hold the workpiece. I have a pair of great saw benches that are exactly the right height. One of them now has a simple modification, two vertical rails added between an end stretcher and the top of the bench. They are mortised into the bottom of the bench top and screw attached to the stretcher. The space between them is about 1 and 1/2 inches. The space from stretcher to bench top is 10 and 1/2 inches. Most any board I want to resaw can be stood on edge within that space. Then, wedges are used to center the board vertically and to push it up against the bench top. The fit snugs up nicely enough to not need any other clamps.  This ended up being a very simple solution which seems to work well. I haven’t yet discovered the saw blade’s optimum attack angle, but will soon. The ergonomics feel right with the saw just wide enough to be evenly guided by knobby knee bones.

resaw with bob

The test piece shown in the first pictures is about four feet long. When I get to resawing a sixteen foot piece, I was expecting that I would need another pair of vertical rails installed on the second saw bench. Not needed. A quick set up finds that a simple pair of wedges on that other bench will be enough. Time to find some good music and get to sawing.
resaw 16 footer

Filed Under: Boatbuilding, Hand tools, Woodworking

  • « Go to Previous Page
  • Page 1
  • Interim pages omitted …
  • Page 98
  • Page 99
  • Page 100
  • Page 101
  • Page 102
  • Interim pages omitted …
  • Page 128
  • Go to Next Page »

Primary Sidebar

Footer

Recent Posts

  • New Frame Saw / Scroll Saw
  • Lamppost Sign
  • Goodbye PayPal – Goodbye Bob’s eBooks
  • Anarchist’s Workbench is Done
  • Why we keep offcuts…

Categories

  • About
  • Artwork
  • Boatbuilding
  • Boating
  • bowl carving
  • Boxmaking
  • Clocks
  • Drawings
  • eBook
  • etude
  • Eva Too
  • Eva Won
  • Fiddlehead
  • Fiddlehead model
  • Flying
  • frame saw
  • gilding
  • green woodworking
  • Grinling Gibbons
  • Guns
  • Hand tools
  • Humor
  • kerfing plane
  • Lettercarving
  • Mill Creek 13
  • Model building
  • Power tools
  • Rant
  • resawing
  • scroll saw
  • Shopmade
  • sign painting
  • Stonework
  • Swimming
  • Technology
  • The Wall
  • treadle lathe
  • Uncategorized
  • VSD
  • Woodcarving
  • Woodturning
  • Woodworking
  • workbench

Other stuff

  • About
  • Contact
  • Privacy Policy

Copyright ©2024 · Bob Easton · All Rights Reserved