• Skip to primary navigation
  • Skip to main content
  • Skip to primary sidebar
  • Skip to footer

Bob Easton

Chocolate powered woodworking

  • Home
  • Grinling Gibbons Tour

Eva Too – Small Stuff

May 4, 2010 by Bob Easton 2 Comments

Or, maybe we could call this post “Waiting for epoxy to cure, episode 496.”

Let’s prep the rub rails while that last coat of epoxy is curing. They’re easy. These will go on the outside of the hull just below the edge of the deck, and are intended to take the abuse of banging into docks, other boats, and such. They’re skimpy little things 1/4 inch by 3/4 inch, ash, scarfed lengthwise to a bit longer than needed. … and still longer than my wonderfully long, but still too short, bench. Preparation of these parts includes three operations. three photos of fabricating the rub railsI taper the height of the rail for about 18 inches toward each end. Shortening the height by about 1/8 inch at the ends, shaved from the bottom edge, subtly accentuates the curve of the sheer.
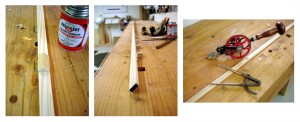
Next, the edges are chamfered. One could use a dedicated chamfer plane for this, but I decided to use the money for 438 Milky Way bars instead. My method of chamfering these long pieces uses a collection of little 45 degree blocks, adhered with my favorite temporary adhesive, and propped up against a row of dogs. They laughed when I made a dog for every dog hole in my bench. A few block plane passes, flip the other way, and a few more block plane passes, and we’re done chamfering. Lastly, a 1/16 inch hole every 4 inches sets these up for nailing to the boat. I’ll set them aside now and attach them later.
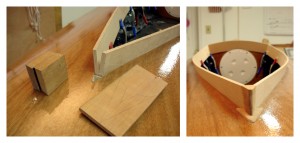
two photos of fabricating the coamingNext day, that epoxy is cured enough to work around. So, let’s fit out the coaming. It is mostly 6mm plywood which gets attached to the carlins around the cockpit opening. The raw edges on the front are covered with a nose block. Mine is a bit different than the one pictured in the builder’s manual, and of course I like mine with its arrowhead base, better. This is really fussy work. Everything is either curved or angled. The block and arrowhead are built up from small bits of mahogany (Never throw anything away). Here again, this prep work gets done to a certain stage, pieces get marked with “p” or “s,” and then set aside.

Next … why one needs 438 Milky Way bars.
Filed Under: Boatbuilding, Eva Too, Mill Creek 13

Eva Too – Deck Glassed

April 27, 2010 by Bob Easton 8 Comments

Excuses for no “before” or “during” pictures:

  • The dog ate them. Ooops, we don’t have a dog.
  • You’ve seen this stuff before.
  • Didn’t want to get poxy all over the camera.
  • Forgot.
  • Too stressed by the messy challenge.

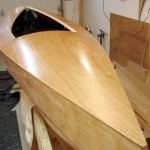
photo of scored and ripped fiberglassphoto of full deckGlassing the deck was simpler because it’s smaller than glassing the full hull. It was more difficult because it consists of two overlapping pieces. Other than that, it went quickly and with a little less mess than the big job.

Like many woodworking jobs, prep takes almost as long as doing the job. Prep in this case included much better sanding than the hull because the deck will be finished bright and every little scratch is visible through the glass: 120, 150, 220, 320, brush off, vacuum, wipe with tack cloth, wipe with alcohol.

Hint: wipe on a liberal wetting of alcohol. This briefly simulates a clear finish, highlighting any remaining scratches. It evaporates off quickly, leaving no stains.

Prep also included applying package tape where I don’t want new fiberglass sticking to the hull. The tape was applied with it’s top edge right at the line which will be the bottom of the rubrail, 3/4 inch below the rounded over deck edge.

After about 8 hours of cure, I scored the fiberglass that was hanging over the side with a sharp knife. That score line is about the middle of where the rubrail will be, about 3/8 inch below the deck. Then, I pulled the excess fiberglass upward, breaking off at the score line. Score and rip. Neat!

Filed Under: Boatbuilding, Eva Too, Mill Creek 13

Pencil Box

April 24, 2010 by Bob Easton 11 Comments

Inspiration from Roy Underhill, Kari Hultman, and Dan Lauder. THANKS to all! (click any image for a larger version.)

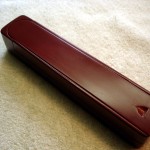
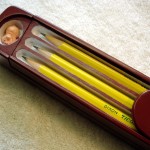
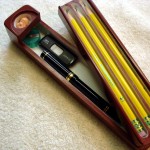
photo of closed box photo of box with sliding lid removed photo of fully open box

Roy Underhill, author, Colonial era woodworking master, and proprietor of The Woodwright’s Shop, opened his 2009 season with the making of a palm sized grease pot that used a sliding lid and dovetail latch to secure its contents. Some of us live in parts of the country “too sophisticated” to carry a back woods woodworking show on TV. (New York City’s last country music radio station shut down in April of 1983, giving way to light jazz or some other kind of funk.)

So, along comes Kari Hultman, The Village Carpenter, to tell us about her replica of Roy’s little grease pot. Like Kari, I had that project on my to-do list. She got there first with a very nicely made box and some great construction photos.

It was Dan Lauder, and an approaching birthday, that moved the project to the top of the list with his discovery of an 1879 pencil box. While a bit different than the grease pot, the pencil box shared a similar 3 part construction of interlocking parts that qualifies it, like the grease pot, as “clever.”

The lid slides in a dovetailed track. Sliding it out reveals the top tray. That action also unlocks the top tray so that it can swing sideways revealing the bottom of the box. As an aside, the box that Dan discovered had a little pocket in top layer. I don’t know it’s purpose, but in my version, that pocket is now a resting place for a good luck charm, the happy little pig.

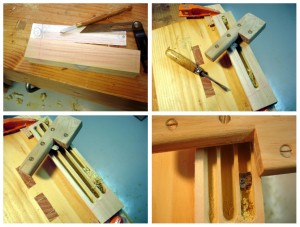
photo collage of making the pencil groovesOK, let’s look into how it was made. The lumber was stuff on hand, some tulip poplar. More about that later.

That roughly drawn sketch was my only “plan.” Like Kari, I used only hand tools. Unlike Dan, I don’t have a huge choice of planes, so I routed the pencil grooves with a scratch stock. It was slow going, but worked out OK. It needed more than one scratch. Use your sharp eyes to find my first error. It’s in the very first photo.

photo collage of making the lidThe sliding lid is about 1/8 inch thick. A router plane provided the space for it, and another small scratch (no photo) made the dovetailed tracks.

photo collage of making the bottomThe bottom, and the piggy’s nest, were excavated with forstner bits. Back to the router plane for cleanup. The last photo in this sequence shows that error corrected.

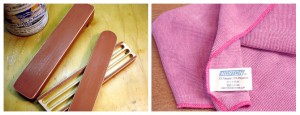
photo of raw edges and tack clothFinishing took more time than building. That’s because I don’t have a clean room for finishing (blame the tools) and I used a very slow drying paint. I wanted to use the same color as the gift recipient’s (not-yet-done) boat, a slow drying enamel. I call it “siren paint,” because as it dries it is constantly singing “Come to Me” to every dust bit in the building. To counteract the dust, I used a hand rubbed finish technique. After a few coats, that technique highlighted the fact that sharp edges need to be rounded to hold paint. So, correction and more coats. As an aside, the Norton tack cloth is a very handy aid. No more waxy cheesecloth.

Briefly, my hand rubbed finishing regime included: wet sanding with 600 grit, fine sanding with 0000 steel wool, rubbing with pumice, then with rottenstone, and lastly several layers of paste wax to bring to a high satin sheen. For service veterans, “spit shining” is the paste wax method that works best.

Lessons Learned

  • Double, triple, quadruple check that angled cuts lean the right way.
  • Hardwood would have been a better choice and avoided a few little “dings.” A lot of labor gets invested, and why invest in anything less than the best quality wood?
  • Double, triple, quadruple check that angled cuts lean the right way.
  • Make the sliding top thicker to lessen bow and give more “meat” to the dovetails.
  • Double, triple, quadruple check that angled cuts lean the right way.
  • A shellac sealer would have been better than the white sealer I used. The white really shows brightly when edge finish wears.
  • Double, triple, quadruple check that angled cuts lean the right way.
  • Slow drying paint gathers more dust than fast drying paint. (Doh!)
  • Double, triple, quadruple check that angled cuts lean the right way.
  • Finish gets really thin on sharp edges. Rounded edges hold finish much better and will wear better. I’ve often read this, but needed to wrestle with the problem myself, and ended up reshaping the work after several rounds of white undercoating showing up as I polished the finish.
  • Double, triple, quadruple check that angled cuts lean the right way.
  • Hand rubbed finishing takes a lot of time. Well actually, waiting for paint to dry firm enough for hand rubbing take a lot of time.
  • Starting 4 days before a birthday isn’t enough time when finishing alone needs 16 days.

Filed Under: Woodworking

  • « Go to Previous Page
  • Page 1
  • Interim pages omitted …
  • Page 72
  • Page 73
  • Page 74
  • Page 75
  • Page 76
  • Interim pages omitted …
  • Page 128
  • Go to Next Page »

Primary Sidebar

Footer

Recent Posts

  • New Frame Saw / Scroll Saw
  • Lamppost Sign
  • Goodbye PayPal – Goodbye Bob’s eBooks
  • Anarchist’s Workbench is Done
  • Why we keep offcuts…

Categories

  • About
  • Artwork
  • Boatbuilding
  • Boating
  • bowl carving
  • Boxmaking
  • Clocks
  • Drawings
  • eBook
  • etude
  • Eva Too
  • Eva Won
  • Fiddlehead
  • Fiddlehead model
  • Flying
  • frame saw
  • gilding
  • green woodworking
  • Grinling Gibbons
  • Guns
  • Hand tools
  • Humor
  • kerfing plane
  • Lettercarving
  • Mill Creek 13
  • Model building
  • Power tools
  • Rant
  • resawing
  • scroll saw
  • Shopmade
  • sign painting
  • Stonework
  • Swimming
  • Technology
  • The Wall
  • treadle lathe
  • Uncategorized
  • VSD
  • Woodcarving
  • Woodturning
  • Woodworking
  • workbench

Other stuff

  • About
  • Contact
  • Privacy Policy

Copyright ©2024 · Bob Easton · All Rights Reserved