• Skip to primary navigation
  • Skip to main content
  • Skip to primary sidebar
  • Skip to footer

Bob Easton

Chocolate powered woodworking

  • Home
  • Grinling Gibbons Tour

Shopmade

You’re Gonna Build a What?

February 17, 2010 by Bob Easton 9 Comments

A lathe, my dearest, an ole time treadle lathe.
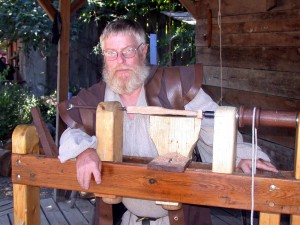
Preserving history at the Kansas City Renaissance Festival
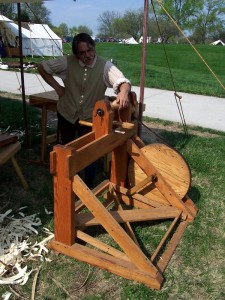
Re-enacting at Fort Osage Missouri

We looked at some pictures a while. She said “Sure, get to it … but, if you show up in one of those costumes…”

These top two photos are thanks to Jerry who preserves history by working with the Institute for Historic and Educational Arts in Kansas City. THANKS Jerry! (As always, click a small picture to see a larger version.)

Why a human powered lathe?

  1. Because I like human powered things, hand-tool woodworking and paddle powered boats, for example. Treadle powered tools have always caught my attention, and now I have time for them. In short, I see a treadle lathe as a neat machine.
  2. There’s no shortage of turned things I find interesting: mallets, tool handles, more tool handles, lidded boxes, chairs (not Windsors), and exquisite wooden bowls. I’m not interested in pens or bottle stoppers.
  3. The lathe will also be the power base for a scroll saw. I have some very interesting scroll projects in mind.

To which design or plan? Choices, choices, lots of choices on the internet. I collected several comprehensive plans (Roy Underhill’s, Steve Schmeck’s, Mike Adams’ and Howard Ruttan’s), and plenty of pictures. All have great merit, and I will build not to one specific plan, but will take bits from here and there. From Roy’s, I will take the concept of the scroll saw. His lathe has one aspect I didn’t care for, an inboard flywheel. It was also skimpier that the lathe he uses on his TV Programs. Mike’s and Steve’s are more robust and have flywheels held between two uprights, not cantilevered like Roy’s. I like the full width treadle of Mike’s, and actually a sturdier one like in the Ft. Osage picture at the top. Guidance for bearings, various shafts, and centers come in bits and pieces from all of the plans and from an email exchange with Jerry.

The attractive feature (to me) is that any of the above designs can be made from readily available “Nbr 2” construction grade SPF (SprucePineFir) lumber. The big orange store up the road has some fairly good Doug Fir that I’ll use for most of it. Some Ash or Oak will fill certain roles.

Oh, for those who like the idea of a treadle lathe but would rather not build one, Chris Yonker makes beautiful lathes and sells them through his CME Handworks eBay store.

OK. It’s time to get to it.

UPDATE: Mike Adams seems to have disappeared from the Internet.

UPDATE 2: Update (Oct, 2022): Stephen Shepherd’s website has disappeared from the interwebs. A couple of years ago, I heard he was having health problems. I certainly wish him well and will leave his link here in case he gets back on the air.

Stephen Shepard suggested (in the comments) another set of plans that I had overlooked. Stephen’s plans are available from his own online store. Thanks Stephen.
Filed Under: Shopmade, treadle lathe

Andre Roubo’s Try Square

February 4, 2010 by Bob Easton 5 Comments

The workshop is still too cool for epoxy work, keeping the boat building project on hold.

Waste not; want not. After making the winding sticks, the left over madrone was crying out to be used, not wanting to linger or be relegated to the cart (1:02). I imagined enough left in that remnant to make a try square. No, I don’t build large squarish things (yet), but I do appreciate shopmade tools, and know that someday I will want a try square a bit longer than the metal 12 incher.

Lessee now, haven’t I seen articles about try squares recently? It’s not that I really wanted detailed plans, but a few hints and tips would help. Oh yeah, “the Schwarz” wrote something a couple of weeks ago. By remarkable coincidence, the very day I went looking for articles was the day that the Popular Woodworking magazine published Chris Schwarz’s article and plans for Andre Roubo’s Try Square. It’s a fine article, and the dimensions came close to finding themselves inside my left over piece of madrone. I adjusted sizes to the material on hand and got started by reserving a 10 1/2 inch length for the stock and using the remainder for the blade, which turned out almost 20 inches long. The stock was ripped to width, and the remaining  3/4 inch material was handily resawn with my frame saw. Planing the blade down to 1/4 inch thickness was only a few minutes work. That prepares the raw materials. There’s only one small problem. Schwarz’s article highly recommends making layout tools from quartersawn hardwood (“is a must”), and specifically beech. My madrone was neither. But, it had two other attributes that made it suitable: it was on hand, and it was paid for. I think its stability will be OK. This piece has been acclimated for a couple of years.

Schwarz says, “There’s only one joint in this project and you need to make it perfect.” Well, that’s a fine way to make me throw down the article, walk out of the shop and go for a Snickers bar, or something stronger and more soothing. Perfect!? Gheesh! After that proclamation, Schwarz wanders off into Norm-land describing how to make the cut for the bridle joint using jigs, dado stacks and a table saw. None of those things around here. Time for another Snickers bar.

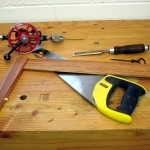
Shucks! I’m a boat builder, not a furniture maker. I haven’t yet bought any sophisticated saws, no tenon saws, no dovetail saws, no backsaws of any kind. I can do that joint without any of those fancy saws. My cheap Stanley toolbox saw is still kink free and cuts relatively straight. I’ll just color carefully inside the lines and if it doesn’t work out, blame it on the lumber not being vertical grain beech. The toolbox saw and some careful chisel paring made a bridle joint that is a small distance from perfect, but is a very much closer than I originally imagined. It is further proof that “We don’t Need No Stinkin’ Backsaws.”

The rest of the work roughly followed the advice from the article and the square went together nicely. It is also square, after very minor truing. I added one feature that I saw Chris write about sometime ago. A 1/4″ dowel resides in a hole toward the end of the stock. Slide that dowel out a bit to help hold the stock on the workpiece being marked. It keeps the square from flopping over just when you don’t expect it. Finish is the usual, a couple of coats of BLO. The picture shows the square with the first coat, showing the richness of this nice little piece of wood.

Filed Under: Hand tools, Shopmade

Woodworking “Appliances”

January 29, 2010 by Bob Easton 1 Comment

The workshop is too cool for epoxy work, keeping the boat building project on hold.

So, what else am I doing in a cold workshop? Making woodworking “appliances,” working down the to-do list of small projects. Each of these was a fairly small project and done with materials on hand.

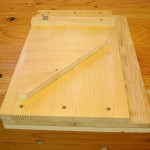
A shooting board is handy for planing the ends of boards, getting them square. There isn’t a lot of need for anything straight or square in most parts of a boat, but there are other projects that occasionally need a squared up component. No particular plans were used for this shooting board. They are simple enough to not need detailed plans, so I made this one to a size convenient to the material on hand. The material is from some shelving that has been standing unused for a couple of decades, glued up, hard, splintery, Southern yellow pine. The best attributes of this material are that it’s stable and was paid for years ago. The fence is adjustable. I also made an extra board to accommodate miter shooting.  While very simple, and made of almost throw away materials, this tool is great fun to use. Splash some alcohol or mineral spirits on the end of a board that needs truing. Then shoot it with that big ole jointer plane. The mass of the plane does the work effortlessly, making that end grain shine with smoothness.

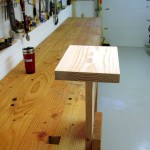
A carving jack is a device for elevating a work surface to a convenient height for close work. This would have been very handy when I was carving the scrolls on the stems of the Fiddlehead boat. Not having one of these, I used the table of a band saw as a poor substitute. This is a dead simple appliance, a simple “T.” The material was straight from the scrap pile, a couple of pieces so badly cupped and twisted that they were reduced to a mere image of their former selves to correct the defects. To get a little bit of new practice, I used a mortise and tenon with a doubled tenon, fixed firmly with wedged tenons. The mortises were fabulously clean (in comparison to previous work like this). My tenons were rough sawn and then trimmed to fit. Before someone asks (someone always does), yes, that’s a glue line on the end of the table piece. Yep, busted it while fitting the tenons. Yep, threw the busted parts back on the scrap pile. Yep, used a few choice words. Yep, sat for about 2 1/2 minutes in the moaning chair, then, glued the broken part back together and completed the fitting the next morning. Since this picture, it has been soaking up my standard finish for shop tools, BLO.

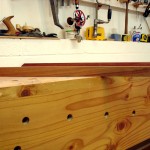
Winding sticks are useful for detecting a twisted, or “wound,” board. The length of the sticks amplify the distortion, making it easy to know what area to correct. I do enough milling of rough lumber to make these frequently useful. They are made of Madrone, a hardwood that has a pink cast with some deep maroon streaks. I originally intended it for another purpose and wasn’t satisfied with how that project worked out, so I set the remainder aside. These sticks seem a very good use for the remnant. A little bit of time ripping and planing is all it took to make these. Planing with the long #7 (That’s a “jointer,” Jeff.) produced the true top and bottom edges. A few features, gleaned from Rob Rozaieski and Tom Fidgen, make them easy to use. First, one is stained darker to afford some contrast between them. Next, the bevels denote the “this side up” edge of the sticks. Lastly, the holes in the ends serve both to give them the same orientation and to provide a way to hang them from the shaker pegs on the back wall of the shop. Finish is BLO.

Three mini-projects done, and it’s still cold.

Highly recommended: Watch Rob Rozaieki’s episode about “Hand Tool Appliances” over at his Logan Cabinet Shoppe blog.

Filed Under: Hand tools, Shopmade

  • « Go to Previous Page
  • Page 1
  • Interim pages omitted …
  • Page 17
  • Page 18
  • Page 19
  • Page 20
  • Page 21
  • Page 22
  • Go to Next Page »

Primary Sidebar

Footer

Recent Posts

  • New Frame Saw / Scroll Saw
  • Lamppost Sign
  • Goodbye PayPal – Goodbye Bob’s eBooks
  • Anarchist’s Workbench is Done
  • Why we keep offcuts…

Categories

  • About
  • Artwork
  • Boatbuilding
  • Boating
  • bowl carving
  • Boxmaking
  • Clocks
  • Drawings
  • eBook
  • etude
  • Eva Too
  • Eva Won
  • Fiddlehead
  • Fiddlehead model
  • Flying
  • frame saw
  • gilding
  • green woodworking
  • Grinling Gibbons
  • Guns
  • Hand tools
  • Humor
  • kerfing plane
  • Lettercarving
  • Mill Creek 13
  • Model building
  • Power tools
  • Rant
  • resawing
  • scroll saw
  • Shopmade
  • sign painting
  • Stonework
  • Swimming
  • Technology
  • The Wall
  • treadle lathe
  • Uncategorized
  • VSD
  • Woodcarving
  • Woodturning
  • Woodworking
  • workbench

Other stuff

  • About
  • Contact
  • Privacy Policy

Copyright ©2024 · Bob Easton · All Rights Reserved