• Skip to primary navigation
  • Skip to main content
  • Skip to primary sidebar
  • Skip to footer

Bob Easton

Chocolate powered woodworking

  • Home
  • Grinling Gibbons Tour

Eva Too – Paintin’ While the Paintin’s Good

April 13, 2010 by Bob Easton 2 Comments

(1st of 3 postings today) Do you follow directions step by step, exactly as written, no deviations? No, I didn’t think so. Does anyone? Sometimes it works out easier to break stride and do work a different way. This is one of those cases.

Progress on the boat slowed as I did another project (to be detailed sometime), but it’s boat building time again. The last you saw, I was fitting carlins and a seat. I decided to hold off on the carlins and complete the fitting out of the cockpit. One reason: paint. While all the wood gets at least two coats of clear epoxy as a sealant, that’s not enough. Epoxy needs some extra UV protection, hence paint, varnish, or some other coating is also needed. The cockpit and the decks will be “bright,” in the case of my boats “workboat bright” not “yachty bright.” I use Cetol Marine for those surfaces. It is clear with an amber tint. Three very thin coats do the job well.

The Fiddlehead, another decked canoe, taught me that painting the cockpit after the deck is installed requires numerous maneuvers easily handled by someone with triple elbow and wrist joints. I don’t need to learn that lesson twice.  As I started to install the carlins, I thought, “Whoa. Hold on. Fit out the rest of the interior stuff and paint it before letting the carlins and deck get in the way.”
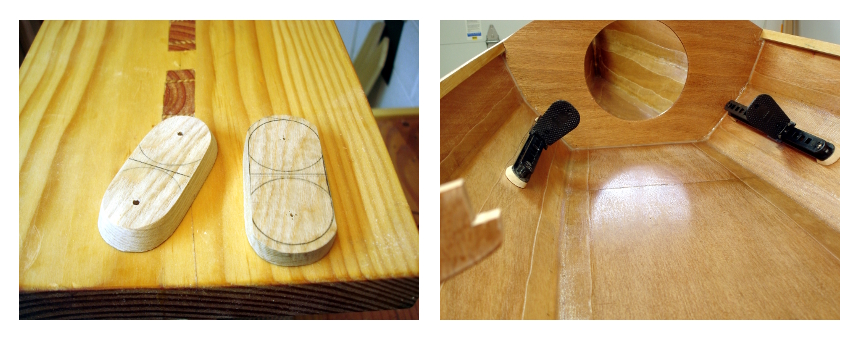
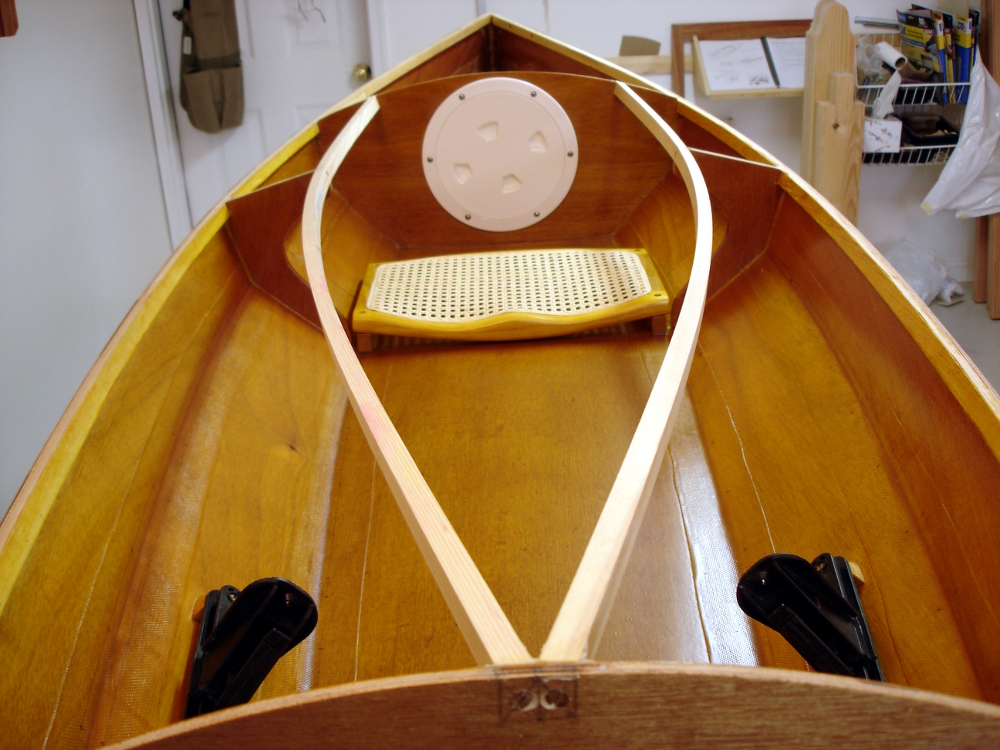
photo of foot braces and their attachment padsThe photo of cockpit shows footbraces, seat, hatches, and carlinsother interior fittings were footrests and the deckplates that comprise the hatches into the watertight / flotation / storage  compartments. The only element requiring any real work was the footrests. As shipped, they are designed to be screwed in place with big ugly screws that pass through the hull. I’ve always shunned having any more holes than absolutely necessary in a boat’s hull. So, I made some mounting pads that glue to the inside of the hull, to which the footrests can then be fastened with screws.

With few obstructions, the painting was quick. I’ve found the little 4 inch foam rollers to be very convenient for this work.
Filed Under: Boatbuilding, Eva Too, Mill Creek 13

Treadle Lathe – Gams Mortises and Tenons

March 28, 2010 by Bob Easton 8 Comments

We’ve had plans and lams. Now we have gams. (Italian: la gamba = leg) OK, legs … and maybe some feet too.

Before I get started showing how I made rather big mortise and tenon joints, let me preempt a question. Someone is bound to ask why I didn’t make much easier half-lap cuts in some pieces before I laminated them. They would be so much easier than cutting big mortises. Simple answer: when I started laminating parts, I had a good idea of general dimensions, but had not yet decided on which style of lathe to make. Should it be one with the wheel sitting back behind the ways, or one with the wheel centered on the headstock? They have completely different construction.

I’ve decided. The lathe will have the wheel centered on the headstock, similar to those by Steve Schmeck and Stephen Sheppard (see the Plans and Lams entry). This makes the contraption a bit more compact while simplifying construction.

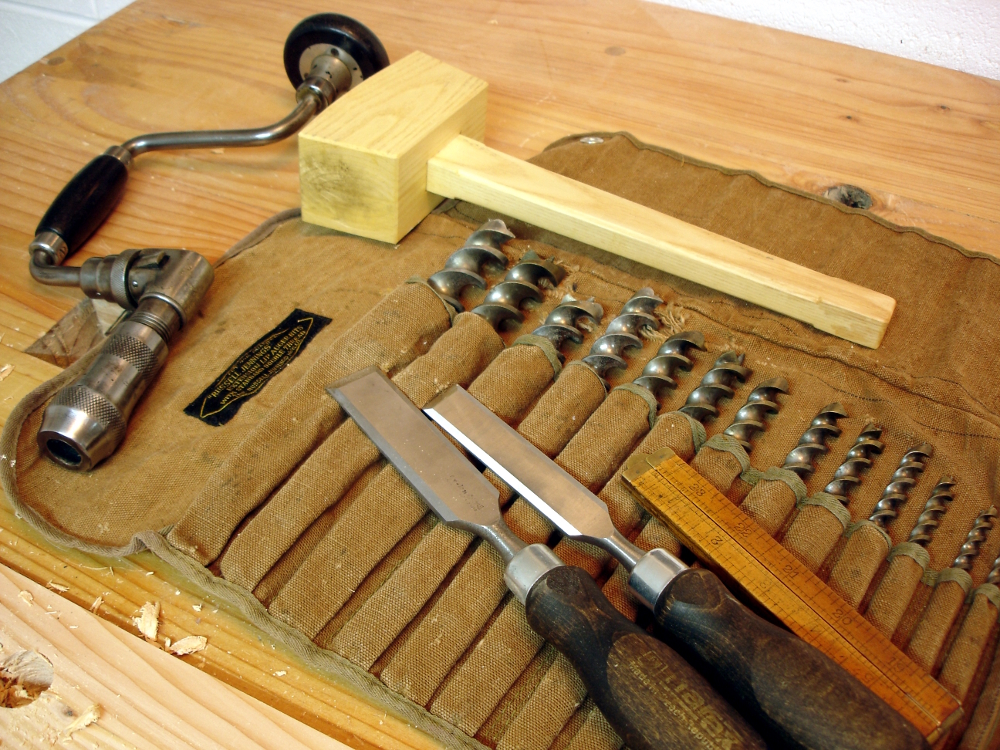
photo of drill bits, chisels, and hammer

This part of the work started several months ago with tool acquisition. No, I don’t think I’ll ever need huge mortising chisels more than once, so I didn’t look for them. I did look for, and took a good long time watching the market, a set of Russell Jennings double spur auger bits. A set of these pops up on eBay about every 4 days. A set is 13 bits ranging from 3/16 to 16/16. They are packaged in either a 3 tier wooden box or a canvas roll and date to sometime prior to 1944 when Stanley bought out Russell Jennings. The eBay offerings are often missing one bit and range from mediocre to almost unused condition. Prices vary accordingly and are remarkably predictable if you watch for a while. I waited until I found a complete set that needed only a little cleaning and was lingering around with no bids. My one bid brought it to me at a price I clearly liked. Overnight in some white vinegar cleaned the bits up to near new condition. All were sharp. The smallest was a bit bowed but easily straightened. The chisels in the photo are Narex bench chisels, great value at an affordable price. The mallet is shopmade from black locust.

The uprights / legs are 5 inches by 3 inches in cross section. The feet are 3 inches by 3 inches in cross section. I’m not a tenon engineer and don’t know the optimal size for this application, but I decided to make the tenons 1 inch by 3 inches in cross section, and of course three inches long. Mortises first, or tenons first? I did the mortises first. If one were to do a lot of these, a great big 1 inch mortise chisel would be the tool of choice.

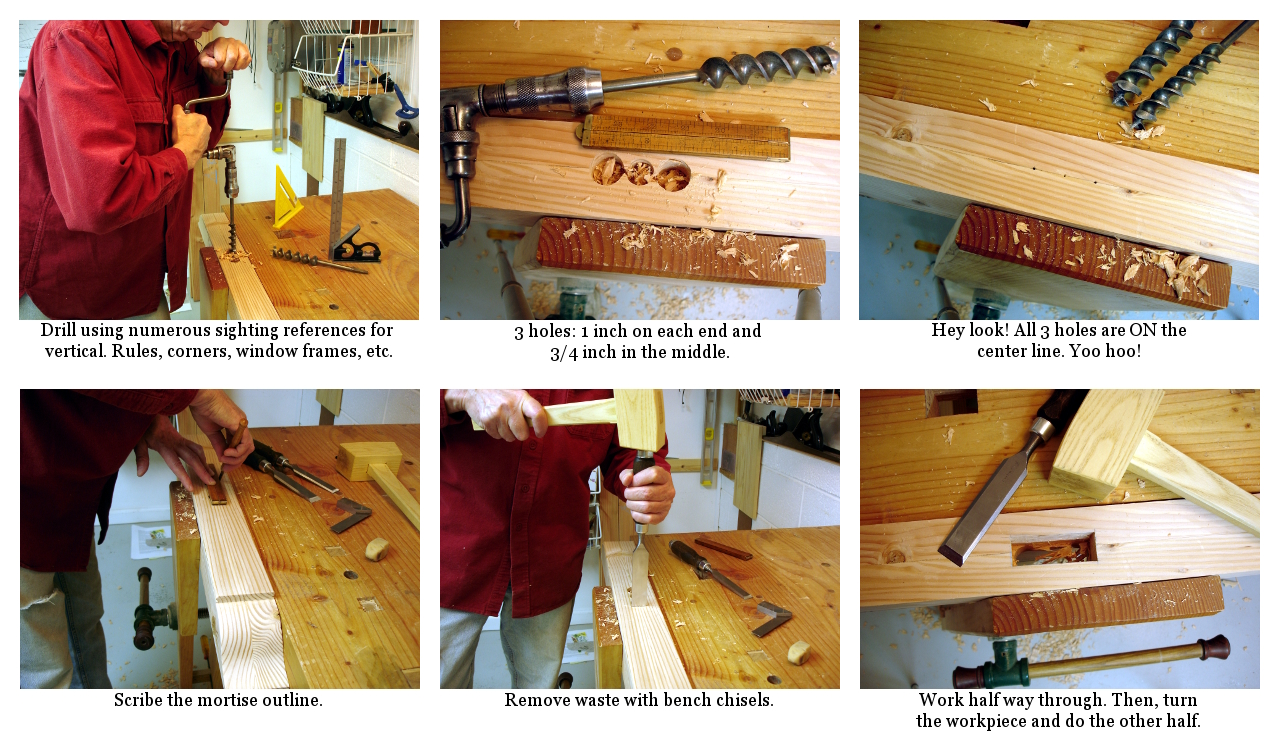
a photo collage of drilling and chopping mortises.

I don’t think I’ll be making many more, so drills were my choice. Layout was easy since the centers could be placed on the lamination line. Just find the center of the workpiece and layout the 3 inch extent of the mortise. Drilling by hand, without a drill press, needs a bit of practice and several sighting references. It’s really not too hard to make holes that are vertical within the precision needed. Drilling by hand does have some limitations. One cannot overlap holes as can be done with a drill press. Even getting two holes close together can let the bit cut through a thin wall into the nearby hole and “drift” astray. I drilled two one inch holes, one at either end of the mortise and a 3/4 inch hole in between. When working with spur bit augers, the practice is to drill until just the spur starts to exit the far side of the workpiece. Then, turn the piece over and complete the hole from the other side. This technique makes a nice clean hole with no blow out. Waste removal was now a small enough job for bench chisels. Mark a very clean outline. Chisel away waste until half way through. Turn the workpiece and repeat.

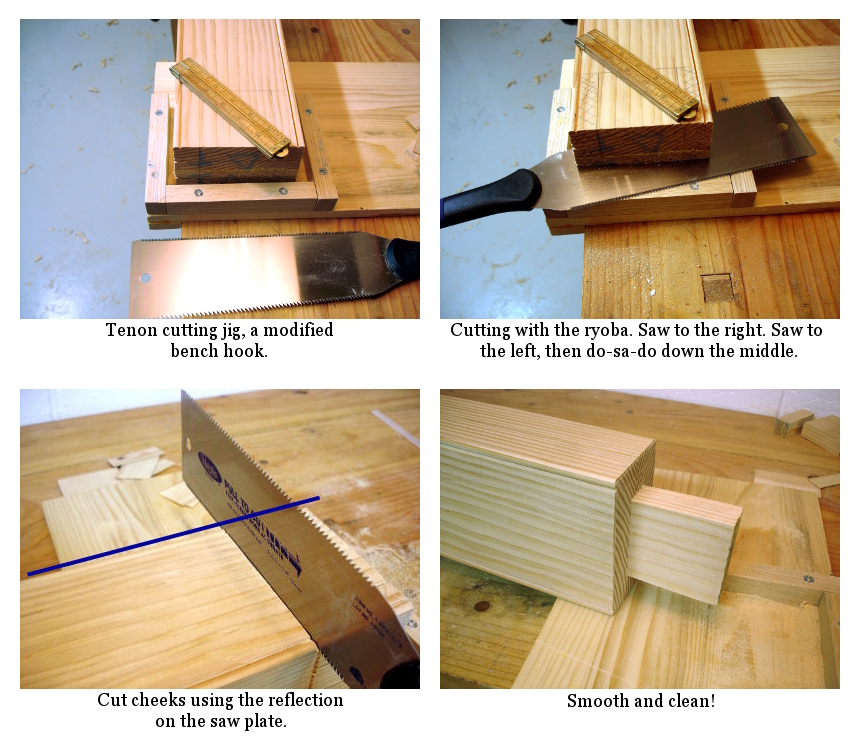
The last large tenons I made were for the stretchers for my workbench. They are serviceable, but not pretty. My sawing skill is slowly improving and I think I can make better tenons than before. Yet, I decided to try a technique that I saw on Steve Branam’s “Close Grain” blog. He did a riff on a Chris Schwarz technique using a simple jig and a ryoba saw. It works well, as the picture shows. I varied from the technique Steve shows by using the reflection technique to make the absolutely square shoulder cuts. Note how the edge of the workpiece reflects in a straight line on the saw plate. I added a blue line in the photo to highlight what to look for.

This cut, by the way, is a first class cut and needs to be very clean. Although I don’t show it in the pictures, I marked the cut with my wonderful Czeck Edge marking knife and then reinforced that marked line with a shallow chiseled “V.” That provides a starting notch for the saw while keeping the edge very crisp.

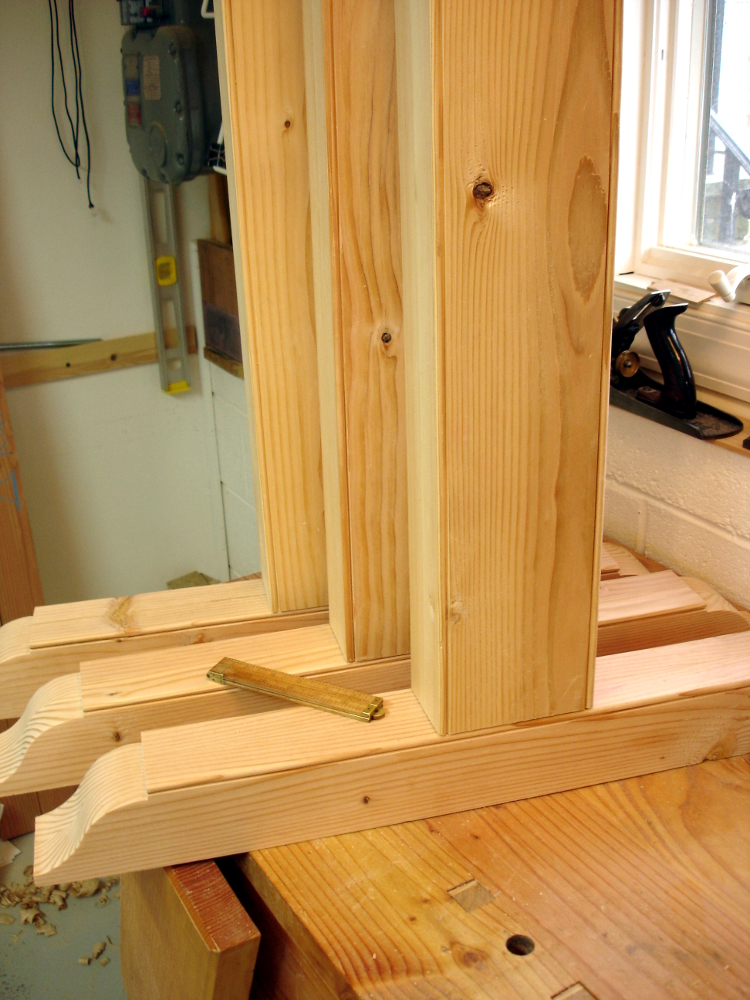
photo of three legs joined to their feet

The ryoba saw is a simple one from the BORG, inexpensive and useful. I saw a question posted in a forum recently from a guy with analysis paralysis on how to best spend $100 for a new ryoba saw. He got no answers while the rest of us are busy cutting up lumber.

The joints fit together very nicely, snug, not sloppy. They will be completed with hot hide glue and drawboring. Lot’s of people have written about drawboring, so I won’t repeat all that here. It’s simple and it works.

Filed Under: Shopmade, treadle lathe

Eva Too – Hull Structure & Seat Parts

March 26, 2010 by Bob Easton 1 Comment

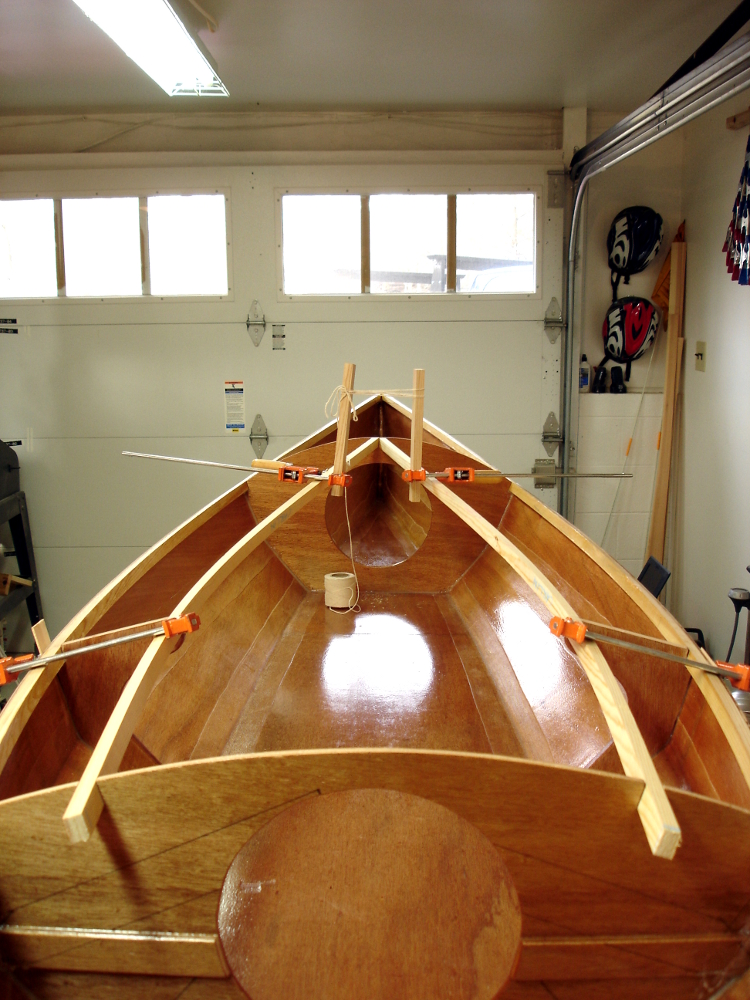
photo of hull interior showing bulkheads, carlin knees and carlinsThe MAS epoxy I am using is a bit thinner than the West System epoxy I used on the previous boat. It’s low viscosity and absence of amine blush (have to dig deep into epoxy chemistry for that one) make it the preferred choice for sealing and coating, and there’s a lot of that with this type of boat construction.

Progress on the hull interior is moving along nicely. The bulkheads are now completely fitted, and glued with fillets that make them watertight. The carlin knees are installed. All of the interior surfaces have received two rolled on coats of epoxy as a surface sealant. Short, 4 inch, foam rollers make this coating activity almost enjoyable, and rolling lets me make the coating really thin. Many areas will get two more coats of clear or paint finish and it all adds up to weight that must be carried. The photo shows the carlins being fitted. These are the structural members which support the inner edges of the deck. The “interesting” pair of clamps, sticks, and strings near the far end were used to twist the carlins into “verticality” at that point, a temporary measure while fitting them.

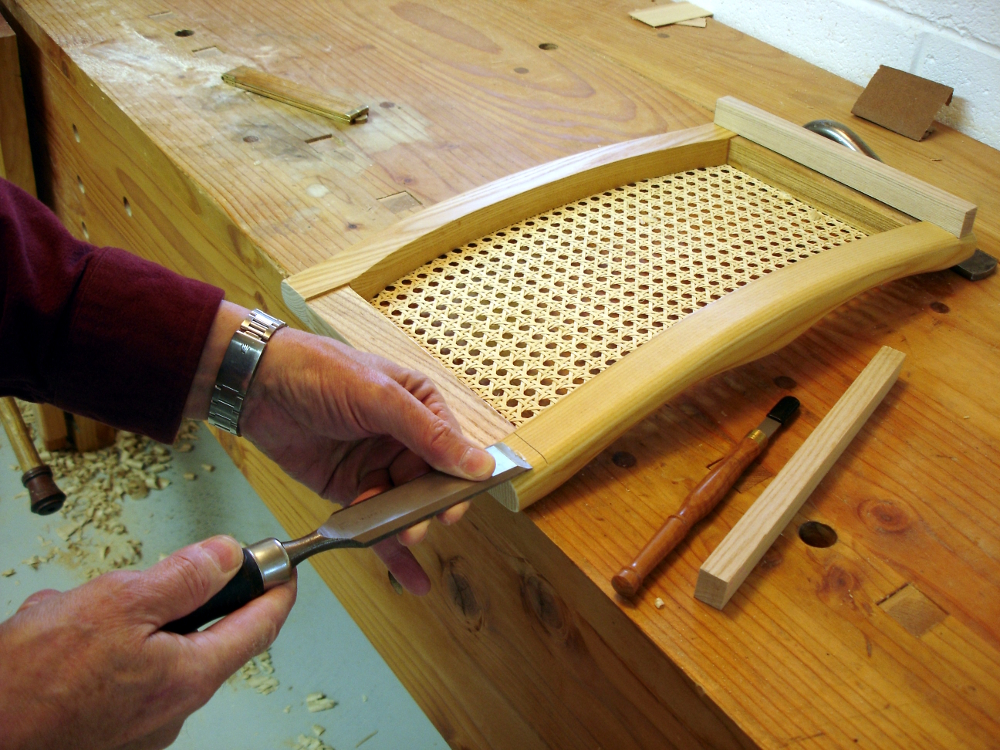
photo of a chiseling operationWhile epoxy cures, there are plenty of small things needing attention. The drawings for this boat include plans for a slatted seat which is made largely from plywood. There are enough plywood cutoffs for this, so it makes good sense. Yet, the design is not one I find appealing. I like traditional cane seats and have purchased yet another from Ed’s Canoe. It’s both a comfortable and beautiful seat. Fitting it is a matter of cutting off the arms which might normally be used for a hanging type mount, and fitting rails to the bottom. The rails get glued to the boat’s bottom and the seat screwed to the rails.

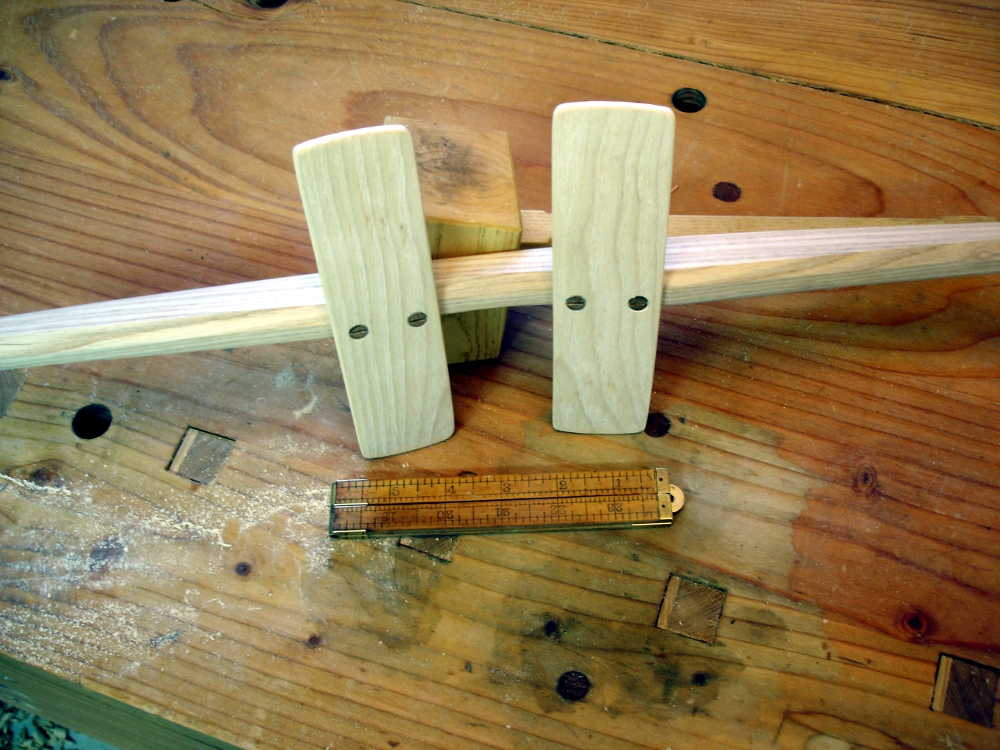
photo of the seat backA lightweight traditional style of seat back consists of two curved slats fixed to a yoke shaped cross piece. Again, this is similar to the previous boat. The thin pieces are 1/4 inch thick, resawed left overs. They are shaped by boiling and then clamping to the curved back of some chairs. The yoke is made eight sided and will be cut to the correct length after the deck and coaming parts are done. We’ll see more of it later.

Did you know that epoxy has nearly infinite open time at 40 degrees? Spring squeaked open for a few days and is now squeaking closed again. The forecast for the next few days predicts very slow epoxy curing.

Filed Under: Boatbuilding, Eva Too, Mill Creek 13

  • « Go to Previous Page
  • Page 1
  • Interim pages omitted …
  • Page 75
  • Page 76
  • Page 77
  • Page 78
  • Page 79
  • Interim pages omitted …
  • Page 129
  • Go to Next Page »

Primary Sidebar

Footer

Recent Posts

  • Sign Your Work!
  • New Frame Saw / Scroll Saw
  • Lamppost Sign
  • Goodbye PayPal – Goodbye Bob’s eBooks
  • Anarchist’s Workbench is Done

Categories

  • About
  • Artwork
  • Boatbuilding
  • Boating
  • bowl carving
  • Boxmaking
  • Clocks
  • Drawings
  • eBook
  • etude
  • Eva Too
  • Eva Won
  • Fiddlehead
  • Fiddlehead model
  • Flying
  • frame saw
  • gilding
  • green woodworking
  • Grinling Gibbons
  • Guns
  • Hand tools
  • Humor
  • kerfing plane
  • Lettercarving
  • Mill Creek 13
  • Model building
  • Power tools
  • Rant
  • resawing
  • scroll saw
  • Shopmade
  • sign painting
  • Stonework
  • Swimming
  • Technology
  • The Wall
  • treadle lathe
  • Uncategorized
  • VSD
  • Woodcarving
  • Woodturning
  • Woodworking
  • workbench

Other stuff

  • About
  • Contact
  • Privacy Policy

Copyright ©2024 · Bob Easton · All Rights Reserved